Have you noticed that your drawing looking flat is an ongoing problem that you seem to have? It's no surprise if this happens to you, it's an issue that plagues many artists.
After all, you are drawing on a flat surface and attempting to create the illusion of a three-dimensional space. Creating this type of illusion isn't easy to do, but with enough practice, and the right tools and techniques, you can get there.
You can learn to create three-dimensional images by using a proper perspective and shadow placement. There are a lot of little tricks you can use to create the illusion of a three-dimensional image, and fortunately for you, you can find many of the answers you are looking for by simply looking at what artists have done in the past. The secrets of making your drawings come to life are out there, all you have to do is look for them and practice them.
Use The Correct Pencils And Shading Tools
If you want to understand the secrets to make your drawings come to life, then you need to start with the right tools. You can't expect to create an artistic masterpiece if you aren't using tools that will help you to get the job done.
While it's true that you can draw with any type of pencil on any kind of surface that will accept graphite, if you want to create the illusion of three-dimensional depth, having the right tools will make it so much easier on you.
As an artist, you probably already know that there are many different types of graphite pencils. Hard pencils create light marks, and softer pencils create darker marks.
If you want to be able to convey a range of values when you are shading an object, then you will need different types of pencils. One of the secrets to creating the illusion of depth in a drawing is to ensure that your dark areas are really dark. You can't be afraid to really lay down a heavy layer of graphite in truly dark parts of your picture.
This will cause the shadows to recede into the background, which helps to create the illusion of depth that you need in a three-dimensional image.
Now, depending on your preference, there's no reason you can' combine other types of drawing mediums into your graphite drawing. For example, you can use charcoal to really add in dark areas.
Or you can use water-soluble graphite pencils, which work much like a watercolor pencil, in order to create intensely dark and smooth areas. Ink is another possibility, as are Inktense pencils, which generate an ink finish, much like a watercolor pencil creates a watercolor finish.
The possibilities of what you can combine with traditional graphite to create deep shadows are practically limitless.
What type of paper should you use? That depends on what you are going to be drawing with, and what you want your finished drawing to look like. If you want a rough-looking final picture, you may want to draw on charcoal paper.
If you plan to add some water-based media to your drawing, then cold press watercolor paper works. If you want a smooth picture, then try bristol board.
It's also a good idea to have some blending stubs on hand for producing smooth transitions between light and dark. Using your finger will work, but it's far less precise than using a smaller blending stub.
Plus, when you use blending stubs, you don't have to worry about getting a finger covered in graphite. For producing highlights, a kneaded eraser can work wonders.
Since you can shape it however you want to, you can be very precise when erasing areas giving you the ability to create the highlights necessary to give your drawing a feeling of real depth.
Master Basic Shading Techniques
There are many different ways you can apply shading to a drawing, and as an artist, you owe it to yourself to explore as many of them as you can. The style of shading that you use will have a significant impact on how your final drawing looks. There's more than one way to do shading in a drawing?
Do you want a drawing that looks extremely realistic? Then you are going to have to learn how to apply smooth shading at different levels, that transition smoothly from one level to the next. You can do this by either shading from dark to light or light to dark.
Shading from light to dark is the more straightforward approach as an artist, but as always, you are the artist so you should do what works best for you. If you decide to shade from light to dark, start out with a hard pencil to add light shading.
Then use softer pencils to add increasingly darker levels to your drawing until you have a full range of values.
Now, when it comes to your shadows, you need to create gradual changes in value, but you don't have to apply the graphite or charcoal you are drawing with smoothly.
You can use hatching, which is a fancy way of saying small lines, to indicate shadow. Short lines that are spaced somewhat far apart show a light shadow, and to suggest a darker shadow, you simply decrease the space between the lines.
Or, you add lines going in the opposite direction, which is called cross-hatching.
Why would you want to use hatching or cross-hatching instead of smooth shading? Using hatching or cross-hatching creates texture on a drawing, which makes it more interesting to look at. It's simply another technique that you can try to add some variety to your artwork.
Hatching and cross-hatching work when you draw with a pencil, but it really comes into its own when you use the technique for ink. Ink cannot be used in a smooth gradient unless you are doing ink and wash, so using hatching and cross-hatching is an excellent approach for creating shadows of different intensity levels.
Make Your Drawing Look More Three Dimensional
If you are tired of your drawing looking flat, then you need to learn how to use composition, light, shadow, and other drawing techniques to create the illusion of a three-dimensional image.
The first step in creating this illusion is to use a solid composition with a proper perspective. You should start every drawing with a light sketch, keeping your movements loose, and working quickly. During this stage, you are trying to get ideas down on paper, while letting your instincts guide you.
What should you try to do when you are sketching out your design? First, try to have any objects or people in the foreground overlap objects or people in the background.
If you want to make something appear to be behind another object, you should draw it behind the object in front of it. By having the objects in the foreground partially obscure the objects in the background, you'll have a foundation for a drawing the looks three-dimensional.
You should also make certain that any objects in the foreground are highly detailed, while objects in the background are left with lesser levels of detail. Why should you do this? Shouldn't you try to make every part of your drawing as detailed as possible?
In a word, no. Look across the room at something. Study it, focus on it, or better yet, take a picture of it. Now, move closer and take a look. Compare the more distant image with the closer view you have now. The more intimate image has much more detail, right?
This is why having less detail in the background is another trick that can help you to avoid your drawing looking flat.
Learn To Graduate Your Shadows
With few exceptions, anything you see around, you will have a range of levels from light to dark. Now, there are going to be times when extreme lighting creates only very bright highlights and extreme darks, but this is the exception.
Most of the people and objects that you see around you will have a range of values. Creating these values is challenging. Learning to transition from value to value is even more difficult.
But, once again, mastering the ability to do this effectively will help you to create more realistic looking drawings that have a three-dimensional feel to them.
How can you create smoothe graduations in your drawings? The easiest way when drawing with either graphite or charcoal is by blending with either your finger or preferably a blending stub.
Now, you can't just start blending away indiscriminately, doing so will leave you with a grey, flat, dull looking drawing. The best way to create graduated shadows is to first place your different shadow levels in your drawing. Use harder then softer pencils, and lighter than more substantial levels of pressure.
After you have your shadows in place, then you can use a blending stub to start to blend the edges together.
Learn To Draw Cast Shadows
Shadows are everywhere, and any realistic looking drawing that has three-dimensional appearance will have shadows in it. How do you create realistic shadows? Figure out what your light source or light sources are.
Light will create highlights where it touches an object or person, and it will create different levels of shadow where it does not touch a person or object. Shadows need to be drawn in a way that indicates where the light source is coming from.
For example, if the light source in your drawing is directly above a person, then you would draw shadows under their eyebrows, nose, chin, etc. These shadows would be directly below these areas because the light source is above them.
Now, if the light source is to the upper right of the person, then these same shadows would be cast downward and toward the left. This is a simplified explanation, but it forms the basis of what you need to understand to create shadows that help to give your drawings a three-dimensional look.
How To Realistically Shade With A Pencil
Assuming that you don't want to use a more stylized approach to applying shadows, you'll need to master the art of creating realistic shading on your drawings. How do you do this?
First, when drawing shadows, you should use the side of the pencil lead instead of the point. The point should be used for details, the side will allow you to put down shadows more quickly, as well as allowing you to put them down more smoothly.
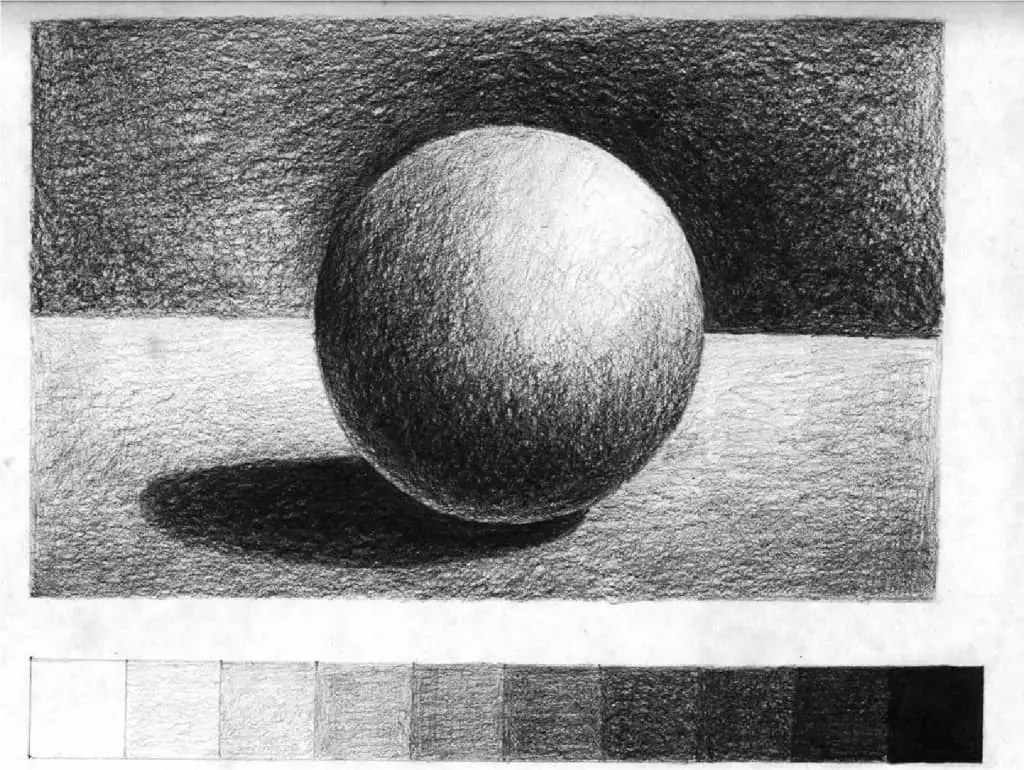
Now that you have the basic technique down, you need to use it the right way. That means creating shadows of different levels, and highlights of different levels. A great way to practice this is to draw a simple object with a single, stable light source.
Look at your subject and squint your eyes. This will help you to pick out the really light areas, and the really dark areas. Start by lightly sketching in where these areas are. Then you can start to flesh out the rest of the drawing from thereby adding different levels, and blending them together.
Learn How To Draw Depth In Faces And Portraits
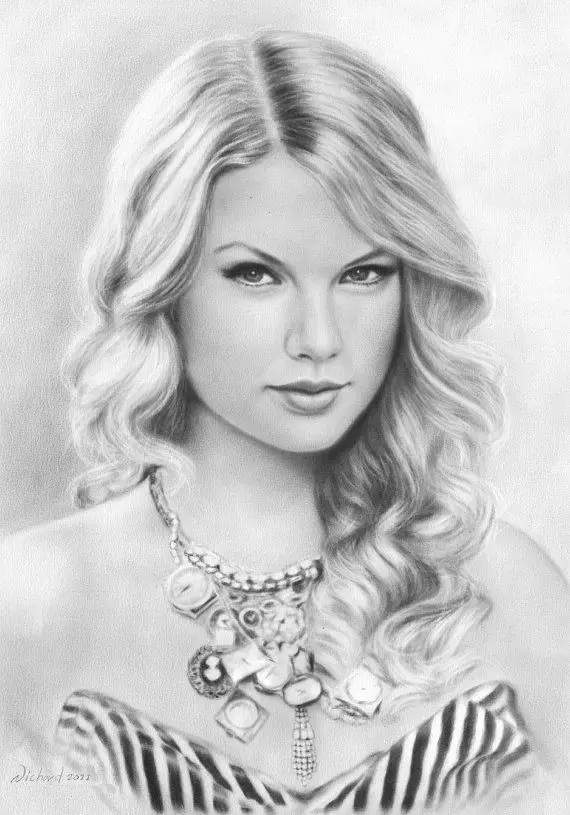
Drawing a realistic face is one of the more challenging things to learn how to do as an artist. Having proper proportions and the general anatomy of the face is the foundation. But if you just create a line drawing of a face, then it will lack depth.
How do you create the depth that you need? You do it with shadows. There are high points on a face, such as a forehead, nose, and cheeks. Then there are lower points, such as the eyes, under the nose, and under the chin.
To create an illusion of depth, you need to determine your light source, then figure out how that light will cast shadows beneath the high points.
Assuming that you have an overhead light source, the forehead, bridge of the nose, and to a lesser extent, the cheeks should have highlights. Then the eyes and under the eyes should have shadows, under the nose should have a shadow, and under the chin and jawline.
This is a simplified explanation, but it should give you a basic understanding of how light and shadow interact on the human face, and how you can use it to create a sense of depth.
Learn How To Draw Depth Of Field To Your Landscapes
Understanding depth of field is essential to creating realistic landscape drawings. What is a depth of field? In simplest terms, it describes the detail level of different levels in an image.
The elements in the foreground should have a lot of details, and gradually as you move toward the background, those details should begin to fade away. If you want to understand the depth of field, spend some time looking at nature photographs.
You'll notice that the further away an object is from the foreground, the more simple and less detailed it will look. By mimicking this when you are drawing, you can create an illusion of depth that makes your drawings much more realistic.
Combine Color Into Your Shadows
Are you drawing in color? Perhaps you are using soft or oil pastels? Or maybe, colored pencils? No matter what your medium of choice is, using color can really bring an image to life.
How can you turn a vibrantly colored image into one that is dull and boring quickly? By adding shadows that are simply variations of grey and black. This approach works just fine when you are drawing in black and white, but when you are drawing in color, not so much.
So, how do you create better shadows in color drawings? By adding color to them! This is another artistic technique that is going to take some practice, but it's definitely time well spent. Start by drawing something simple, like a cube or a sphere with a single light source. There will be a shadow cast under it.
What color is the ground? What color is the object? Why does this matter? It matters because one of the most effective ways to create a shadow is by mixing a color with it's opposite on the color wheel. For example, if you are drawing something blue, adding a dark orange to it will create a darker color that can be used as an effective shadow.
Don't Draw With Harsh Outlines.
Take a moment and go look in the mirror. Or look across the room at whatever is in front of you. How many outlines do you see? None? Well, when you draw then, why would you ever put harsh outlines around anything?
Drawing an outline around an object in your drawing is perfectly fine. This is art, after all, where just about anything goes. But when you are trying to draw realistically and create the illusion of three-dimensions, then harsh outlines should never be a part of your drawing.
When you draw something, you should focus on drawing shapes. Don't outline something with a heavy line, if you must outline something, try to use only a light line. Ideally, you won't have any outlines at all, and will instead give the impression of shapes through the use of light and shadows.
The Secrets To Make Your Drawings Come To Life Take Practice And Patience
Learning to create the illusion of a three-dimensional image takes a combination of a variety of techniques. Will it take time to master them? It will, but it's definitely worth doing.
As an artist, you should be trying to grow and learn new things all the time. When you stop learning, you stop progressing as an artist. While it's going to take time to learn to create the illusion of three dimensions and depth, it's a journey that will prove to enrich you as an artist.