How to begin a still life drawing? Still life is a drawing traditionally comprises of static everyday objects is arranged on a tabletop. Still life drawings can be drawn on A4 – A3 size paper, or in a smaller sketchbook. To start a still life drawing, you will need to complete the following tasks:
- Consider the arrangement of the objects
- Select an appropriate drawing style
- Gather materials
- Complete warm-up sketches
- Draw the composition
- Explore the form of the objects you are drawing
- Add an increasing level of detail
- Create the illusion of depth and space
- Consider adding shade and tone
Still life drawings can be created in many ways. In this post, I will outline techniques you can apply directly to your picture to build a successful still life drawing. I will also describe some of the traditions which have inspired the great masters and explore this genre and create amazing masterpieces!
How to Start a Still Life Drawing?
Arrangement
How will I arrange my still Life? To create a successful still drawing, you will need to source several objects to study drawing. Additionally, space will be required where you will be able to place the objects into a satisfactory arrangement. I will explain the aspect in more detail later in this post.
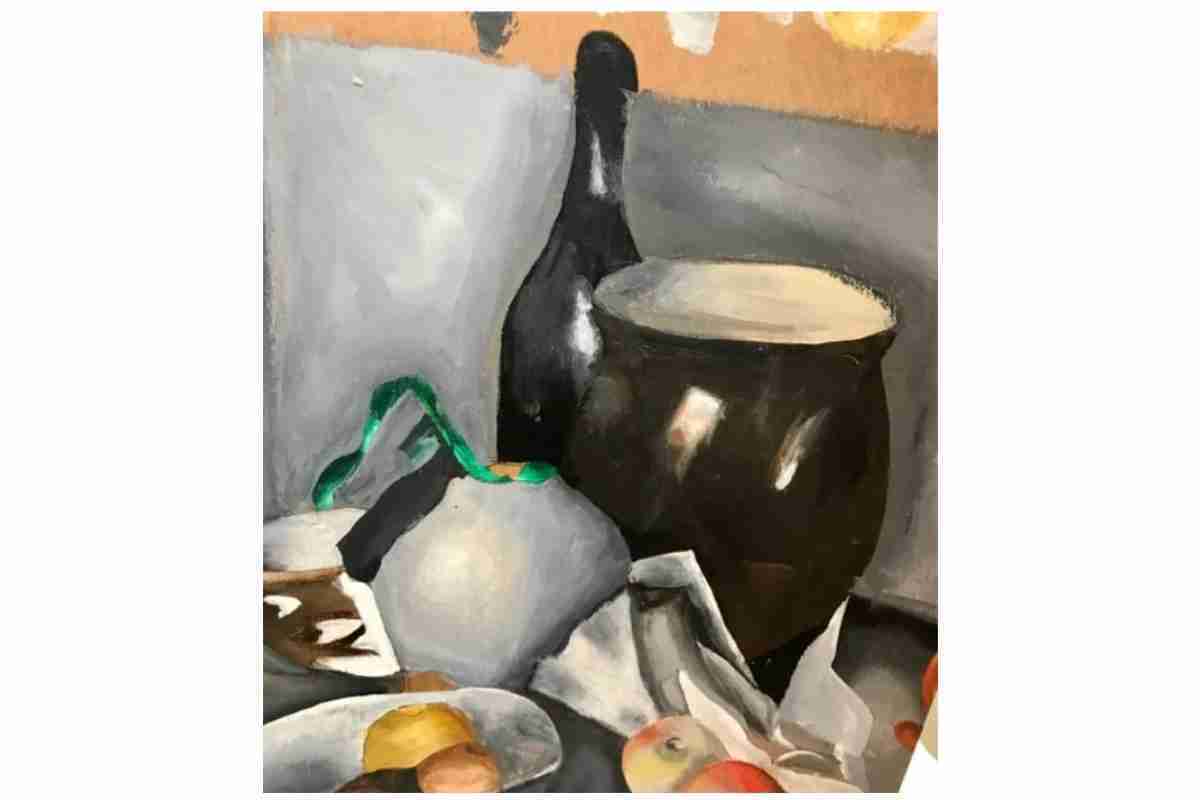
The default situation for many artists when arranging and setting up objects for a still life drawing is usually a tabletop. This can be arranged merely with a three to five simple objects arranged on the flat surface to begin.
My advice is to use simple symmetrical objects laid onto a sheet of paper or a plain tablecloth. When choosing the objects, I suggest you select a variety of sizes and shapes. For example, a tall bottle or vase, which will give the arrangement a sense of height. Also, if the majority of the objects are regular forms, select one random object, this will give the arrangement a greater sense of balance and contrast, plus emphasize the shapes more.
Finally, now that you have arranged the objects onto a surface, you will need to focus on the viewpoint. An excellent way to create a useful composition is to use a viewfinder. This can be moved around until you find the best view through the frame.
Drawing Style
What style of drawing is best for the beginner? How that you have arranged your objects into a still life formation or set up, you will want to begin drawing them. Still life drawing and painting can be rendered in a multitude of mediums.
But as we are commencing drawing as a beginner, I suggest a simple observational line drawing or linear drawing.
Gather Materials
Which medium should you use? Use a grade B pencil to draw with, this will enable you to work with faint lines and establish your compositional arrangement. Also, think about the size of the drawing, A4 to A3 is a good manageable, to begin with.
Warm-up Sketches
Why create warm-up sketches? A warm-up will allow you to make studies of the still life from different viewpoints. It will also enable studying the underlying form of the objects you are drawing.
The benefit of complete several initial studies is that you can analyze the underlying form of the objects quickly. Practice drawing the first cylinders, ovals, and ellipses that make up the structure of the objects.
Another useful exercise when you are attempting to develop your visual awareness of your subject is to create a negative space drawing. I have found this particularly helpful exercise when trying to draw hard objects, as it allows you to draw the object from a different perspective.
Draw the Composition
How to draw a still life composition. First, place your paper in the horizontal landscape position, as this is the most satisfactory position when drawing a still life.
When commencing a still life drawing you will need to consider the spatial relationships of the objects you are drawing. To break this down further, consider the horizontal and vertical forms that make up your still life.
Commence drawing with faint lines, at this stage draw a horizontal line across the page ensuring that it is below the bottom third of the page, this line should never be drawn on the central axis of the page. This line can be drawn on a slight incline to increase the visual tension if you wish.
Explore the Form of the Objects you are Drawing
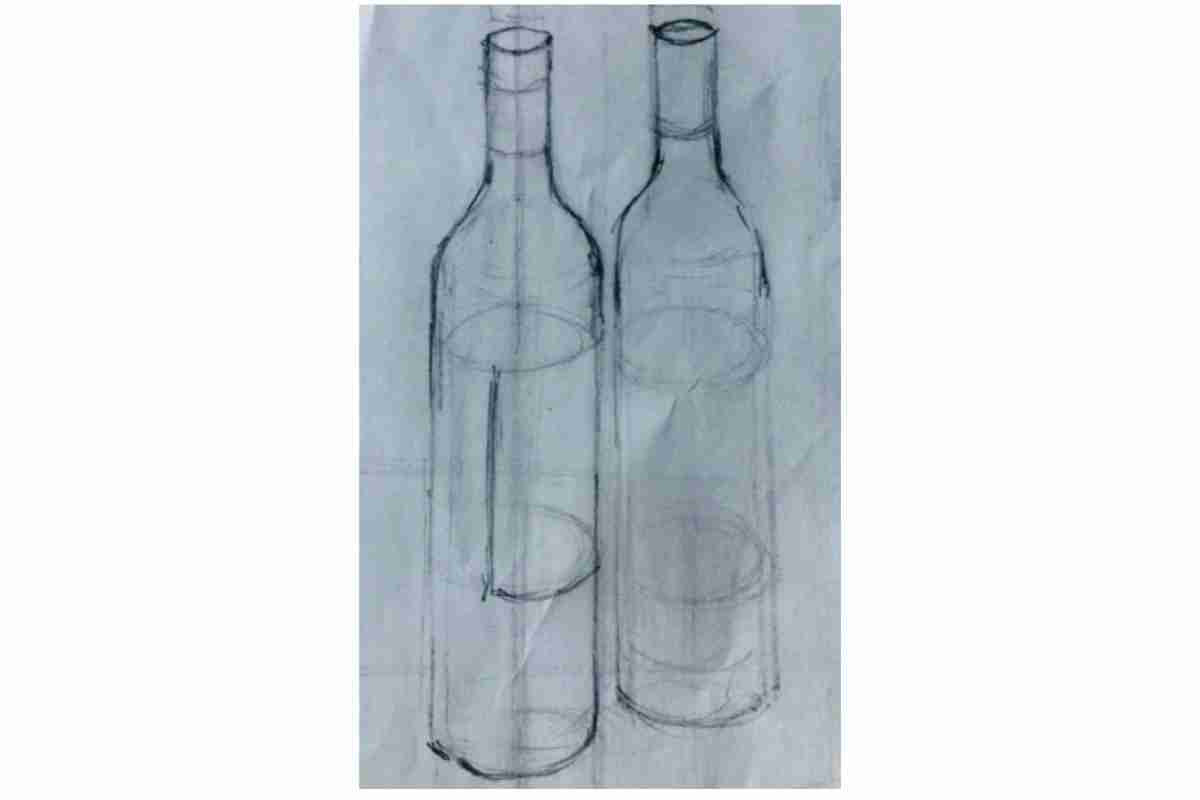
Form and space. You can now begin to draw the objects in your still life arrangement. Firstly, apply faint lines to establish the basic underlying forms such as rectangles, cylinders, and ellipses.
If you are drawing a symmetrical object such as a bottle, the form of the object can very quickly be drawn with the addition of a centerline. This will immediately give you control over the proportions of the object in your drawing. For further inspiration read, Easy Drawing Ideas.
The relative proportions in the drawing can now be checked, once you have drawn a two of three objects. Consider the scale and size of each object individually. If one object seems too large, it will be quite easy to alter it at this stage.
The form and space of the objects can also be explored with other slightly more advanced methods, for example:
· The grid method
· Using a viewfinder
Adding Increasing Levels of Detail
How to add detail to your still life. If the proportions of the still life are correct, you are now free to attempt adding some fine detail onto the objects in your still life. Also consider adding of a faint line to the back of the drawing as well, as this can be an excellent way to balance your composition.
Create the Illusion of Depth and Space
How to create depth in your drawings. As this is a linear drawing the easiest way to create the illusion of space, is to vary the strength and intensity of the lines in your picture.
Objects in the front of your composition can be drawn with a slightly darker line. The trick here is not to create bold dark our lines around everything. But instead draw with a slightly darker line, as this will create the illusion of space.
You can also add some diagonal lines onto your composition which can also add space to the drawing.
Consider Adding Shade and Tone
Applying shade and tone to still life. Consider adding to shade onto a section of your drawing.
If you are drawing simple objects such as a cup or vase, practice applying graduated tone and shading as this is an effective way to display the form of the objects you are attempting to draw.
Simple Still Life Inspiration
How that you have attempted drawing still life. You may want to develop the concept further by trying out some of the following ideas. Read my post, What is Still Life Drawing?
Stylized Line Drawing
Personally, one of the most successful techniques I have taught with students when explaining how to draw a still life is a stylized line drawing.
This technique is best tackled by students’ who have some previous experience of linear drawing.
You should try drawing with a free-flowing line, and render the outline of the objects as accurately as possible.
An accomplished artist can produce a variety of stylized responses to the subject of still life when using this technique.
The focus is upon line and to produce visually, and aesthetically pleasing composition.
The Cubist Still Life

Cubism changed the way people view art forever. It was a revolutionary art movement which, broke the rules of traditional perspective and replaced it with the form of pictorial composition and on a new principle of multi-view perspective.
The Cubist movement was pioneered by Pablo Picasso and his associate Georges Braque. If you are looking for artistic inspiration, I would suggest a Cubist mixed media paper collages of Braque and Picasso.
Tackling your first Cubist Still Life can be difficult if you are not familiar with this style of composition. Again, I suggest that you complete a series of warm-up sketches to help establish your Cubist structure. This will enable you to become accustomed to the process of arranging and selecting shapes and forms to combine.
To begin, I suggest that you merely extend lines, and overlap shapes and outlines to create a Cubist composition. To read more about still, life genres read this post.
