If you are looking for a new drawing challenge might seem that learning how to draw the Parthenon is impossible since it’s a fairly elaborate building.
But when you break it down into manageable steps, it becomes much less intimidating. Like anything else you draw, learning to simplify it by creating a series of small steps you can follow is the key to succeeding.
Materials to Draw the Parthenon
Step one is to get your materials together. Are there any specific materials that you should be looking for? Not really. It all comes down to personal preference.
You can choose something more straightforward, such as graphite or charcoal, or you could decide to challenge yourself and go with oil paints.
Whatever you decide, make sure that you have the supplies you need before getting started.
You can find essential drawing equipment to complete this task here: Click here to view my basic equipment list.
New Drawing Course
Take a look at this online drawing course which will teach you how to draw perspective step by step and draw buildings accurately. Architectural Drawing: From Imagination to Conceptualization Click this link to visit Domestika
Draw The Parthenon
How to Start Drawing?
Follow these basic step-by-step instructions to create your drawing.
Start With A Triangle
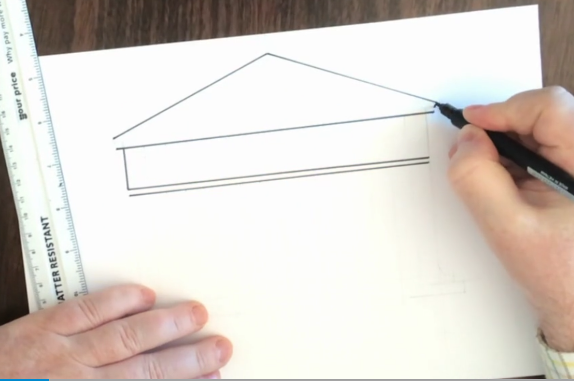
When drawing anything, it’s essential to choose the right starting point. The starting point to this drawing tutorial should involve sketching the basic shape of your subject, in this case, a triangle. The Parthenon is instantly recognizable due to its unique architecture and prominently a sizeable triangular structure.
In many cases, you’ll want to avoid using a straight edge or ruler when drawing since drawing very static, sharp edges can lead to a drawing that seems dull and lifeless. However, this is one case where using a ruler is a virtual necessity.
If the edges of the most prominent architectural feature in your building are crooked, your building won’t look right. Make sure that you use a straight edge and a protractor to correct the angle. If you’re working from a reference photo, and unless you are lucky enough to be in Greece, you will be.
You can even measure the angle of the reference photo and use it to get an accurate angle for your drawing. At this point, you might be tempted to put down a solid, permanent line, but you must keep any lines light for now. You’re still sketching, which means you may need to come back and make changes. That’s much easier to do when you aren’t trying to erase a dark line.
Add Rectangle Below The Triangle
Once you have the main triangle sketched in you, you need to start fleshing out the rest of the building. That means creating the central part of the building, which consists of many columns. Now, attempting to sketch in all of the columns right away will probably drive you crazy. Instead, sketch out a rectangle in the general shape of the columns. This shouldn’t be a series of rectangles. It should be one rectangle. Make sure that you sketch lightly and use a ruler to get straight edges.
Draw The Base

What do all of those columns sit on? They sit on a base. Next, sketch in the shape of the base. Again, sketch lightly, and use a ruler to ensure that you have straight edges.
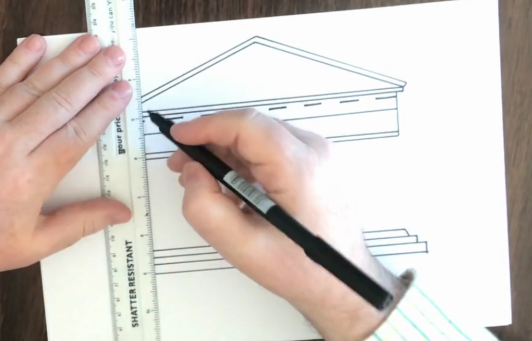
Subdivide
Now it’s time for some math. Yes, math does have a place when learning about art, which is one of those times. First, take a look at your reference photo and compare the space between each column compared with the width of each column.
Next, measure the length of the entire rectangle that you sketched out to represent the placement of the columns. Once you have that, you do some math to figure out how many inches across each column should be and how wide the spaces between them should be.
Then it’s a simple matter of measuring everything out and sketching the placement of the columns.
Draw 8 Columns
Like everything else, you should sketch the shape of the columns lightly. While they have a reasonably consistent shape, their built imperfections, combined with centuries of weathering, have caused many minor imperfections.
You must capture these small details to add realism to your drawing or painting.
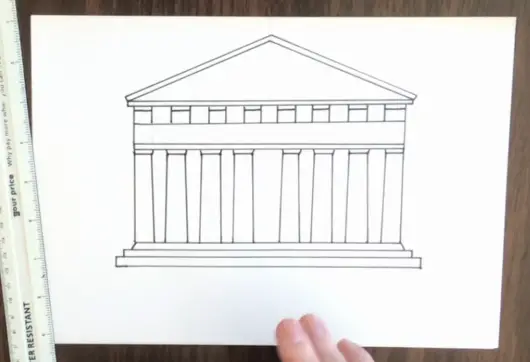
Add Details To The Temple
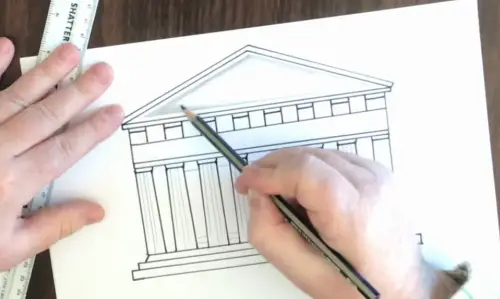
The final step in the process is to start rendering in details and values. Always make sure that you have a full range of values.
This will help to create the illusion of depth. You also want to render the small details, the decorations, damage, and anything else you see. The more that you add to this most famous surviving building the more realistic your drawing will appear.
Learn to Draw the Parthenon in Perspective
Once you draw the Parthenon from a basic front viewpoint. Attempt to learn to draw this Classical example of classical architecture in perspective. One-point perspective is the simplest and easiest form of technical drawing which will enable you to draw a three-dimensional drawing of the Parthenon.