Cross Hatching Techniques
Cross hatching techniques are the most important and valuable drawing techniques that you'll ever learn. Cross-hatching gives you the ability to control value, and when you can control value, you can create the illusion that the flat drawing you are working on is a three-dimensional image.
Figuring out how to create the illusion of depth requires you to create a full range of values in your drawing. You need highlights, mid-tones, and deep shadows, as well as every value in between.
When you're working with graphite, charcoal, or another medium where you can blend, creating value isn't that challenging. But, what do you do if you're working with ink?
You could use an ink wash technique, but what if you don't want to go that route? Do you have other options? You do, and the best option for them is cross hatching.
Please look at this drawing and sketching video course I have created. Use this link.
How do you Cross Hatch in Drawings?
When planning out your drawing, the first step is to figure out what type of final look you are hoping to attain. Cross hatching is a great technique, but it can leave a drawing looking rougher and less finished unless you are very careful.
There's nothing wrong with this. It's a look that a lot of artists strive to achieve. But, if you are trying to create a more refined look, can you still use cross hatching? It's simply a matter of slowing down and being more deliberate when you're drawing.
You need to use short, controlled strokes when doing your hatching, and you need to follow the shape of the object you are shadowing carefully.
When doing cross hatching, make sure that you work from light to dark. This is especially important when working with ink since erasing isn't an option. Start with a sketch that lays out the general composition of your drawing, then start to ink over those lines.
In areas with shadows, start by doing regular hatching, then as you need to darken the values, start adding cross hatching to the mix.
Related Posts:
- Should You Outline Drawings?
- Scribble Drawing: Everything You Need To Know
- How to Sketch Loosely
- Experimental Drawing Techniques For Inspiring Students
What are Hatching Lines?
When learning about cross hatching techniques, you will have to learn about hatching. What are they? Hatched lines are short lines that you draw parallel to each other in areas you want to indicate shadow.
The closer you put them together, the darker the shadow will appear. When you cross them over each other, you get cross-hatching, which increases the darkness of the value even further. So, to summarize, hatching lines are what all drawings with cross hatching use as a means of creating shadows.
They are the foundation that cross hatching is built upon, and they are a technique that you need to master before you attempt to move on to more advanced techniques.
Parallel Lines

Parallel lines are what you use when doing single-direction hatching. They are also what you use when doing cross hatching. When you first render a drawing with hatching lines, you should use single-direction lines.
You'll have a lighter value when the lines are spread far apart. As they get closer together, the value will darken. If you can group them very close together, you can achieve a reasonably dark value, which you can then darken further by adding cross hatching to the mix.
Just remember, it all starts with simple straight lines. You can also determine how orderly or messy a drawing appears by the amount of variance you have in your parallel hatching.
If all of the lines are about the same length, and the space between them is carefully controlled, then your drawing will look more orderly.
On the other hand, if you start placing lines quickly in your drawing without being careful to control their length and spacing, then your drawing will look rougher and messier.
There's no right or wrong way to do this; it's simply a matter of personal preference.
Importance of Parallel Hatching
What makes the use of parallel hatching so crucial in a drawing that features hatching and cross hatching? They're essential because they are the foundation your drawing is built on.
That's kind of like asking why brush strokes are essential in a painting. Lines are necessary when you are creating a drawing using hatching techniques.
Contour Lines and Hatching
When most people think of the cross-hatching technique, they probably picture short, overlapping parallel lines. This is a great way to think of this technique since it is the most common way to use it.
However, the number one rule in art is no rules! This means that there's no reason that you should have to use hatching and cross hatching in this way. You can also use contour lines that follow the curve of an object, which can give you some stimulating effects.
What is Hatching in Art?
Hatching in art is a way of creating value in a drawing without using traditional blending techniques. It is a technique most closely associated with ink drawing, although you can use it with other types of artistic mediums as well.
Hatching involves using parallel lines that have the distance between them varied to control value. You can further darken the value by overlaying multiple layers of hatching to create what is known as cross hatching.
Hatching Techniques Drawing
When using hatching in your artwork, make sure that you try a wide variety of techniques. The more you vary your approach, the more visually appealing your drawing.
Now, you need to be careful to use techniques that will work for your subject and work well together, but as long as you keep these things in mind, there's no reason not to mix and match and try different techniques together.
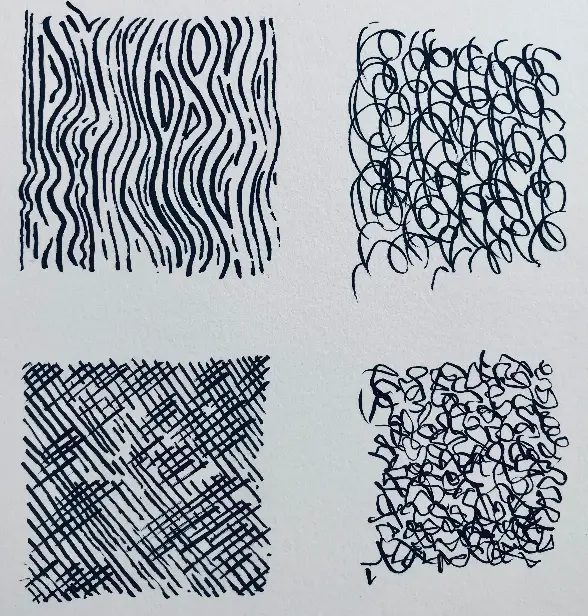
What are the Different Hatching Techniques?
When it comes to using hatching in your drawings, there are several techniques that you can employ. That's right, there's more than one way to use hatching, and if you're interested in using this technique, you owe it to yourself to learn all of the different ways you can use it.
Generally speaking, there are two main ways that you can use hatching, you may use it initially, or it can be used by drawing overlapping lines, something is known as cross hatching.
Hatching
Take a moment to think about what type of art you prefer to create now. Now, take a moment to think about where you started as an artist. Did you start out creating the same type of art that you create now?
Probably not. Why is this important? It's vital so that you don't jump into more advanced hatching techniques right away. If you want to feel discouraged at your lack of ability, then go ahead and start trying to do more advanced techniques.
But, if you want to do it the right way, start out with something simple. Start practicing hatching exercises in a sketchbook. Start with simple shapes, then start to draw more complex ones. Then, you can start to try more advanced techniques after having a solid foundation in place.
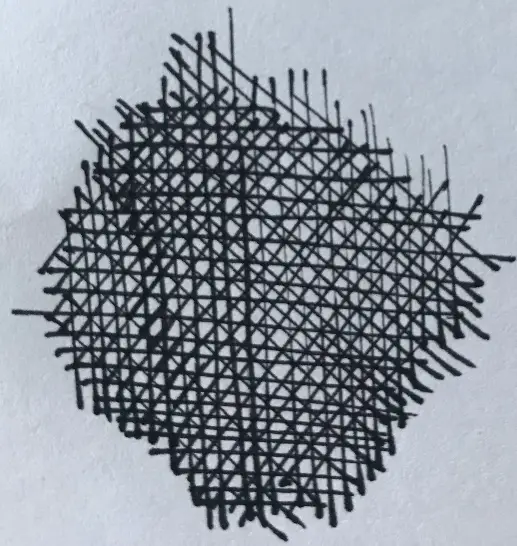
Cross-Hatching
Cross hatching is used in a drawing when traditional hatching cannot produce dark enough values. Even when you have your hatching lines very closely grouped, there's only so dark a value you can attain using regular hatching.
But, when you add hatching lines that go in different directions, you can overlay these on top of the first hatching layer, giving you a darker value. Don't limit yourself to only using cross hatching in one direction.
There's no reason you can't layer multiple layers of hatching on top of each other, with each of them going in different directions. The more layers that you add, the darker the value will become.
Dotting

What is dotting? Dotting, also known as stippling, is another means of creating value in a drawing that shares similarities with hatching and cross hatching techniques.
How does dotting work? Dotting is done when pen and ink drawing; instead of using hatch marks when you indicate shadow, you use tiny dots with dotting. The closer you group the dots, the darker the value will become.
Dotting will allow you to transition more smoothly between values than you can with hatching, but it does come with a significant drawback. Dotting is very time-consuming. Does that mean you shouldn't try it?
Absolutely not, but it does mean that you need to be prepared to exhibit significant patience when using this technique.
Circle Hatching Techniques
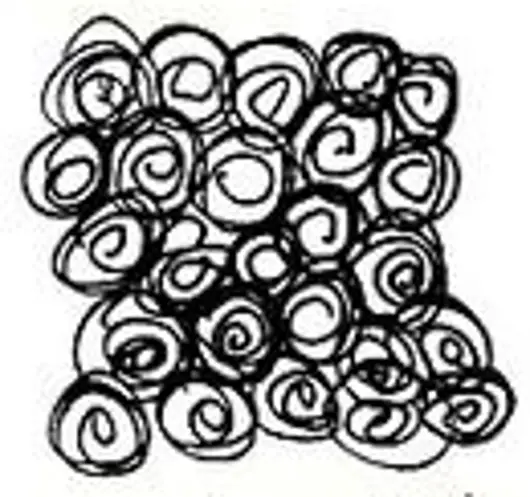
Circle hatching is a type of hatching where you follow the curve of an object when you are using hatching or cross hatching to add value.
Many artists that are first learning about hatching make the mistake of thinking that they can only use short, parallel lines. This is not the case. Using contour lines that follow the curve of an object can work incredibly well, as long as you take the time to practice the technique.
This is called circle hatching because practicing it on a circle is one of the best ways to get used to using a contour hatching technique in your art.
Cross Hatching Exercises
Do you really need to practice cross hatching by doing exercises? Nope, not unless you want to get better, that is. If you want to get better at art, you need to practice.
Unless you want to be frustrated by an inability to finish drawings using a brand new technique, practice exercises are the intelligent approach. Start by hatching and cross hatching on a blank page working from light to dark.
Once you're more comfortable doing this, you can start using your techniques on simple shapes and then move on to more complex shapes.
How do you Practice Hatching?
If you're trying to master the cross hatching technique when drawing, there's only one way to get better at it; you have to practice. The more you practice, the more mistakes you are going to make.
Don't worry; making mistakes is a big part of the learning process. If you aren't making mistakes, then you aren't pushing yourself.
You aren't exploring new possibilities and expanding upon your artistic skillset. If you aren't making mistakes, you're staying in your comfort zone, which means that you won't grow and advance as an artist.
Since mistakes will be a part of the equation, you should start your cross hatching journey by sketching. After all, what's the point of spending a lot of time laying out a drawing when there's a good chance that you're going to end up messing it up?
The best way to get better at anything is to practice, and when it comes to art, this is especially true. One of the best ways to gauge your evolution as an artist is to use a sketchbook.
A sketchbook is better than sketching on scratch paper because it allows you to keep your sketches so you can go back and look at them in the future.
Why would you want to look at old sketches? For one thing, it helps you to track your progress. When you look back at sketches from a week, month, year, or any length of time longer than that, you should notice how much your art has changed over time.
If you're sketching regularly, your art should be improving, and looking back at your older work is a great way to stay motivated so you can keep working on perfecting your craft.
Another benefit of keeping a sketchbook is that it gives you a way to keep track of any new ideas you may have. You might look back at old sketches and realize that you were doing something in the past that worked better than what you're doing now.
Create Art With My Favourite Drawing Resources
General Drawing Courses. I like Udemy if you want to develop your knowledge of drawing techniques. Udemy is an excellent choice due to its wide range of creative courses and excellent refund policy. They often have monthly discounts for new customers, which you can check here. Use my link.
Sketching and Collage. Take a look at this sketching resource I have created. Use this link.
Proko. Is one of my favorite teachers who surpasses in the teaching of Anatomy and Figure drawing. Prokos course breaks down the drawing of the human body into easy-to-follow components aiding the beginner to make rapid progress. For this, I really like Proko.
Art Easels. One of my favorite ways to draw is by using a drawing easel, which develops the skill of drawing on a vertical surface. The H frame easel is an excellent vertical way to add variety to the style and type of marks you create when using a drawing board.
To see all of my most up-to-date recommendations, check out this resource I made for you.