Are you interested in learning how to draw with watercolor pencils? If so, then learning how to draw a sunset is a subject you should focus some attention on because watercolor pencils are an ideal medium to depict it with. How do you draw a sunset with watercolor pencils? That's simple, you do it however you want to.
Drawing Sunsets In Watercolor Pencils
Watercolor pencils give artists the ability to create vibrant, colorful pieces of art while maintaining a level of control that is difficult to do with traditional watercolors. While it's not impossible to have a great deal of control with watercolor paints, it's much harder than using watercolor pencils.
Why do you think that it is? That's simple, chances are pretty good that the first thing you picked up to draw with, besides a crayon, was a pencil. Very few artists started out with a paintbrush in their hands, so there's familiarity with holding a pencil that makes artists feel at ease and in control.
While you may not always want to have a lot of control when painting with watercolors, having it as an option by using watercolor pencils gives you more flexibility when you're working.
One of the main reasons that watercolor pencils are such an excellent choice for painting sunsets is their vibrancy. Sunsets are some of the most beautiful, colorful scenes in nature, and you need a medium capable of capturing them in all of their glory. Watercolor pencils have the vibrancy and covering power necessary to render a full range of intense colors to create a beautiful drawing or painting of a sunset.
How do you Start Drawing With Watercolor Pencils
If you've spent any time drawing with traditional colored pencils, you should have a pretty solid idea of how to use watercolor pencils. Watercolor pencils can be used exactly like a regular colored pencil, or you can use them and take advantage of the watercolor effects that they are capable of producing.
One of the most common mistakes people make when they start using colored pencils is not applying enough pressure and getting enough color saturation. You can usually tell when someone is new to using colored pencils because a lot of the white of the paper will show through their drawing.
Once you've become more comfortable using colored pencils, you should learn how to saturate color to create rich and beautiful values. If you plan to use your watercolor pencils as a traditional colored pencil, make sure that you use enough pressure and layers to really get excellent color saturation in your drawings.
While you could use your watercolor pencils just like a traditional colored pencil, why would you want to limit yourself when you can create watercolor effects and colored pencil effects? If you want to take full advantage of watercolor pencils and their unique capabilities, you'll introduce water into the mix.
The first thing you should do is start to sketch and block in color lightly. While you can pressure to get a lot of pigment on the paper, you don't need to do this right away. Instead, use a light amount of pigment and plenty of water to create your first wash. After that wash has dried completely, you can add another layer of color, this time using more pigment. You then continue this process, slowly adding more color and detail until you get your painting to a finished point.
What Equipment You Will Need
What kind of equipment are you going to need to work with watercolor pencils? Let's start with the most obvious thing, first, you'll need watercolor pencils. There are many brands to choose from, but remember, you usually get what you pay for. If you're just getting started and are looking to save some money, using inexpensive student quality watercolor pencils for experimentation is fine. Click here to read my post The Best Color Pencils for Blending and Shading.
Once you move on and want to start producing finished paintings that you can sell or show, you'll need a higher quality watercolor pencil. Try buying a few loose ones from different manufacturers to get a feel for how you like them. This will prevent you from spending a lot of money on a high-quality watercolor pencil set, only to find that you don't feel comfortable using it. Castle Art Watercolor Pencils offer excellent value. Click here to view the price on Amazon.
What kind of paper do you use for watercolor pencils?
Next, you'll need paper to work on. Once again, when you're just experimenting, using cheap paper is fine. But, once you start to produce finished paintings, you'll need a better quality watercolor paper. Hotpress paper has a smooth surface, and cold press paper has a rougher one, so try a few different kinds to see what you'll like.
You may also need a hard graphite pencil for sketching in your painting if you prefer to work this way. If you do use graphite, make sure to get a quality eraser. You'll also need some type of masking or artist tape to hold the edges of your paper down and create a crisp border. You may also need masking fluid, but this is also a matter of personal preference.
Last, you'll need brushes. You can go with traditional watercolor brushes and a cup of water. Or, you can get water brushes, which have a built-in reservoir of water. Water Brushes are quite popular since they are convenient, especially when you are working away from home.
Optional: Mask The Edge Of Paper With Tape
Should you mask the edge of your paper, or shouldn't you? This is a decision that you'll have to make on your own. If you mask your paper's edges, you'll get a nice, crisp edge to your paintings. If you're planning to matt and frame your work, then this edge won't matter. Masking the edge of your paper can also help keep the paper from buckling when you're using heavy washes.
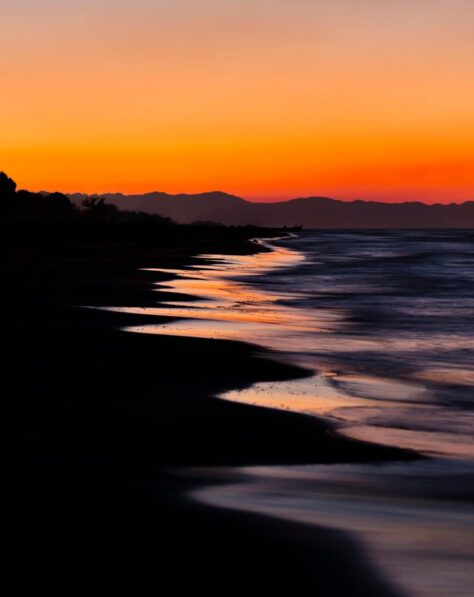
What Colors are in a Sunset?
If you're planning to paint sunsets, you better get used to working with a warm color scheme. Most sunsets have a variation of reds, yellows, and oranges. The best sunsets will have these colors appear to paint the sky and flow together, creating a spectacular image that just begs you to paint it.
When working with a warm color scheme, yellows, oranges, and reds should dominate your painting. But, that doesn't mean that you can't use cool colors as well. You should use cool colors in most sunsets so you can add some contrast to your painting.
You can use some cool blues at the top of the painting where the glow of the sun isn't as strong, and you can also use some cool colors for mountains, trees, or other parts of the painting where there is ground that should be darker than the sky.
Drawing a Sunset Sky
If you're planning to draw or paint a sunset, you should start by using washes of color to first paint in the sunset sky. Painting a sunset usually works best when you have something in the distance, or even in the foreground, to give the painting a sense of scale.
If you just have a bright orange and red sky, it can be hard for people to envision what it would be like to see the actual sunset. When someone looks at your painting, you want them to feel the warm glow of the sun and understand the beauty of the scene that caused you to want to paint it.
To do that, you need to put things into perspective, which means painting in the ground and some landmarks. The easiest way to paint a sunset with some background or foreground elements is paint in the sky first. Lay down several washes of bright colors; then, after it's completely dry, you can go through and use a series of dark washes to indicate other elements in the painting. Click here to read my post, Should You Sketch Before Watercolor.
Apply Watercolor Pencil Horizontally Across The Page
While it's possible to dip your pencils in water and use them as paint from the beginning, when painting something that's going to require a lot of color over a large area, this isn't the best approach. When you need to put down a lot of colors and use watercolor pencils, it's better to use them dry to start with.
Start by applying them horizontally across the paper. When you're doing this, remember that these pencils will transform into the paint, so you don't need to worry about blending the colors right now. Just start using bright, warm colors, and scrub them across the paper horizontally.
After you have a nice base coat of pigment, you can start using water to blend the colors together, creating a gradation of color that shows what a sunset looks like. Once the paint has thoroughly dried, you can add more color and continue following this process until you've gotten the color saturation that you need.
Aim For A Thick Consistent Color
It takes time to become comfortable working with any new medium, and watercolor pencils are no exception. Artists that are just getting started using watercolors and watercolor pencils often fail to utilize them to their full potential. Specifically, they embrace transparent washes and don't take advantage of the fact that watercolor produces vibrant, thick, consistent color.
The trick to being able to produce color like this with watercolor is to work in layers. One of the advantages of using watercolor pencils is enjoying the ability to put down color more quickly. If you try to use watercolor paint too thickly without adding enough water, it's going to crack. Watercolor pencils are a little different, though, since you can put down more pigment without having to worry about it cracking.
Start your painting out by working horizontally and adding the colors of the sunset to the paper. Next, start to blend those colors and create your first wash by adding a liberal amount of water to the paper. You want your initial wash to be light and blend the colors together well, so it's important to use quite a bit of water.
Once that initial layer has dried, you can then go back and add another layer, using slightly more pigment than you did the first time. Once again, use a fair amount of water and turn the pencil into a wash, but use a little less water than you did for the first wash. If you continue this process until you have multiple layers of pigment, you should create a thick, vibrant, consistent color.
Graduate Colors Dark To Light
If you want to paint a realistic sunset, you're going to learn how to graduate colors from dark to light. If you have any clear lines separating one color from the next, then your painting will look artificial. Click here to read my post: How to Mix and Blend Watercolor Pencils
Fortunately, watercolor pencils were made for blending. Adding water to the mix will enable you to blend one color into the next, and once you are good enough at it, you should be able to do it seamlessly. The easiest way to blend watercolor pencils is to do a lot of the work while still in pencil form.
Lay down pigment and then start blending the next color that you want to use into the first, do this before you add any water to the mix. You should also spend some time looking at sunsets to give you a better idea of what colors show up. Everyone is familiar with bright orange sunsets, what you may not know is that there are many other colors besides orange. There are various hues of yellow, purple, red, and even blue, you just have to look to find them.
Layer Variations Of Color On Top Of Each Other
If you've ever painted with oil paints and have been trained in the classical method, you're probably pretty familiar with working in layers. Classically painting with oil paints involves glazing thin layers of color on top of one another.
This can allow you to create stunning paintings, but it's also incredibly time-consuming. To say that oil paint dries slowly is a significant understatement. While many artists are familiar with working in layers with oils, and even acrylics, not as many are familiar with working with layers of watercolor paint.
Wait, since watercolor paint is water-soluble, won't layers of watercolor paint blend together? They will, but rather than look at that as a problem, embrace it as a solution! Allow the layers of color to bleed together so you can achieve a higher level of color saturation.
Watercolor paint is often thought of as wishy-washy, in that you can't obtain the same level of vibrant, opaque color that you can achieve with oils or acrylics. If you are patient and willing to work at it, you can develop very vibrant colors using watercolor pencils in layers.
Instead of only using the same colors on top of one another, you can also add different hues to achieve even more vibrant results. For example, adding a layer of orange on top of red will produce a different color than you would get if you only used red or orange alone.
Yellow/Orange/Red
If you plan to paint sunsets, you better get used to working in yellow, orange, and red. These are the primary colors of any sunset, the only thing that really differs is how much of each color you'll use. There will be traces of blue and purple, but for the most part, yellow, orange, and red are going to be the main colors in your color palette.
While working with a limited color palette can be challenging, it doesn't have to limit what you can accomplish in your paintings. Make sure that you sprinkle in some cool colors while you're working, and you should be able to create enough contrast to keep your paintings interesting.
Experiment With Different Combinations
Experimentation is how you learn what will work and what won't work, and using watercolor pencils gives you the ability to work quickly and easily, which facilitates experimentation. Try using complementary colors on top of one another, and try using warm colors next to cool ones.
The point is that you can't be afraid to push the envelope and explore new things. Who knows, maybe an experiment that you try will lead you down a new path that you never would have walked if you didn't try something out of the ordinary.
Related Posts You May Want To Read:
- Should You Outline Drawings
- How to Draw Waves
- Udemy Best Drawing Courses
- What is Proko?
- Best Digital Art Courses
Simple Sunset Drawing Color Scheme
Have you ever considered the possibility of painting a sunset in cool colors? While a sunset in cool colors is definitely not the norm, they do happen, and when they do, they can be quite spectacular.
When working with a cool color scheme and painting a sunset, the key to success is balancing the cool and warm color palette. Painting a sunset using nothing but cool colors probably won't work out very well for you. It could, but how often have you ever seen a sunset without at least some warm colors? Probably never, right?
So, unless you're painting an abstract scene or an alien landscape, you're going to learn how to walk the delicate line between warm and cool colors. It's challenging, but that just means that it should be more fun for you!
Apply A Damp Brush Horizontally Over The Page
When you are trying to blend colors together and work with watercolor pencils, the direction you use a brush to apply water will matter. Brushstrokes are going to show up when you work with watercolor pencils, so you can either have those brushstrokes work for you or against you.
If you use a damp brush and stroke horizontally over your painting periodically, you can help blend colors together, and you can do it in a way that doesn't disrupt the natural flow of color in the painting. Click here to read my detailed post on How to Care for Watercolor Brushes.
Advantages Of Working Quickly
Why would you want to work quickly when painting with watercolors? The main reason is to embrace the spontaneity of the medium. One of the advantages of working with watercolor paint is that you can take your time when you are working since adding water to your palette will reactivate your paints.
With watercolor pencils, it's even more convenient since all you have to do is start sketching again, add more water, and get back in business. But that doesn't mean that you should work slowly. Watercolor paint works best when you embrace the natural flow of water and paint and the unpredictable results that it can produce.
If you want to work slowly and deliberately when doing a watercolor pencil painting, that's fine, but you may end up with a painting that lacks vibrancy and motion when you're finished.
Clean Your Brush With A Dry Fresh Tissue
Whether you use a traditional watercolor paintbrush or a water brush, you need to keep your brush clean. Fortunately, cleaning watercolor paint is very easy, all you need is water. You might be tempted to leave your brushes sitting in a cup of water while you work, but you have to resist this evil temptation!
Resting your brushes in water will damage them. Sure, it will keep the bristles from becoming stiff while you're painting, but you'll also have to replace your brushes more frequently. Rather than spending more of your hard-earned money than you have to, try rising your paintbrushes between uses and then drying them with tissue paper.
Allow Each Color Wash To Dry Completely
One major mistake that many people new to using watercolors and watercolor pencils is not waiting long enough between washes. Watercolor washes dry quickly, so do your best to be patient and make sure that each wash is completely dry before you start adding more color to your painting.
If you're really in that much of a hurry, you can always use a hairdryer to speed the process up. If you add a layer of watercolor paint on top of a wash that's still damp or wet, the color will bleed together, which isn't necessarily bad.
Even if you let a watercolor wash dry completely before adding the next layer of paint, you will have some paint bleeding together. Why is it so essential to ensure that a wash is completely dry before using watercolor pencils on top of it?
There are two reasons why working on top of wet paper with a watercolor pencil is a bad idea. The first reason is that as soon as your watercolor pencil touches the wet paper, the lead is going to activate. There's nothing wrong with working this way, but if you do, and you're trying to create even washes of color, it's going to be a problem.
When you work with a wet watercolor pencil or work with it on wet paper, you're going to get highly pigmented marks. Those marks are going to stand out from the rest of your painting, and not in a good way.
The other problem is that working on wet paper with sharp pencil lead could easily damage your paper. The point is that since watercolor dries so quickly anyway, do yourself a favor and exercise a little patience.
Use A Dark Color To Draw The Horizon And Mountains Lightly
If you plan to put in a horizon line or mountains, and you really should, you'll need a guide to help keep you from creating a crooked horizon line. There's not much worse than finishing a spectacular looking watercolor painting, only to notice a significant flaw.
Watercolor paintings are not paintings that can be changed easily, so if you make a significant mistake, you're probably out of luck. That's why sketching in your mountains and horizon line in a dark color makes so much sense, it gives you a guide to prevent unwanted errors.
Add A Dark Layer Of Color To Fill The Mountain Profile
Once you have your mountains sketched in you can't leave them as a single line on the horizon, you need to fill them in. What color should you use? A lot of people use brown, please don't be one of those people.
A big brown mountain in your painting looks ugly and out of place in your sunset painting. What color should you use instead? Believe it or not, purple works very well. It's dark enough to contrast a bright sunset, and the purple color works well with the warm colors of a sunset.
Add Details To The Foreground Or Midground Of Your Picture
Depth is everything in a picture, especially when you're painting a sunset. When you just have a bunch of bright, warm colors, you're going to have a flat painting. Sure, the colors are pretty, but without context, they're just bright colors.
What you need to ground your painting and to give it depth is foreground and midground. The easiest way to convey depth in a painting is to remember that closer to the viewer, always has more detail. It's how our eyes see, and it's how you should paint if you want a painting that has depth to it. Add some details to the midground, add more to the foreground, and watch it as your painting takes on a much deeper feeling.
Draw On Location
Watercolor paints are prized by many artists because of their ability to be moved to new locations easily. If you paint with oils, there's an entire setup that you'll have to bring with you when you are going to paint. Then, even if you're successful, you'll still have to deal with transporting wet oil paint back home.
If you try to paint on location with acrylics, you have to bring just as much equipment and supplies with you, plus you'll have to deal with the paint drying extremely quickly. Watercolor paints can be set up quickly, and you don't need a lot of equipment.
Do you know what's even easier to transport than watercolor paints? Watercolor pencils. Watercolor pencils are easy to transport, and you don't even need a palette to work on. You also don't need a cup of water or paintbrushes since you can carry water brushes with an internal water reservoir. You can pack up a pad of watercolor paper, a few water brushes, a bottle of water to refill them, and a pack fo watercolor pencils, then hit the road for your artistic adventure.
Draw And Paint From A Photograph
While watercolor pencils are great for traveling, no rule says that you have to travel with them. You can just as easily stay home and work with them, where their versatility and ease of use will be an excellent benefit for you.
If you want to paint realistic looking sunsets, you'll need some reference to work from. That's where working from photos comes into the picture. You can either take your own photos or go online and find ones that suit you.
Try Creating Sunsets In A Variety Of Formats, Both Landscape & Portrait
When painting a sunset, your first instinct would probably be to paint it with the paper turned sideways for a landscape, and that's a good first instinct. If you restrict yourself to that type of layout, you won't be able to explore all of the possibilities that lay before you. No rule says you can't paint a sunset on a paper set up for a portrait, so give that a try, and you'll probably be surprised at how much you like the results.