The drawing of water is considered by many graphics artists to be a difficult subject to tackle and draw correctly.
The trick to drawing water and to achieve the results you want is to adopt a step by step method. This will enable you to break down the challenges you encounter and methodically overcome them.
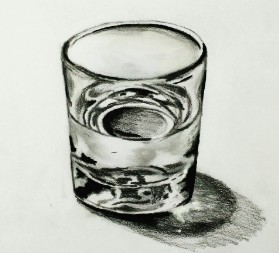
How to Draw a 3D Glass of Water? To draw a glass of water, you will need to ensure the following steps are completed:
- Establish the Composition of Your Drawing
- Draw the Outline of the Glass
- Learn to Draw Ellipses
- Drawing the Reflections
- Thins to Consider When Applying Shade and Tone
- Apply the Finishing Touches to Your Drawing
In this post, I will explain how to draw a glass of water employing a simple step by step methods. Beginning with how to observe and compose your drawing correctly before you apply any of the detail.
Establish the Composition of Your Drawing
As with all sketches and drawing from life, you will only ever produce a genuine looking drawing if you study the subject directly from observation. This will allow you to focus on and investigate the subject carefully in the round.
Please look at this drawing and sketching video course I have created. Use this link.
Drawing from direct observation will also enable you to look closely at the details and variations of shadow and reflection that you will need to render and sketch with your pencil.
The first task you will need complete is organizing the layout or composition of your drawing. As this is an essential a simple shape, the primary consideration is the placement of the glass.
Centrally position the glass on a piece of paper with a light source emanating from one side. Additionally, of a white piece of paper beneath the glass will make it stand out visually. This also has the benefit of separating it fro the rest of its environment.
You are now ready to begin the process of drawing and sketching the glass onto your sheet.
Draw the Outline of the Glass
Begin your drawing by sketching with faint lines and holding the pencil halfway down. This will ensure that you don't press too heavily on the paper.
First, you will need to draw I faint rectangular shape onto the page into which the form of a symmetrical glass can be outlined.
At this stage in the drawing, it is also a good idea to think about the position of the glass in relation to the page and its placement.
For example, do you wish it to be drawn central or to one side of the page?
The first thing you will need to draw is a rectangular shape. This will enable you to draw the forms related to the glass in proportion.
Once this rectangular shape is established, you can add a centerline. The center line is the central point around which all of the ellipses will be drawn.
Another important consideration before you apply any essential details is where to draw the eye level, as this will determine your viewpoint.
A higher eye level will result in a drawing looking downwards, for example, if you usually looking at the glass on a table beneath you. Alternatively, you may wish to draw the glass from a seated viewpoint where the viewpoint is not as steep.
If you choose to fill the whole of your page in a close-up viewpoint, you will still need to consider the angle and perspective of the ellipses you will need to draw at the initial stages of your drawing.
Before you move on to the next stage, look carefully at the proportions of the initial rectangle and check the position of the center point.
Also, make a faint mark oh the paper to indicate where you will need to draw the water.
Learn to Draw Ellipses
If your finished drawing is going to look right, you will need to make sure that the ellipses are drawn correctly in the early stages of sketching the drawing out.
Several methods can be used to help you draw an accurate ellipse and check its accuracy in its drawing.
But before you begin, it is a good idea to understand the basic principles behind the ellipse shape. The shape of an ellipse will change according to the angle from which it is viewed.
To draw an ellipse, you will need to return to the glass you drew earlier. Using the center line as your starting point and as a guide from which to draw a continuous light line.
New rectangles can be added at the top and the base of the glass. These first lines will enable you to establish and draw the top and bottom of the glass and the water line.
Before you progress onto the next stage in your drawing and begin to add detail, it is a good idea to check the accuracy of the shapes and ellipses that you have drawn.
A quick and easy way to do this is to turn your drawing upside down as this helps you look at the drawing from a different angle and will often reveal inaccuracies of lines which seem out of proportion.
Drawing the Reflections
When confronted with complex reflections either in water or on glass, most beginners will hesitate.
So why do people find it challenging to draw the surface of the glass? When looking at the surface of the glass on for the first time, it difficult a subject to tackle. The variations of tone and shapes become visually confusing.
A simple and effective technique for overcoming this issue is to treat the surface of the glass as a combination of light and dark patterns.
Using this method will enable you to simplify and to progress onto adding value to these reflections and shadows step by step.
As you progress through the drawing, make sure that you are following the curvature of the glass.
This will ensure that the glass appears three dimensional by the time you have finished drawing it.
Things to Consider When Applying Tone and Shade
It is always a good idea to use a tissue to lean after you begin applying shade. A spear piece of paper will also suffice; this will prevent the drawing smudging as to progressively add tone.
Before you begin drawing, it is a good idea to sharpen the pencil correctly. This is best achieved with a good quality sharp craft knife.
This will allow you to achieve the best point on the pencil for adding additional detail.
When shading and adding value hold the pencil on the side halfway down the barrel.
If will enable you to achieve lighter free marks. Don't make the mistake of holding the pencil at the tip. This will result in dark lines which you will not be able to erase easily.
You are now ready to begin the application of graduated shading and blending onto the reflections created in on the glass and water.
Apply the Finishing Touches to Your Drawing
Once you have completed adding shading and detail, you may feel that you finished your drawing. However, it is a good idea to check your picture and see if you can perfect it.
Looking at the drawing from a distance is an excellent way to look at the overall look of your drawing. You may need to add darker areas of tone or blend and graduate the shading further.
Turn the page upside down as we mentioned earlier is also an excellent way to spot imperfections and alter aspects of the drawing which you don't quite like or feeling need rearranging.
Another task which will improve the overall look of your drawing once it is complete is to clean the edges of the page will an eraser. This is an effective way to reduce the number of marks and smudges that appear on the page as you are drawing.
Once you have completed the drawing and corrected any errors, your drawing will be ready for display.
Additional Questions
How to Draw Water Step by Step in Pencil
The skills developed in this tutorial will enable you to approach the drawing of water and reflections systematically and methodically. To Learn more about drawing water, waves and ripples read my post 10 Tips For Drawing Water, Waves, and Ripples.
Create Art With My Favourite Drawing Resources
General Drawing Courses. I like Udemy if you want to develop your knowledge of drawing techniques. Udemy is an excellent choice due to its wide range of creative courses and excellent refund policy. They often have monthly discounts for new customers, which you can check here. Use my link.
Sketching and Collage. Take a look at this sketching resource I have created. Use this link.
Proko. Is one of my favorite teachers who surpasses in the teaching of Anatomy and Figure drawing. Prokos course breaks down the drawing of the human body into easy-to-follow components aiding the beginner to make rapid progress. For this, I really like Proko.
Art Easels. One of my favorite ways to draw is by using a drawing easel, which develops the skill of drawing on a vertical surface. The H frame easel is an excellent vertical way to add variety to the style and type of marks you create when using a drawing board.
To see all of my most up-to-date recommendations, check out this resource I made for you.