Eyes are often seen as the windows into the human soul. Throughout history, artists have wanted to represent and embody human emotions through drawing and painting eyes and portraits.
The most primal civilizations have represented the human body and its features in various symbolic forms. Now contemporary artists still explore innovative techniques to draw the beauty and mystery of the human eye.
In this post, I will outline various techniques you can use to draw an eye. Beginning with conventional methods of drawing and progressing onto explaining the many multiple techniques employed by various artists to depict this fascinating subject.
Realistic Eye Drawings
Creating a realistic drawing of an eye is a technique that will enable you to break down the eye's form to its basic parts.
- This way of drawing the eye is best begun with a faintly drawn line. Draw the eye from direct observation using a mirror or drawing a model.
- To draw the eye, start by drawing its circular outline shape. Establish where the center point is and draw the iris and pupil.
- Once the basic underlying shapes of the eye have been set, you can begin by adding detail to the areas you need to focus upon.
- At this stage, it would be good to look at some examples of analytical drawings of eyes.
- Focus upon drawing the sections of the eye where you can apply tonal shade. The eyeball is a spherical 3-dimensional form.
- Apply tonal shading to the edges of the way to render the illusion of its 3-dimensional structure.
Please look at this drawing and sketching video course I have created. Use this link.
Tonal Drawings of the Eye
Now that the form of the eye is established, progress onto drawing the iris.
- This is a focal area, so observe carefully and try the use a suitable shading technique that conveys the details and complexity of this area of this eye.
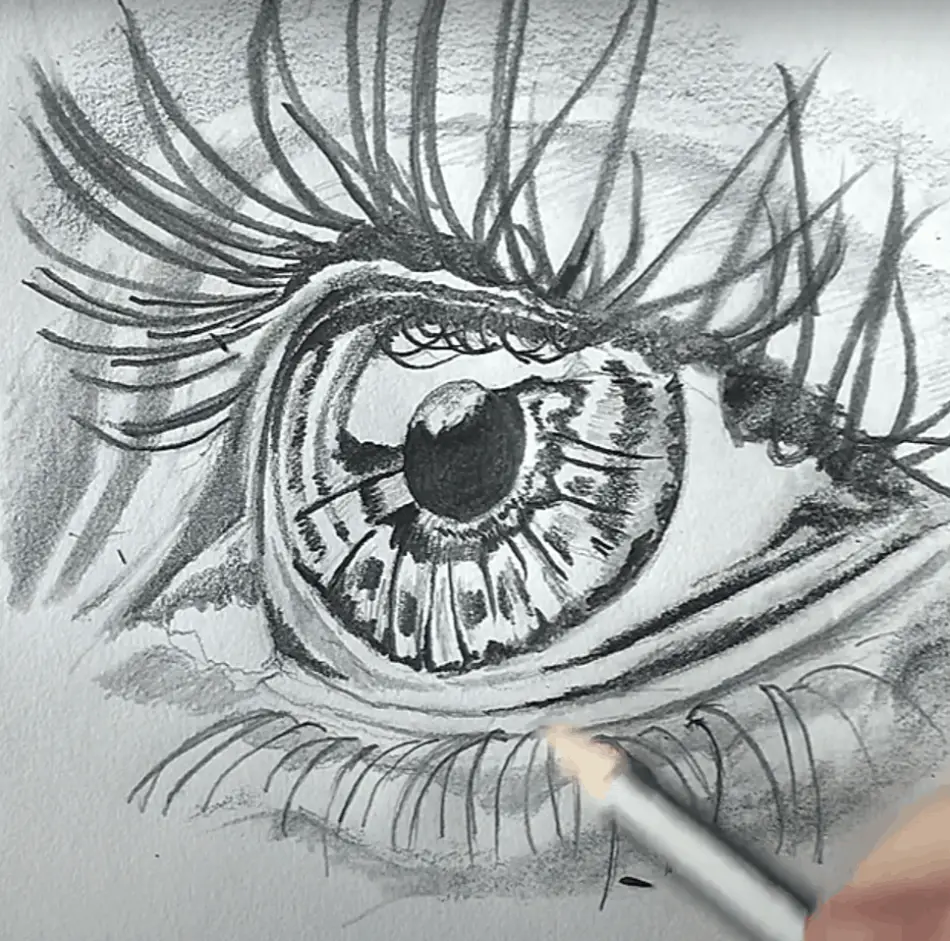
Use Color Pencil to Draw the Eye
To begin this drawing using the same technique of faintly sketching out the underlying shapes of the eye.
- Your aim now is to build up layers of color pencils. Again, I suggest with the shadows on the eyelid and eyeball.
- Don't use black to create shadows, but instead build up layers of darker colors of shade. This will give your drawing a greater sense of depth. Whereas black shadows will make your picture seem flat.
- Progress on to applying color to the pupil and iris, building up details, reflections and highlights.
- Finally, focus on aspects of your drawing where you can add fine details. Eyelashes are an excellent example of where this can be achieved.
- Draw the curving form of the eyebrows. Achieving this will add a level of realistic detail, which will create a more finished drawing.
- Finally, apply shadows around the form of the eye.
Create a Line Drawing of an Eye
To produce a line drawing of the eye concentrate on the quality of the line you are drawing with.
- The strength of the line you draw with is dependent on how well you control and hold the pencil.
- Focus on establishing the underlying form of the eye with a faint pencil line.
- Once you have drawn this outline, progress by applying the linear aspects, shapes, lines, and fine details. Again this will be added to the main features and forms.
Draw the Eye with Pen and Water
- Pen and water as a drawing technique will enable you to focus on the type of gestural effects that can be achieved when drawing with different materials.
- Pen and water is a spontaneous technique that will add the element of chance into your drawings.
- First, establish the underlying form of the eye with a pen.
- Draw simple shapes to illustrate where the main outline of the eye.
- Using a water-soluble pen, draw with a sketching line to map out the main features.
- Next, progress onto applying water spontaneously with a fine brush.
- Apply water quickly and with an appropriate level of control to create these chance effects.
Other Posts You Might Enjoy:
- Drawing vs. Sketch Paper: What's the Difference?
- How To Add Color To A Graphite Drawing: The Complete Guide
- Camera Lucida App: A Guide To Improving Your Drawing
- The Best Online Drawing Courses that are Actually Worth the Money
- What Stuff Do You Need For An Art Studio? The Essentials
Mixed Media Collage of an Eye
Creating a mixed media collage can introduce a level of surface quality, which a sheet of white cartridge paper will not achieve.
- The first step here is to find different surfaces from a variety of sources.
- Old patterned wallpaper, newspapers and magazines, flyers, and tissue paper can be a great way to find different surfaces on which you can draw.
- Once you have collected a good range of resources, you can commence working.
- Creating a contrast between torn and cut edges is an effective way to create visually exciting surfaces.
- Papers can then be pasted onto the surface with a glue stick or brush.
- Emulsion or gesso can then be painted onto the paper to create a neutral surface onto which you can begin drawing.
- Some artists take this method a stage further by tearing back into the paper's surface to create more texture.
- This is a highly effective technique to use with tonal shaded drawings with a soft pencil or graphite sticks. As seen in the pictures of the artists Ian Murphy.
Drawing the Eye with Ink and Water
This drawing method is similar to a pen and water technique that was mentioned earlier in this post. With one main difference is the application of wet on wet, will have the potential to create some visually exciting bleeding and dripping effects.
- As with earlier techniques mentioned in this post, if you lack confidence with your drawing method, it is advisable to draw the eye's underlying form with a faintly drawn line.
- Apply and brushing water sparingly onto the outline of your drawing, the focus should be on the areas where you want to create a darker effect.
- A dry brush can then be applied to lift liquid off the surface of your drawing, where you wish to create highlights and lighter patches of contrast.
- This method will introduce the element of chance, which can result in some interesting visual effects.
Draw a Cubist Eye
This drawing style will allow you to interpret the human eye's subject in an entirely different way.
- The Cubist method of viewing an object from several viewpoints and integrating them into one image.
- An excellent place to begin if you are unfamiliar with the Cubist style is to look at some examples of a Cubist portrait, especially by Picasso.
- With this drawing method, you can work directly from observation as you draw and interpret the eye. Focus upon the application of straight linear lines as opposed to a curved naturalistic response.
- You can build up and draw the larger shapes first and progress onto drawing more exceptional detail as you proceed with your drawing.
- It also may be a good idea, to begin with, a few warm-up sketches to develop your understanding of this drawing method.
Create a Photomontage of an Eye
Photographic montages are a technique that multiple artists have explored. Appropriating the method to investigate the specific idea of viewpoints.
Like the Cubist notion and concept of a multi-viewpoint perspective, the photo montage can show many different views in one piece of work. There are some alternatives you can consider when creating a photo montage.
- Firstly, you can create your own digital images and then manually cut, arrange and paste them onto a mounting board or piece of paper.
- Alternately, you can work in a purely digital fashion and copy, clone, and paste the same image until you create the desired effect with the pictures you are trying to develop.
- The third alternative, and probably the most satisfying artistically, is to work manually with found images from magazines or photographs. A good trick here is to photocopy them. First, this will allow you to arrange and cut and paste without destroying the original images.
This is a new technique that has been explored by many artists, notably the British artist David Hockney.
Felt Tip Pen
Felt tip pen is a straightforward and immediate way to create expressive line drawings of the human eye. When producing a picture in this manner, it is essential that you draw with confidence and not be afraid to make mistakes.
- In a drawing of this type of mistakes are to be encouraged. As they form a unique part of this drawing the eye.
- Try holding and controlling the pen in different positions, as this will enable you to create a variety of marks with the pen.
- Again, as with other drawing techniques mentioned earlier in this post, it would be useful to develop some warm-up sketches, these drawings often look better than the final pictures that you will produce using this method.
Felt tip pen and water
Felt tip pen is water-soluble, which means water can be added to it, creating such useful results. And it is suitable to begin worked on creating some effective results when drawing.
Bleach on ink
This is a new technique if you are looking to develop alternative visual effects with your drawing. This is a great way the create a picture using a variety of marks.
- Firstly, you will need to prepare the paper by painting quink ink onto the paper's surface. You can allow this to dry by itself. You use a dryer to expedite up the process.
- Once the paper is dry, begin drawing onto the paper using different lengths of cocktail sticks dipped into bleach. This will absorb the bleach and allow you to draw onto the paper.
- Focus on producing a diversity of strokes and outlines, which will result in a fabulous way to draw.
Watercolor Techniques
You may be saying to yourself that painting is not drawing. However, you can draw with a paintbrush.
- My suggestion here to illustrate and establish the outline of the form of the eye with a light watercolor wash. A light blue or green is ideal.
- However, if you wish to omit color altogether, use a grey wash to draw with. The basic rule with watercolor is to work with confidence and let the water do the work. Do be too picky and move the liquid around too much.
- If you lack confidence with a paintbrush, the rule is to continuously practice the technique until you get used to drawing with the brush.
Tea Paper Staining and Drawing
Staining the paper's exterior can produce a picture of a subtle quality that a blank sheet of cartridge paper will never achieve.
- This particular technique is an excellent way to create an inspiring sketchbook of different drawing methods.
- With this process, you will need to prepare and dry the paper before you can begin drawing.
- Once the paper is ready, you can start drawing the eye with any of the following media.
- Pen and Biro, pencil to add tone or ink with a brush are all exciting ways to draw the eye.
Stencil Printing
Stencil printing is a specialist process for creating a specific effect with cut paper stencils.
- To generate a stencil of an eye, draw the eye in pencil onto a good quality grade paper.
- Once the drawing is complete, find a craft knife and a cutting mate to protect the surface underneath where you are working.
- Select areas that will help the edge of the eye stand out or a focal point. Progress onto cutting out areas where you want to apply ink.
- Before you begin the printing process, make sure you have some ink prepared on a disposable paper plate with a small sponge.
- Disperse out the ink and apply the sponge to lift the ink.
- Pressing the stencil still administer the ink with the sponge onto your stencil. When sufficient ink has been applied to include the whole stencil delicately peel away, make sure you don't smudge the image's surface.
- Allow the ink to dry or use a dryer to speed up the process.
Drawing with a Cocktail Stick
The first thing you need to the source different lengths of a cocktail stick or a skewer.
- Drawing with a variety of various tools will allow you to create a whole array of marks when working.
- So be experimental and try to draw the eye with a cocktail stick.
Drawing with Pipette or Pipet
- A pipet is a fundamental scientific tool that lifts liquid using suction to redistribute the fluid onto the paper. This is ideal for drawing with ink.
- This technique will help you create a highly preliminary drawing of an eye with a quality of line that can not be achieved with a pencil.
Continuous Line Drawing
The last few tips on this post will detail what I believe to be more experimental approaches to a picture, which will create the impression of the eye but will not result in a photo-realistic image.
- This is primarily an observational drawing technique seeking to develop a more exploratory response when drawing.
- A continuous line drawing is created when somebody draws the subject while continuously scanning and not taking the pencil off the paper.
- The end result will be a drawing that has an unusual character and a liberated sense of line.
Drawing on White on Black Paper
To complete this drawing, you will need some good quality black paper and a white colored pencil.
- The picture can be achieved on a small scale for a sketchbook study or on a larger A4 or A3 drawing.
- Use the color pencil to lightly sketch the eye's form, making sure that you draw faintly.
- Try to outline with confidence while observing the eye directly.
- Once the main structure has been achieved, begin to draw with more detail and apply tonal contrast, by shading with a graduated white.
- The darker tones will be represented with a more solid white, which can be calibrated to a lighter shadow in the illuminated areas.
Pop Art Eye Drawing
This is drawing of an eye the is primarily an interpretative response. The subject of the eye should be sketched in the usual way, including all of the main features.
- Begin by faintly and lightly drawing the pupil, iris, eyelid, and eyelashes and included at the opening stages of the drawing.
- Looking at examples of Pop Art eye would be an excellent way to start, the most prominent example being by the Roy Lichenstein painting.
- Using a marker and colors is a good way the add bold outlines, and pixels are an excellent way to render the Pop Art style in your drawings.
- This style and way of illustration is a favorite and quirky way the finish our 20 ways to draw and render the human eye.
Create Art With My Favourite Drawing Resources
General Drawing Courses. I like Udemy if you want to develop your knowledge of drawing techniques. Udemy is an excellent choice due to its wide range of creative courses and excellent refund policy. They often have monthly discounts for new customers, which you can check here. Use my link.
Sketching and Collage. Take a look at this sketching resource I have created. Use this link.
Proko. Is one of my favorite teachers who surpasses in the teaching of Anatomy and Figure drawing. Prokos course breaks down the drawing of the human body into easy-to-follow components aiding the beginner to make rapid progress. For this, I really like Proko.
Art Easels. One of my favorite ways to draw is by using a drawing easel, which develops the skill of drawing on a vertical surface. The H frame easel is an excellent vertical way to add variety to the style and type of marks you create when using a drawing board.
To see all of my most up-to-date recommendations, check out this resource I made for you.