Do you want to learn how to draw shadows on buildings? If you want to draw buildings realistically, then learning how to draw shadows is a must.
Drawing shadows on buildings are different than what you'll experience when you're rendering shadows on natural forms. You need to start out slowly when you first start to draw buildings. Drawing an entire cityscape might be a lot of fun, but it's also going to frustrate you since it's probably going to be quite a bit above your skill level. The last thing that you want is to become frustrated when you're undertaking a new artistic challenge. When you get frustrated, you may give up, which would be too bad because drawing buildings can be advantageous.
How To Draw Simple Shadows On Buildings
Learning how to draw shadows on buildings is very different from drawing shadows on organic shapes with round, soft edges. Buildings have straight edges that often make shadows stop abruptly instead of slowly changing in value. This causes shadows on buildings to look different than they do on natural subjects, which can be challenging for some artists to come to terms with. For example, if you are a portrait artist, you probably have spent a great deal of time learning how to subtly change from dark to light when rendering shadows. So, when it comes time to render shadows on buildings, and many of those same subtle gradients aren't present, it can be difficult for an artist to figure out how to proceed.
Now for the good news, drawing simple shadows on buildings doesn't have to be that difficult of a process for you. All you need to do is determine your light source, look at the building's geometry, and then add shadows accordingly. When the light source is higher above, you're going to have cast shadows that are shorter while also stopping more abruptly. When the light source comes from a lower angle, you'll have longer cast shadows and a more gradual transformation of dark to light.
You also need to remember that the building's structure is going to affect how the shadows look. Most buildings are roughly rectangular in shape, so that's a good starting point. Spend some time setting up boxes then putting light sources at different angles around them.
Sketch these simple examples so that you'll develop a better understanding of how to draw simple shadows on these types of shapes. Once you're comfortable working with these simpler shapes, start to pay attention to doors, windows, ledges, and other features on buildings so you can see how they affect shadows. By starting with simpler forms, then working toward more complex ones, you can master rendering shadows on buildings without feeling overwhelmed in the process.
Determining A Light Source When Drawing Shadows On A Building
Do you want to learn how to draw shadows on buildings in a realistic manner? The number one most important thing that you need to do is learn how to understand how the light source affects a building's shadows. When rendering shadows identifying the light source is vital. Without understanding where the light is coming from, you won't be able to add convincing-looking shadows. Now, if you're drawing a building or buildings from a photo or you are drawing on location in front of them, then you have the light source already determined for you. You can try to change it, but trying to mentally visualize light and shadows on anything is challenging for even the most experienced artists.
One option that you could try assuming that you aren't averse to using technology to your advantage is to use a 3D modeling program to assist you in your work. There are several 3D programs that you can use, and there are even a lot of free ones. Then, you just upload a model, of which there are many free ones available online, and you're set. Now you can set up lighting however you want it, and you can set up the camera angle wherever you want it, which gives you complete control over your composition. After rendering the scene, you have a great reference image that you can use to draw from. While this approach isn't as good as using a photo of an entire building or drawing on location, it's pretty close, and it's far more convenient.
Related Posts:
- How to Shade a City Street in Perspective
- Guide On How To Draw A City Street
- The Principles Of Composition And Design
- How To Draw Shadows On The Face
- Best Online Drawing Courses
How To Draw A Cast Shadow From A Building
Drawing a shadow cast from a building is a lot like drawing a shadow cast by anything else, with some key differences. The main difference is that the shadows cast from a building usually have sharper edges since buildings are square.
Shadows cast from buildings are usually darker near the building's base, then toward the end of the shadow, they tend to lighten up. The change in value will be much more dramatic with building shadows in most cases since buildings have sharp edges. Despite the more dramatic change in value with cast shadows from buildings, there will still be a perimeter around the softer shadow. This effect can be achieved relatively quickly once you learn how to blend properly.
The most important part of drawing cast shadows from the building is getting their angle right. Cast shadows from buildings have to be drawn with proper perspective. If they aren't, then your drawing will fail to come across as realistic. To achieve this, work with reference photos and draw out your perspective lines. This step may add more time to the process, but it also ensures more accurate shadows.
How To Draw The Perimeter Of A Cast Shadow On The Ground
When drawing cast shadows on buildings having them at the right angle and having them rendered correctly is the key to having a realistic-looking scene. One part of a cast shadow that many artists struggle with is what to do with the cast shadow's perimeter on the ground.
Buildings cast shadows that are usually much more defined than shadows casts from smaller, less angled forms. But that doesn't mean that there's a harsh edge where the shadow ends, and the light begins. There is an edge, but instead of the edge switching from dark to light, it slowly transitions, shifting in value from dark to light. The shift is reasonably abrupt, but there are definitely value changes that happen gradually at the edges of a cast shadow.
Shading The Perimeter Of A Cast Shadow
How do you achieve the subtle changes in value as a cast shadow disappears once the light begins to hit the area around it? This can be tricky, but once you understand the process, it should get quite a bit easier for you. First, you need to lay down a base color for the ground.
No matter what medium you are working in, you don't want to have the ground be plain white. It won't look right, and working on rendering a shadow, then having to do the ground around it will make things far more complicated than they have to be. So, start out by creating a nice, even, fairly light value for the ground. This will be the base that you work on when you are rendering the cast shadows.
Once you have a base to work on, take a look at your reference and figure out where you will put the cast shadows. Next, start out by lightly sketching on top of the base value you created to indicate where the shadow's perimeter will be. After you have the basic outline, you can go ahead and start to render it. It's usually best to work from light to dark. Why is that?
That's simple, it's much easier to add more pigment to create a darker value than it is to remove pigment. It's not impossible when you're working with graphite or charcoal, but it is more complicated. The easiest way to render a shadow is to create an even base value of the shadow's lightest part.
Simply put, you will fill in a shadow with a value that's a bit darker than the ground. After you do this, you can start to add darker values. Always remember that the darkest values in a cast shadow will be directly next to the object blocking the light and creating the shadow.
The trickiest part of rendering a cast shadow is the perimeter of the shadow. This is an area where the darkness of the shadow quickly turns into a light area. When working with graphite or charcoal, this is where having a base value for the rest of the ground comes into play. Instead of adding additional graphite or charcoal to the edges of the shadow, you can use your finger or a blending stump to pull some of the pigment from the shadow outward. By blending this with the base value you created earlier, you can easily create the cast shadow's fuzzy edges.
Drawing And Shading Shadows In Perspective
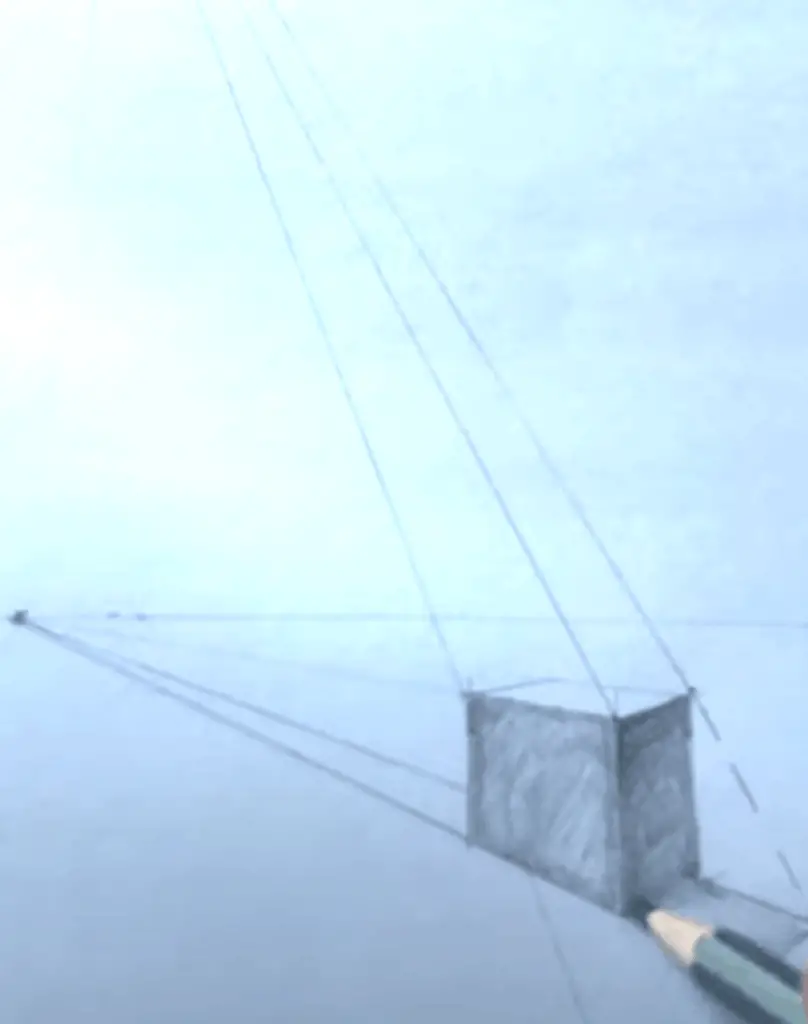
Drawing and shading shadows from buildings in perspective can be very challenging, so if it's something that you struggle with, try not to get too discouraged. If you want to draw shadows using the proper perspective, you'll need to use perspective lines. The truth is that most artists hate drawing perspective lines. The thing is, though, they work. They are time-consuming, boring to draw, but they are the best way to maintain a proper drawing perspective. How do you draw perspective lines?
First, you need to establish the horizon line in your drawing. This is relatively simple to do when you are working with a photo for reference. Next, identify the vanishing point; this is the point, usually near the center of your composition, where the edges of buildings will angle off. When looking at a building facing you, you should see the building's standard shape, a rough rectangle.
But the sides of the building, which you can only see part of, will be distorted and angle toward the vanishing point. Use this process to sketch out perspective lines lightly using a hard graphite pencil, then you can start to sketch the buildings in your drawing. After you have a solid sketch in place, you can go ahead and render the drawing, then it's time to deal with shadows.
Make sure that you pay attention to the angles of the cast shadows. Nothing will make a drawing of a building look more off than having cast shadows that are not at the right angle. The cast shadows' length and angle are going to depend upon the location of the light source. You have to take all of this into account when you are rendering shadows. In terms of core shadows, perspective isn't an issue; just make sure that you cover a full range of values.
How Distance Affects Shadows When Shading
What does distance do when you're drawing shadows? Well, what does distance do to anything that you're drawing? It causes some of the details to fade, giving you a more clear looking image. If you want to understand how to draw shadows on buildings that are farther away from you, spend some time looking at buildings at a distance. Look at different buildings at different times of the day and at varying distances.
If you want to keep a visual record, then pull out your smartphone and snap some pictures. As an artist, observation is the most powerful tool that you have when you want to create a realistic-looking drawing, so use that tool. Observe your subject, study it, then you can understand how distance plays a crucial role in how shadows look.
One important thing to remember is that cast shadows on the ground will usually not be seen when you draw buildings from a distance. If you are drawing your scene from above, you'll see cast shadows on the ground, but you won't see them if you are drawing from ground level. Does that mean you would never draw cast shadows when drawing buildings from the ground? No, because buildings cast shadows on fences, other buildings, and anything else around them. Don't forget that distance also blurs cast shadows, so if you're drawing buildings that are off in the distance, make sure that you render simpler shadows for them.
Adding Color To A Shadow
Adding colors to shadows can be one of the most challenging things that you attempt to do, but if you work in color, then it's something that you'll need to master. Many artists, especially inexperienced ones, will see a shadow and immediately mix in black, grey, or brown to create a darker area. Will this work? Yes. Is it going to leave you with a picture that looks flat? In all likelihood, it will. What can you do to create dark shadows without merely putting a solid block of black or brown onto your drawing or painting? You should use complementary colors.
What are the complementary colors? Complementary colors are colors that are opposite one another on the color wheel. When used next to each other, they create a unique and dynamic visual effect that is appealing and eye-catching.
Examples of complementary colors are red and green, blue and orange, and yellow and purple. While using complementary colors next to one another helps the colors pop in a drawing or painting, mixing them together does the opposite. When you mix complementary colors together, you get brown. The amount of each color in the mix determines the tint of the brown. For example, if you add more red than green with red and green, the brown you mix will have a red tint.
If you're painting, then mixing complementary colors to create different brown shades is relatively simple.
You can then add some dark blue, purple, or a little black to darken up the shadow's brown. What happens when you're working with colored pencils instead of paint? Then you simply layer the colors and mix them on the paper. Getting colored pencils to mix by using mineral spirits or simply applying pressure and blending them works. But, if you want a more engaging, textured look, then try layering them instead. Put down a layer of one color, then put down its complementary color on top. You can do this multiple times, giving you the ability to create deep, dark shadows.
What Are The Two Types Of Shadows Called?
When you want to learn how to draw shadows on buildings, you will need to learn about the two types of shadows in everything you see in the world around you. Those shadows are called core shadows and cast shadows. Each has its place in your drawing, and you need to have both of them in a drawing to create an illusion of a three-dimensional image. So, what is the difference between a core shadow and a cast shadow?
Core shadows are shadows that appear on an object. Core shadows appear on any part of an object that is not in full light. Core shadows do not have to be completely dark; they have variations in value, just like any other shadow type.
The parts of an object that are entirely obstructed from the light will have the darkest values. When working in graphite or charcoal, you'll want to use a lot of pigment in these areas to create the darkest shadows possible. Without the darkest values in a picture, the picture will end up looking flat. After rendering in the darkest values, pay attention to the graduation as the darkest values transform into mid-tones, and then highlights. You'll need to be able to convincingly render all three of these values if you want to create a realistic drawing of a building.
What are cast shadows? Cast shadows are shadows that are cast behind an object opposite of the light source. Cast shadows can appear on the ground, walls, and any other area behind an object and away from the light source. Cast shadows will always be darkest at their base, where the light source is most heavily obstructed by the object in the picture. Then the shadows will gradually get lighter until they are in the picture where there is full light.
Core And Cast Shadows
When you draw anything that has a strong light source, you need to ensure that you have both core and cast shadows represented in it. If you don't have both types of shadows, you won't have an image that looks realistic.
When you're drawing something, you are trying to represent a three-dimensional object in two- dimensional space. How do you do that? By using shading. How do you create realistic shading? You do it by observing your subject, ensuring that you have the core and cast shadows, and having a full range of values.
Is it going to take time for you to master rendering core and cast shadows?
Absolutely, but then again, everything that you've learned about art so far has taken time, hasn't it? Rendering shadows can become second nature to you once you get used to it, but it's going to take time and practice to get there. You'll need to do two things if you want to become great at creating core and cast shadows when drawing buildings. First, you need to observe them. That means looking at pictures, walking around and looking at buildings, using 3D models, and even setting up simple boxes with lights. Second, you need to practice. That's all there is to it.
How To Draw A Shadow On An Object
When drawing shadow on anything, what is the first thing that you have to do? You have to determine the light source. If you're drawing on-site or from a photo, then you have the benefit of having a reference to work from. That will already show you where the light is coming from.
To be honest, when drawing something as complex as a building, you should be using some type of reference. Very few people can simply close their eyes and imagine what a building will look like and then draw it, but if you're one of those people, then good for you. But for the rest of us, reference when drawing buildings and their shadows is a must.
Assuming that you're working with a reference of some kind, the first step in drawing shadows is completing a sketch of the building.
Working on a drawing without a sketch is very challenging, and it's even more challenging when you're working on something that requires as much precision as a building does. You might be able to get away without a preliminary sketch if you work in a more abstract style, but if you work in a realistic style, a sketch is a virtual necessity. When drawing a building, you should always do a sketch in as much detail as possible. Make sure that you work lightly so that you can erase as needed. You should also use a ruler, so you don't end up with a building that has wavy or crooked walls.
What does all of that have to do with drawing shadows? Well, before you start to render in shadows on anything, you should always have the base drawing finished. The reason for this is simple when you render shadows, you are going to be applying a lot of pigment. That means a lot of charcoal, graphite, ink, or whatever else you prefer to work in. When you do this, you're set in your course of action. You can't go back and erase, so you need to be sure that what you're doing will work. That's why shadows should be rendered after you have your drawing finished.
When you start to render in shadows, make sure that you pay attention to the shadow's different values. Not all shadows are extremely dark. When you're drawing buildings, you should have shadows that cover a wide range of values. You also need to pay attention to the architecture of the building. The building's basic shape is a cube, but every building has additional features, and these features affect the way that shadows are cast on it. All of the little ledges, roof tiles, antennas, satellite dishes, and air vents on a building will affect both core and cast shadows. These little details may not seem like much, but it's precisely what sets apart an average drawing from a great one.