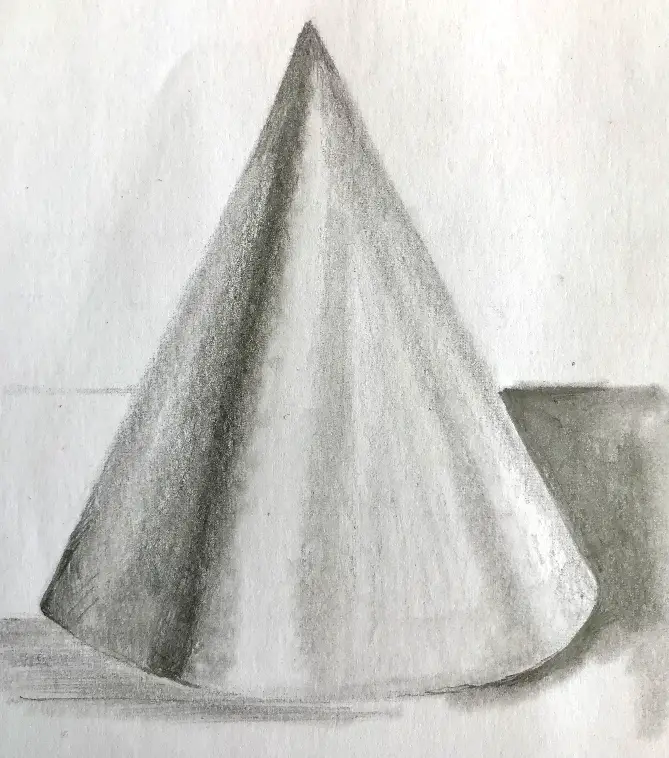
Rendering is the artist's way of representing a structure or an object. It includes shading and adding some lighting effects to imitate shadow, refraction, and reflection. The aim is to enhance the quality of the drawing by improving its appearance and make it more visually pleasing.
What Are Pencil Drawing Materials?
Graphite: This pencil comes in various grades, such as soft black, hard, hard black, and firm. It gives users dark and soft marks when drawing or provides more rigid and precise lines.
Ballpoint pen: Produces a clean and concise line for a smoother drawing or shading experience. It is the most accessible tool for many artists, and if one is in a hurry to render any subject, this is always within reach.
Prismacolor: It comes in various colors that create softer and delicate drawings.
Watercolor: A highly versatile medium that applies in wood, fabrics, paper, or canvas.
CHARCOAL PENCIL – Not just great for drawing, but also for smudging with its dark and rich tones. Also, more suitable for fine details, and if you like a darker shade, this is the tool to pick.
Oil painting: Another versatile medium that is flexible and dries slowly, making it the selected tool by artists as they can work with it for hours without drying.
Willow charcoal: This medium is a softer and more brittle form of charcoal used for sketching, also because of their easy erasability.
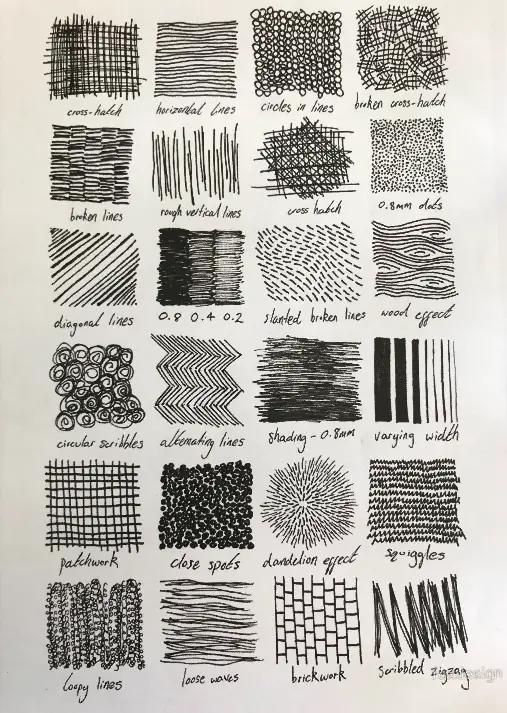
The different rendering techniques in pencil include HATCHING, SMOOTH BLENDING, SCRIBBLING, and STIPPLING. But one can use other mediums besides pencil.
Hatching
It is by using evenly spaced parallel lines using only one direction. The space should tighten as you finish the pattern. It will add color to your subject while providing it with a light and dark quality. Using hatching in one area of your drawing will make it appear darker or have shadows, while other areas are highlights.
Other Forms of Hatching:
Contour hatching: Instead of using parallel lines, the hatch follows the contour of the subject. It helps in enhancing the volume and three-dimensional effect of your drawing while giving it more value.
Crosshatching: This is the style where an artist lays down another hatch mark on top of the original hatch mark. It will help darken and change the density of the hatchings. This method creates a richer appearance and is applied as a straight line. Or following the contour or shape of the subject.
Fine crosshatching: This method uses several layers of crosshatch marks rather than an initial layer and another hatching on top of it. More value and tone are added to the subject as a fine-line pen, or a darker pencil is used as a tool.
Woven hatching: This is a method of placing parallel marks combined with short sets of parallel marks in another direction. The added hatching will be in a perpendicular direction to provide a woven appearance or a basket design.
Tick hatching: A method where short parallel strokes are used instead of long lines. It is also called ticks because of its brief appearance. This style will give density to the subject and is better with thicker pens or pencils.
Please look at this drawing and sketching video course I have created. Use this link.
Scribbling
Others thought that scribbling is a negative habit for an adult, but it is the best way to improve drawing skills for art enthusiasts.
Scribbling is another way of rendering where artists shade a drawing by using scribbles. It is used to create value and provides texture to the drawing. Scribbling is a fun method used by artists cause it is quick, and no specific direction is used.
It is composed of random and abstract lines, where the scribbles are used around the object outline several times. It is not carefully drawn, and there is the random formation of the subject.
An individual who wants to draw a design commonly uses circular scribbling to roughly represent a pattern or quickly fill in a drawing.
Stippling
It is for someone who has the patience to make countless tiny dots on paper, as stippling will require hundreds of dots to color an area. The dots will help make the subject appear darker, and when you want a lighter section, you can use fewer dots with spaces in between.
Stippling creates an impression of texture and gives the drawing shadows, and makes the object appear closer.
A beginner may use this method because odd dots will not ruin the artwork, and the accuracy is easy to control compared to making fine lines or many hatches. A fine point pen, colored pencil, paint, or just pencil is ideal.
Related Posts:
Some Suggestions When Stippling
Decide on the Size of the Image You Will Create
Making a few dots is easy, but using hundreds of them to create a figure or an object is exhausting. You must know what shape you want to draw and be ready to “complete the dots.”
Tools You Will Use. What medium are you using? Are you planning on making tiny dots or want medium-sized dots for your image? A smaller mark will create a more realistic image, and it is easy to find the tool you will need, such as a fine point pen, colored pencil, or graphite pencil. The paint may be paired with a paintbrush.
Decide Where to Begin. You must choose a starting point and use pencils if you make mistakes on the first try. You can cover it up with a fine point pen after and to make the sections appear darker.
Be Careful When Stippling. When you place dots and become tired at some point, you may carelessly place dashes instead of dots, which can ruin your project. Be careful with your pen, as it is impossible to erase after.
Add Detail. It is when you can already see the pattern you are making. You can darken the edges or add a few more dots to make the lines appear dramatic and help your drawing stand out.
Master Smooth Blending With Pencils
Another method used in shading is this technique, where lines are smoothened or rubbed to make an area of the subject or the media appear lighter or make the colors blend well to make it appear smooth. It is also called smudging and is selected by most artists to blend pencils, chalks, or charcoal.
Smooth blending helps softens the transition between colors or edges. They also call it smearing, blending, or smudging, and this is highly useful when an artist likes to give his art a more polished look.
Blending is a learned art cause a beginner will need to practice this technique to help achieve the desired results and must practice several times before applying this procedure accurately.
It is wise to practice blending techniques to know which tool you are more at ease using.
Here Are Common Tools Used When Shading
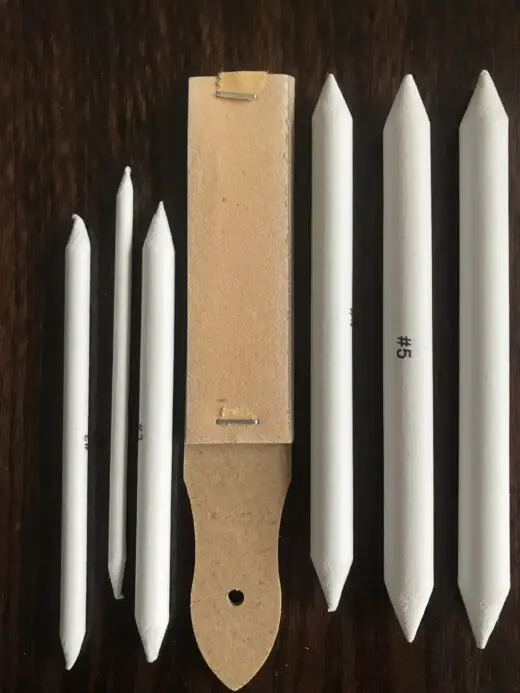
Torillions
Artists differ in their blending tool preferences, and there are a few tools they can choose. It is like a piece of paper rolled in a cone shape or a pen with a tip. You can even DIY tortillions if you like and make thin or thick-shaped tortillions affixed with tape.
Clean tortillions are likely used for lighter and subtle shading, while dirty or dark-tipped tortillions may blend out the darker areas.
Tortillions are available for purchase in the art supply store and available in many packs.
Blending Stumps
A blending stump is also available in any good painting supply store, and you can buy them in packs.
They made blending stumps of felt paper and have pointed ends. It differs from tortillions cause when the stumps become blunt, you can sharpen the tips, and unlike the tortillions, you can clean the tips with a kneaded eraser and remove the discoloration.
Fingers
There may be hundreds of materials available for purchase, but most artists, like to use their fingers when blending colors. However, if you are not used to utilizing fingers instead of other tools, make sure you practice blending pencil, charcoal, or pastels.
Graphite pencil may be harder to get used to as it is notorious for smudging on paper. Even if you use an eraser to remove the spot, the smudge will not budge.
Others place paper as protection against stains and fingerprints.
Chamois
It is easy to make your piece of blending tool with the use of chamois. You only have to buy a large piece ordinarily used to dry cars and then soak it in detergent soap and rinse it well with plain water before you cut it into small pieces. You can also cut the cloth according to your size preference.
Buying from an art supply store is also possible, and you need not soak and rinse it before using it. However, it is more expensive if you do.
Cotton Swab
Well, other art enthusiasts use this as a medium when blending and while they are shading. It is cheap and handy. It is best applied to smaller areas and is highly effective depending on the paper used. You must use caution, though, as it can stick or scratch the paper and leave it with indentation.
Art Brushes
The good thing about art brushes is the availability of various brush sizes. Get the sets that help you blend the colors and make delicate shadings.
Tissues/Paper-Towels
You can wrap the tissue over your finger and rub it on dark areas if you want to lighten the color. It is to clean some areas of the paper and pick up colors that are not supposed to be there.
Paper
A crumpled paper is not just another waste, but for smudging and blending drawing with mediums graphite pencil, pastel, or colored pencils. People who use paper for blending prefer using it since it is readily available and within arm’s reach.
Make-Up Brushes or Applications
There are various make-up brushes available that sometimes it is also functional for blending colors and pencil drawings. Some pieces have varying stiffness, and anyone who will use them for art requires a steady hand and skills.
What is Pencil Rendering?

Practice Rendering with Pencils
You can either use a pencil or a thin-lined pen instead of using charcoal while practicing. Charcoal is a flexible medium but accuracy, and precision is what you must aim for.
Do Not Go For Speed
You can learn better by being accurate and having discipline. It is not helpful to push yourself. It is where you need careful and thoughtful attention.
Learn and Contours
Practice with contours if you are not particular about it and haven’t done it before. Practice with everyday objects and find their contours in various directions.
Understanding Tonal Values
The theory of tonal values is crucial when you want to apply it in the everyday subject you will be drawing. When you draw, you also imagine the tonal values, and then you put them on paper.
Practice Shading
Theories about tonal values and contours are crucial, but you should learn to apply them in your work. You can practice with still-life drawings.
Keep on Learning
You will learn so much by studying traditional art and reading about art history. One can learn from the masters and the rich heritage. Do not stop reading and continue learning.
Pencil Drawing Techniques
HATCHING – One of the most basic pencil drawing techniques in drawing. It creates shading and comprises lines following one particular direction. The tool is angled close to the paper to make the strokes thick and minimize spaces and gaps.
Crosshatching: This drawing technique is for overlapping lines, and instead of following one parallel line, there are lines of various angles. This technique allows you to lighten lines and space by placing them further apart, and if a darker area is preferred, the lines should be closer.
Stippling: This is a drawing technique where several tiny dots create a more presentable and appealing object. The dots are closer together if a darker shade is favored, and they use lesser specks for a lighter area.
Blending and smooth blending: Another pencil drawing technique that artists regularly use is charcoal or pencil when drawing. They rub the medium to combine, merge and create a smooth blending of materials and colors.
Scumbling: A style that involves random and squiggly marks. It creates texture despite the looseness and haphazard application of pen or pencil. It is where little round loops, figure-eight shapes, circular squiggles created in layers, and tighter circles are utilized to create darker areas. Scumbling is perfect with the use of a pencil, pen, or ink.
How Do You Draw and Render Designs?
* You can start by forming your basic design using a light pen marker or a pencil.
* Make a quick sketch of the surrounding shape of your subject.
* When you have the first line, use a heavier line after to define the shape.
* Add the details for your subject and make sure that the shape and the appearance are correct.
* Use a thicker line to create depth and a 3D look to make your drawing stand out. Use thin lines to create lighter areas and highlights.
* Decide where is the light source and start placing shadows and colors. Remember to represent reflections.
* Introduce tonal shade to create the right shade and darker areas.
* Place shadows where they should be.
* Create the finishing touch and check the last details.
Key Tips When Rendering Images
* Rendering flat surfaces is not like rendering curved surfaces.
* You can use an even tone to a flat surface, while on a curved surface, you need to transition the color and tone from light to dark to provide a highlight image.
* Tone or color transition will depend on the material you are rendering.
* Soft transitions are more apt for materials with a matte surface, like concrete or wood.
* Hard transition is better for glossy finishes, like the polished material of the metal surface.
* To practice different rendering objects, use real-life materials instead of practicing using a photograph. It will help you observe the diverse lighting conditions, and drawing is better with it.
Rendering in Shadows in Pencil
In rendering, the focus is on the form and the visibility of the subject. Or the appearance of any given object. It deals with not just the visibility problems but on how they appear from an individual's viewpoint. Shading is to simulate the appearance of the material in a realistic manner.
Photorealism is essential in drawing, as it depends on the artist's ability to produce an object that is akin to how they resemble real life. It is in how an artist reproduces the subject like how it is in the real world.
Shading techniques are essential when rendering as it creates a natural object and is consistent with the real-world appearance. When you render, you must also learn to simulate the colors and apply them according to the angle, orientation of the surfaces, the light source in the scene, and how the object interacts with its surroundings.
Create Art With My Favourite Drawing Resources
General Drawing Courses. I like Udemy if you want to develop your knowledge of drawing techniques. Udemy is an excellent choice due to its wide range of creative courses and excellent refund policy. They often have monthly discounts for new customers, which you can check here. Use my link.
Sketching and Collage. Take a look at this sketching resource I have created. Use this link.
Proko. Is one of my favorite teachers who surpasses in the teaching of Anatomy and Figure drawing. Prokos course breaks down the drawing of the human body into easy-to-follow components aiding the beginner to make rapid progress. For this, I really like Proko.
Art Easels. One of my favorite ways to draw is by using a drawing easel, which develops the skill of drawing on a vertical surface. The H frame easel is an excellent vertical way to add variety to the style and type of marks you create when using a drawing board.
To see all of my most up-to-date recommendations, check out this resource I made for you.