Learning how to draw with perspective transforms you as an artist.
Mastering the art of spatial awareness while putting something down on paper or canvas is a game-changer. You're able to add depth and levity to your work with ease, transforming doodles into something spectacular – something tangible, something “heavy,” something real.
Of course, learning how to draw with perspective is anything but effortless.
Pratical Tips for Drawing with Perspective
Perspective is the cornerstone of drawing with any sense of realism, the better you get at drawing perspective, the better your artwork becomes. Incredibly valuable for those who want to draw architectural prints or designs, those that want photorealism to their work, and those looking to frame their work in the “real world”.
Once you can add perspective to your drawings, you turn a two-dimensional piece into something with three-dimensionality. Suddenly, that sketch feels like it belongs in our world, connecting your art to your audience in a way that would have been difficult to pull off successfully otherwise.
Below we will highlight a couple of practice tips you'll want to focus on when learning how to draw perspective.
As mentioned a moment ago, mastering linear perspective is a lot harder than it appears at first. But things get easier the more you work to incorporate our tips below.
Please look at this drawing and sketching video course I have created. Use this link.
How to Practice Drawing Perspective 101
Before practicing a perspective drawing, you need to realize what perspective is (at least as far as the art world is concerned).
Artists have long been taught about the fundamentals of perspective – a frame of reference that almost exclusively deals with linear perspective.
Linear perspective is nothing more than representing the world around us that we all see with our eyes in the “real world”. The idea of foreshortening in which the scale of different objects diminishes as distance increases (at least from the viewer's eyes or perspective).
Mastering the positioning of your “vanishing point” (the intersection of the ground meeting the sky in your work, the horizon line) is a massive piece of the puzzle. You want to zero in on other focus areas, but we dive into those a little later.
It may surprise you to learn that a focus on mastering linear perspective wasn't all that important for artists until the early 15th century.
Legendary Italian architect Flippo Brunelleschi started to play around with the idea of linear perspective, and his experimentations have laid down the foundation for this practice ever since.
Interestingly enough, this Italian architect started mastering linear perspective through paintings of Florentine buildings that he spied through a mirror. This allowed him to spot the horizon line quite easily, transitioning what he saw in the mirrored glass to the printed paper and changing art forever because of it.
Years and years later, a dedicated student and close friend named Leon Batista Alberti codified the linear perspective concept in a piece that he wrote. He crafted his theories based on his experience working with Brunelleschi and used mathematics from the ancient Greeks to teach others how to create drawings applying perspective.
Related Posts You May Want to Read:
- Is Perspective Difficult to Learn?
- How to Draw in 3D
- How to Draw a Street in Perspective
- How to Shade a City Street in Perspective
- The Best Digital Art Online Courses
How Do You Add Perspective to a Drawing?
Before adding perspective to a drawing, you're going to need to decide what form of perspective you'll begin with.
As stated earlier, the most common models of perspective artists work with are one-point, two-point, and three-point perspectives.
One point perspectives are usually the simplest to work with and the easiest for new artists to visualize.
Think of a deserted road in your hometown stretching off into the distance. All of the elements in that mental picture converge at a single point along the horizon line where things “disappear”. This is the one point perspective and one of the most powerful concepts in all of drawing.
Leonardo da Vinci preferred to draw with one-point perspective as a foundation. If it's good enough for da Vinci, the odds are pretty good that it's good enough for us as artists, too!
Two-point perspective adds a second “vanishing point” into the mix, usually with both horizons at opposing ends of the composition. Almost always left to right kind of arrangement. With both horizons far away on each piece as possible to add a lot of depth to work.
Three-point perspectives (sometimes referred to as multi-point perspectives) are a little bit different. Here multiple horizons in vanishing points are introduced, adding a lot of complexity to a piece but (when pulled off successfully) transforming a drawing into something spectacular.
It's not at all uncommon for three-point perspectives to have two different vanishing points on opposing sides of a piece (the far left and the far right) with another point either in the extreme foreground or extreme background.
You'll only ever be able to add perspective to your drawing after deciding what type of perspective you'll be working with.
Once you fix those vanishing points on your drawing, it's a whole lot easier to begin working with all the other elements in your composition concerning those horizons.
Practice Tips When Drawing with Perspective:
Learn the Elements of Perspective
One of the cornerstones of drawing the perspective you want to master ASAP is understanding the different perspective elements and how they play off one another.
In all perspective drawing (regardless of how many points you are working with), you'll need to include:
- True Shapes
- Vanishing Points
- Horizon Lines
No perspective drawing will be complete unless all three of these elements are included.
Accurate shapes are a core element of mastering this technique, finding a way to correctly render whatever you are looking to draw with their shape created without any distortion whatsoever.
This almost always means carefully drawing something with horizontal and vertical lines, finding ways to add this rigid structure into your perspective so that the viewer naturally identifies and recognizes each component regardless of its size in the composition.
Vanishing points are another core element, and ones you'll need to think about before you start to create your drawing.
This heavily influences each of the images you draw as they move away from the viewer, converging towards a singular point somewhere in your composition that frames everything else.
If you're going to be drawing two-point or multi-point perspectives, you'll need to preplan where each of these vanishing points will be located. On top of that, you'll (ideally) need to locate them in direct opposition of one another – or as close to it – to create proper perspective and spatial delineation between your composition elements.
A vanishing point can be drawn anywhere in your composition. The point that “frames” your viewer's eyeballs is always known as the horizon line. Please think of this as the eyeliner of your audience, working with it to clearly define a standard range of reference that everything else you are drawing moves away.
As long as you keep that horizon line centered and stable, you can play around with perspective in many different ways that would have been difficult to pull off otherwise.
Keep these core elements in mind as you plan out your drawing (and continue to reference them throughout your composition), and you'll find practicing perspective becomes a whole lot easier.
Begin Drawing Simple Forms in Perspective
One of the biggest challenges that artists struggle with when they begin tackling something as challenging as drawing with perspective is diving right into the deep end.
Avoid that as much as possible, particularly in the early stages.
Sure, you may be able to recognize perspective depth and spatial differences in intricate pieces you'd like to draw.
But if you try and practice with these overly complicated compositions you're going to find your time wasted, your efficiency tanks, and your actual ability to master these core fundamentals of drawing a lot more complicated than it should be.
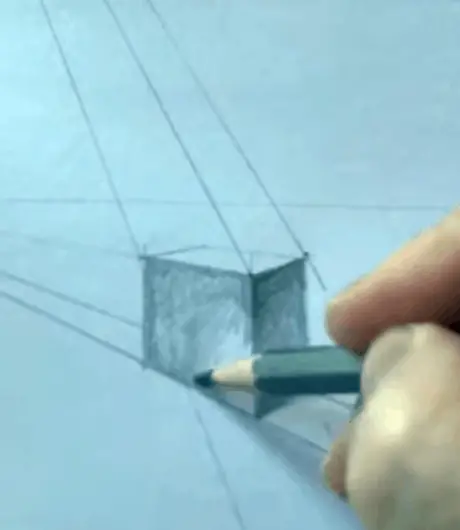
Instead, you'll want to start drawing simple forms (cubes, balls, cones, etc.) from different perspectives before you do anything else.
This approach to feeling rudimentary, mainly if you have been drawing for any amount of time already. But that's the point.
Drawing basic shapes brings you back to the basics, really forces you to hone in on the fundamentals of drawing with perspective, and handcuffs your creativity a little bit until you get the mechanics of perspective down pat.
We won't tell you that you will have a lot of fun drawing simple forms over and over from different perspectives. What we can tell you, though, is that nothing is going to accelerate your learning curve and help you master going with perspective faster than taking this approach.
Some artists find that drawing single point perspective repeatedly with simple shapes before moving on to two-point perspective or multi-point perspectives it advantageous.
Other people like a little more variety, drawing the same cube, ball, or cone in a variety of different perspectives all at once – playing with the framing and composition of their work to get these fundamentals down quickly.
It's up to you. But stick with simple shapes, simple subjects, and simple scenes when you're learning perspective, and your road to mastery accelerates significantly.
Horizon Lines
New artists regularly report confusion, learning the fundamentals of drawing horizon lines, usually because they think of the term as the “horizon” we see in nature.
And while the horizon line in a drawing can be the stretch of land where the sky meets the land (or water), that's not exactly what we mean 100% of the time. The faster that you can disconnect these two ideas, the better you're going to progress moving forward.
No, when your thinking about the horizon line in the world of drawing is a much better idea to think of it as your “eye level” more than anything else.
A great way to practice this approach is to draw an imaginary line across a favorite picture of yours, creating a horizon line in your mind. Change the positioning of that picture in front of you, imagining that you are walking up a hill. Glancing down at the subject, or moving your body (and your eye line) physically while still looking at the same scenery.
You'll notice that even though you will, your horizon line hasn't changed because the level of your head hasn't moved at all.
You'll also notice that everything “above” the horizon line will slope down towards that line while everything “below” that line slopes upwards towards it. This is how perspective is created, transforming how your art looks on the paper and giving it the 3D depth you are after.
You can practice “horizon lining” out and about as you live your life, too. Look at the world around you, recognize your horizon line, and then see how different elements in those “compositions” slope towards or away from that line.
It is a little bit more challenging to do outdoors where there aren't any hard, fixed, rigid shapes.
But if you find yourself downtown in a city somewhere, surrounded by architecture, or even planted in your living room, you should be able to find a horizon, recognize shapes, and then judge the angular nature of the different objects in your viewpoint awing concerning the horizon itself.
Practice this all the time, and mastering the drawing of a horizon line will become almost effortless.
Vanishing Points
The principles we've have covered when drawing with perspective a pretty simple and straightforward to practice.
Mastering vanishing points, on the other hand, is always going to take quite a bit longer.
For one thing, the “rules” of vanishing points depend entirely on the type of perspective that you are drawing in the first place.
Single point perspectives will have a single vanishing point, two-point perspectives will have two vanishing points, and multi-point perspectives will have at least three vanishing points – and sometimes a whole bunch more than that.
Worse, there are no real concrete principles that dictate precisely where vanishing points have to exist concerning your horizon line or any other elements in your drawings, either. This is more of a “gut feel” kind of thing you want to master as an artist, something that's only going to come with a bit of time, bit of effort, and a bit of practice.
Though, we can tell you that with a single point perspective, your natural inclination will be to center that vanishing point somewhere along your horizon line.
This will create straightforward framing, straightforward to understand depth and perspective, but a very simplistic composition and a drawing that feels sort of “flat”.
Fantastic for those practicing and just getting started drawing in perspective. You'll want to graduate from this centrally located single vanishing point along the horizon pretty quickly.
Instead, move that vanishing point along your horizon line with a single point perspective to develop more exciting compositions. This creates a more natural look, a more seamless look, and injects a lot more emotion and storytelling into a composition, too.
At the same time, you don't necessarily want to fiddle around with moving vanishing points to the extreme ends of your horizon line – particularly with single-point perspective.
When you start to push things over to one side or another, you create some extreme perspectives. That might be fantastic for hyper-realism or less than realistic drawings that come off as anything but natural.
But for anything that you want to resemble the real world, you want to move that needle closer to the center (though not dead center, of course).
Two-point perspectives and multi-point perspectives (usually) also have vanishing points somewhere along the horizon line. This isn't always the case – sometimes you want to go with more extreme vanishing points that are even outside of the drawing itself – but when you're just getting started and practicing, it's probably a good idea to keep things somewhat self-contained.
Draw with Straight Lines
Nothing adds perspective to a drawing faster than straight lines will.
The human eye is naturally drawn to straight lines, using them as subconscious reference points to see how whatever they are interpreting is set up in the world around us.
One of the most amazing things about drawing in perspective is the ability to “trick” our eyeballs and our mind that what we see on paper or canvas is no longer two-dimensional (as it is) but instead three-dimensional a lot more depth.
Straight lines contribute to this feeling more than anything else.
Drawing straight lines freehand is a bit more challenging than most people expect at first. Use a straight edge to sort of “train” your hand-eye coordination to draw straighter lines freehand whenever you have to.
Truth be told, though, you're going to want to lean on an artist's ruler as much as possible.
Speaking of an artist's ruler…
Use a Ruler
A lot of new artists think that most of their time is going to be spent drawing wavy, curvy, natural lines – but many are shocked to discover that a lot of their work incorporates straight, really accurate lines that can be difficult to create freehand (especially without a lot of practice).
This is why an artist's ruler is so essential.
For one, the straight edge that it provides makes carefully crafting straight lines effortlessly. You no longer have to rely entirely on a stiff wrist and a steady hand the way you would have had to with a more freehand approach.
All you have to do is run your pen or pencil along the straight edge of that ruler, and you'll get perfectly straight lines every single time.
On the other hand, you're also going to get incremental measurements that allow you to produce straight lines to scale more accurately.
You don't have to worry about messing up the scale of different elements in your perspective, and you don't have to worry about guessing the size of different elements, either.
Instead, you will be able to watch those little measurement marks on your ruler as you create your straight lines, stopping and starting at just the right spot to make sure that you stick to the scale of the drawing you are working.
This adds a lot of realism, consistency, and a lot of predictability to your drawing, which wouldn't have been there otherwise. All of that will add to the feeling of depth and perspective that you are adding to your artwork from here on out.
Learn to Draw Perspective Freehand
Drawing perspective freehand will be a challenge until you master the fundamentals that we mentioned earlier, really practicing everything that we have outlined above to cement these skills in your “artist toolbox”.
Soon enough, though, you should be able to dive headfirst into the world of drawing perspective with freehand.
This is all going to come down to tapping into your imagination and your creativity to better “see” different shapes and how they are distorted when you are crafting with different perspectives.
As we mentioned earlier, you will probably want to start off drawing freehand perspective pictures with simple shapes, simple compositions, and pretty straightforward perspective elements.
It's not a bad idea to begin with, something like a single cube or ball.
Put that object into space down on a piece of paper (in your mind's eye, anyway). Then play with the kind of perspective you want to create from that moment.
After you find your horizon and your vanishing points, freehand them down on a piece of paper.
Twist and turn that object in your mind until it fits the perspective you are working with, and then first draw the side of the object that you want to turn concerning those horizon and vanishing point elements.
From that singular space, you'll be able to flesh out the rest of your work then, working freehand to play with angles, to play with depth, and to cement different components into your composition.
Always work off of the horizon line and vanishing points when you are running freehand, though.
You won't benefit from using something like a straight edge or a ruler to add scale and depth as consistently as you might like. But your results will still be pretty solid as long as you keep those fundamental “anchor points” consistent throughout your freehand work.
Learn to Draw in Three-Point Perspective
The main thing to keep in mind when drawing three-point perspective is that you are going to have three individual vanishing points (two of which are situated somewhere along the horizon line) and then another vanishing point either at the extreme top of your drawing or the extreme bottom of your drawing – changing the way things look entirely.
It's also important to remember that the lines in your drawing will not act the same consistent way that they do with one or two-point perspectives.
Instead, they will always run towards one of the three individual vanishing points – receding towards them quite aggressively, depending on how things are situated along your horizon line – and you'll have to factor that in as you create the different shapes of your composition.
Everything (and we mean EVERYTHING) that you draw with a three-point perspective will be framed in some triangle.
Create Art With My Favourite Drawing Resources
General Drawing Courses. I like Udemy if you want to develop your knowledge of drawing techniques. Udemy is an excellent choice due to its wide range of creative courses and excellent refund policy. They often have monthly discounts for new customers, which you can check here. Use my link.
Sketching and Collage. Take a look at this sketching resource I have created. Use this link.
Proko. Is one of my favorite teachers who surpasses in the teaching of Anatomy and Figure drawing. Prokos course breaks down the drawing of the human body into easy-to-follow components aiding the beginner to make rapid progress. For this, I really like Proko.
Art Easels. One of my favorite ways to draw is by using a drawing easel, which develops the skill of drawing on a vertical surface. The H frame easel is an excellent vertical way to add variety to the style and type of marks you create when using a drawing board.
To see all of my most up-to-date recommendations, check out this resource I made for you.
References