Do you want to learn how to draw 3D? Drawing in three dimensions can be a tricky task, but with the right instructions, anyone can do it. In this blog post, we will outline the basics of drawing in three dimensions and give you some tips on how to improve your skills. So get out your pencils and paper, and let's get started!
When drawing, one method above others tends to cause problems—the drawing of 3-D shapes. The basic rules of perspective and drawing for 3-D shapes are drawing systems that many beginners tend to have difficulty perfecting.
How to draw three-dimensional shapes. Draw 3D shapes by applying the basic rules of linear perspective. Other drawing methods, such as isometric and technical orthographic drawing systems, can draw three-dimensional shapes. These principles can then be applied to more complex shapes.
How to Draw 3D Shapes
This post will describe several ways in which a beginner can progress from drawing simple basic shapes to drawing 3-D drawings in perspective.
What Equipment Do You Need
A few essential items of equipment are required to create a 3D drawing. Here is an essential list of what you will need to begin.
HB pencil. The basic HB pencil is the right choice for drawing basic guidelines when creating drawings in perspective. With the advantage of being able to create guidelines without the need for rubbing out and erasing.
B Grade Pencil. The softer dark outlet integral to the B grade pencil is suitable for drawing darker outlines in drawings that use perspective.
Drawing Board. Drawing boards are a useful item of equipment in that they will enable drawing on a surface at a slight angle, which makes the process of creating drawings and perspectives much more comfortable.
Clear Ruler. A basic clear plastic ruler will suffice when creating technical drawings. Ensure that the drawing is clean and that it will not create marks on the paper beneath it and smudge the pencil guidelines that were initially drawn.
Paperclips. A small but essential item of equipment will keep paper in place while drawing at any angle.
How to Draw 3D Drawings
Many people find drawing three-dimensional shapes difficult, so it is always advisable to practice his necessary drawing skills to become proficient in them. The drawing of basic shapes and forms will enable the drawing of more complex shapes with confidence. Most regular and irregular forms in the real world are all basic shapes and three-dimensional forms. Learning to draw these shapes and forms is, therefore, essential to make progress with drawing.
This begins with drawing of a Cube one point perspective.
Just like any other drawing technique, perspective requires regular to improve and become an expert.
How to Draw Basic 3D Shapes?
Before beginning drawing three-dimensional shapes, it is always a good idea to practice drawing basic shapes, using a piece of paper and a pencil to begin sketching basic shapes to achieve this. So what are the basic shapes?
The Cube. The first form I wish to explain is the solid cube. To begin drawing the cube, draw a square shape, ensuring each of the sites is of the same length. To the right side of the cube, draw three diagonal lines. Join each of the corners of the cube together using two lines. Create a three-dimensional view.
The second method I want to explain is the drawing of a transparent cube. Draw two square shapes, one of which is drawn on top of the first shape to create a three-dimensional cube, and join the corners together using a draw. Create a transparent cube.
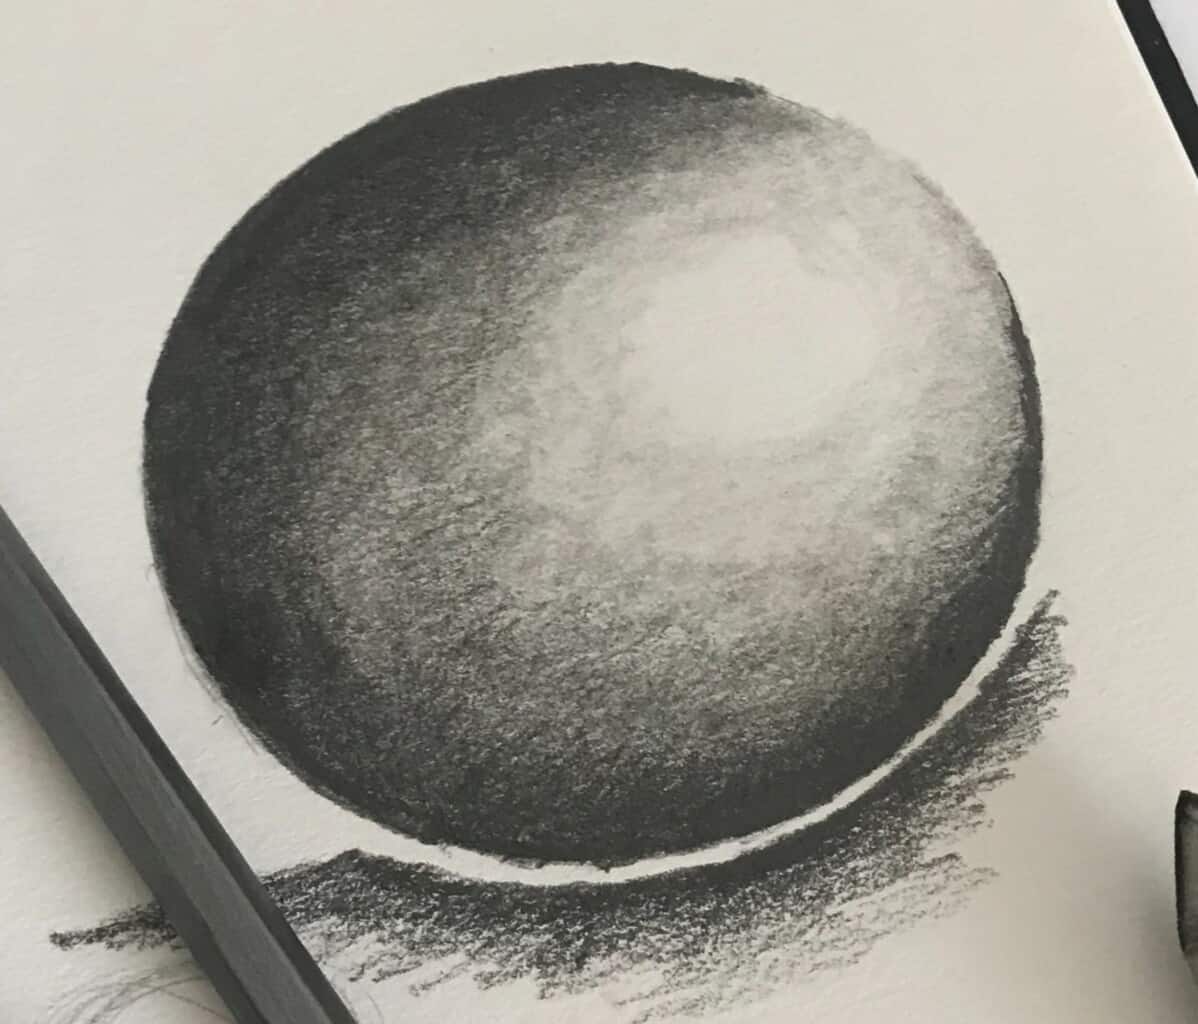
The Sphere. Begin drawing a simple three-dimensional sphere. Several approaches can be employed. The most straightforward approach is to draw around a circular object with a light pencil mark.
An alternative approach is to draw the sphere's outline shape to use a compass to draw a circle. Draw the cylinder's outline shape and find the center point.
Measure halfway down and draw a light point on each side of the circle. Next, draw elliptical curves from one point to the next. Drawing of the ellipse in the center of the circle will create a three-dimensional form onto which tone and value.
To give the drawing a sense of 3D shape, apply tone with a pencil, and separate the circle into three dark—mid-tonal zones.
The Cylinder. Another simple three-dimensional shape is a drawing of a Cylinder. To begin, draw an elliptical oval shape onto the paper. Next, using fake lines, draw two parallel lines down the page.
To draw the base of the cylinder, create a curved half oval shape. To add tone to this drawing, create three faint guidelines using a pencil. Begin to add dark areas of turning on the left side of the cylinder.
Gradually, apply tone from one side of the form to the other side. Remember to take the pressure off the pencil when applying value.
Rectangular Prism. A rectangular prism is similar to a cube. To begin drawing a red long rectangular shape. Draw three diagonal lines from each corner to make sure they are the same length and all at the same angle.
To finish ordering the rectangular prism, join the corners together for eight three-dimensional shapes.
The Prism. There are several different methods used to draw a prism. The simplest method is to draw an equilateral triangle onto a sheet of paper, ensuring that each line is of the same length.
Next, draw lines to the three corners on the left side of the triangle.
This method creates a simple three-dimensional shape that resembles a prism. The prism is a transparent shape, and to render its transparency in pencil, you can draw faint lines that represent the obscured edges of the form of the prism.
The Cone. The simplest method to draw a three-dimensional cone is first to draw a V shape. Turn the V shape around and then join both edges with a curved line. To give this drawing the appearance of a three-dimensional shape, draw the line at the bottom.
We have now drawn a cone. Add value and shading by splitting the shape into three sections. Faintly draw a line, which extends from the cone's apex to its base.
These sections will include three sections, dark, mid tonal, and light. Maternal and highlight applying these shadows and areas of value will give The form a sense of shape.
What Are 2D and 3D Shapes?
The properties of 2D shapes are complex. However, in the visual sense, 2D shapes appear flat and 3D shapes appear three-dimensional.
A list of the characteristics of 2D Shapes.
The Square. The square is a regular shape with the four corners and for regular length by which join together. To begin drawing a square, sketch minus right angles to each other, which needs to be in the corner.
To draw a basic square, begin drawing with faint white lines. Then measure the length of each of these lines either with a ruler or the pencil's side, ensuring that it creates a regular, accurate shape.
The Equilateral Triangle. Unlike the square shape, which has four corners, the equilateral triangle has three. Similar to the regular shaped square, this triangle has
The Circle. A circle drawing is probably the shape that most beginners find challenging to draw freehand. To form a circle, all you need is a pencil and a sheet of paper.
The simplest and easiest method I world recommend is to draw a continuous fluid line. Ensure that the draw from the arm and elbow will make the process of drawing a circle much more relaxed.
A circle can also be drawn more precisely using a standard compass or drawing around a circular object placed on the paper.
Alternatively, circles can be sketched freehand in pencil using smaller pencil marks that create a circle when drawn next to each other.
The Rectangle. The same methods used when Drawing a square can be adapted to draw a rectangle. It is basically a square with unequal sides.
Related Perspective Drawing Posts:
- Is Perspective Difficult?
- How to Draw a City Street in Perspective
- How to Shade a City Street in Perspective
How to Draw a 3D Drawing?
Creating three-dimensional drawings is never easy. When creating a successful 3-D drawing, the basic perspective principles will need to create a successful picture. To begin drawing a 3-D image, you will need to learn the basics of linear perspective and various aspects of how to create a simple drawing in perspective.
What is a Perspective Drawing?
One point perspective is a basic form of linear perspective employing one point in which all of the lines converge on the central point.
What is linear perspective? Linear perspective is a simplistic way that uses linear lines to produce the illusion of depth. This system can essentially be broken down into three specific methods.
This form of perspective lends is excellent when drawing rectangular architectural structures, unlike natural and irregular subjects such as flowers and figures, which are not suited to this illustration method.
Single Point Perspective. The most simplistic system of perspective.
Horizon Line. The horizon line will primarily determine the position on the image where the skyline appears. Low horizon lines will give the impression of height, and a high edge will present an illusion of depth.
A simple exercise that can easily demonstrate this principle is applying a cut out viewing frame.
This will provide the observer the impression of elevation, with the viewer's focus settled on what is above the eye level.
This is a significant theory used in all linear perspective applications and is easy for the beginner to master by completing several simple sketching exercises.
Vanishing Point is the picture plane's location where all the lines concentrate at a particular point—drawn above or below the horizon line.
The Distance Point is the most proximal point on the picture plane from which a continuous line meets directly points to the vanishing point.
To draw a cube. A drawn line extended from the form's most proximal edge continuing following the vanishing point. This point, which renders the object's distance to the vanishing point, is called the distance point.
Foreshortening. The principal aspect of perspective is that objects appear smaller as they recede into the distance. Foreshortening is the process of generating shorter intervals along the line of sight as they retreat into the distance.
When starting a drawing in perspective, it is advisable to use faintly drawn lines. Additionally, use a clear ruler and a drawing board to assist when drawing lines.
To begin drawing in one-point perspective, firstly draw a horizontal line across an A4 sheet. Position the paper horizontally in landscape format as this will generate a balanced composition.
It is drawing the horizon line above or below the central area of the page. But never precisely in the center. It is essential to get this right as it will define eye level.
Drawing the horizon line in the top half of the page will make the shapes appear above. If the horizon line is drawn below the center of the page or in the central bottom half of the page, the story's shapes will appear below the person observing.
Next, establish a vanishing point. Draw it anywhere on the page, the top half of the paper sheet. The vanishing point is critical, as all of the lines on the page will meet and converge on this central point.
Once you have vanishing point has been drawn, you will be ready to begin a drawing in perspective.
How to Draw a Floating Cube?
The most accessible form of perspective to begin drawing 3D shapes is that of one-point perspective.
Drawing a floating cube is an excellent choice for drawing using this method. A cube is a regular shaped form, making it ideal for creating a simple 3D drawing in space. It is also the right choice for a beginner or novice who may not understand the perspective rules.
- Draw your horizon line across the page.
- Draw a vanishing point below it to give the cube you intend to draw a sense of space and height.
- The simplest method for drawing a cube is to draw a regular square onto the page faintly.
- Next, draw a regular square shape, and from each of the individual corners, draw faint lines that converge on the vanishing point.
- To the left of the square, draw a vertical line from top to bottom. Next, draw a horizontal line that joins the vertical corner, creating the cube's far edge, which will appear foreshortened.
- Locate all corners to the left of the cube and draw faint lines that join the previous stage lines—transforming a flat square into a Cube floating in space.
- Applying tone to the cube's sides and beneath it will enhance its appearance to a floating cube in space.
Learning to Draw a Perspective Cube?
Drawing a cube in perspective is a simple and effective way to create the illusion of three-dimensional shapes on a flat sheet of paper. Learning to draw basic shapes and forms in perspective will enable you to draw more complex shapes. If you are experiencing difficulty drawing successful drawings in perspective, read my post: Why is perspective difficult to learn?
To draw a cube in perspective, the most straightforward approach when drawing freehand in perspective is to draw a regular flat square.
When starting a drawing in perspective, it is advisable to use faintly drawn lines. Additionally, use a clear ruler and a drawing board to assist you in your drawing.
To begin drawing using one-point perspective, firstly draw a horizontal line across an A4 sheet. I advise that you place the paper horizontally in landscape format, enabling you to create a more successful image.
Draw the horizon line central to the page but not precisely in the center.
Four example, if the horizon line is drawn in the top half of the page, this will make the shapes appear above you. If the horizon line is drawn below the center of the page or in the central bottom half of the page, the story's shapes will appear below the person observing.
Next, you will need to establish a vanishing point, drawn anywhere on the page, but I suggest that you draw it in the top half of the paper sheet for this drawing. Draw a fault mark randomly onto the top of the page.
The vanishing point is critical, as all of the lines you draw onto the page will meet and converge on this central point.
Once the vanishing point has been drawn, you will be ready to begin a drawing in perspective.
How to Draw a Cube in 2 Point Perspective?
Two points linear perspective can add a different quality to your three-dimensional drawing giving them depth, space, and visual interest. To create a simple 3D cube using two-point perspective.
The first step is very similar to drawing using one-point perspective in that you will need to draw and establish the horizon line. Essentially this is the point in the drawing where the sky meets the ground.
Next, and because this is a two-point perspective drawing, we will draw two points onto the horizon line. However, the vanishing points can be marked anywhere on the line, but do not mark them too close together as this will make a drawing at a later stage far more difficult.
Using the simplest example of a cube, the first stage is to draw the corner of the cube. Next, draw a line from each end of the corner to the horizon line's vanishing point. Next, repeat the same process on the opposite side of the corner, with two lines at each end drawn from the vanishing point.
The next stage is to draw two vertical lines to indicate the ends of the cube. If you are drawing with faint lines, you should see what looks like a solid cube in space. However, this drawing can be taken a step further.
It is essential to draw additional lines representing the far side of the cube. This has the benefit of showing the far side of the cube.
The system of drawing utilizing two-point perspective can be taken further by drawing cubes from multiple vantage points. For example, to draw a cube below, the horizon line repeat the same process. However, draw the edge of the cube beneath the horizon line and follow precisely the identical process.
The drawing of a cube below the horizon line will expose the top part of the cube, which adds a different dimension to your drawing.
To draw a solid cube above the horizon line, you will again need to follow the same drawing process in the top corner of the cube above the horizon line. Learning to draw the cube from various vantage points is an excellent way to become more proficient in drawing perspective.
Again you will need to draw two vertical lines which indicate the far corners of the cube and draw lines from the ends of this corner, which converge at the vanishing point. This drawing will expose the bottom half of the cube and expose the bottom portion of the cube form.
I recommend that you practice drawing cube above and below the vanishing points as this is an excellent way to develop your understanding of viewpoints concerning pictorial composition. Drawing cubes above the horizon lines increase the perception of height in linear perspective as drawing below the horizon line increases the sense of depth.
Once you have mastered the basics of two-point perspective, I recommend that you attempt a more advanced drawing such a street of urban sense. Click here to read my post: How to Draw a City Street Step by Step.
What Are The Three Types of Perspective?
The three types of linear perspective all use a horizon line and vanishing points to create images.
- One-point perspective: One vanishing point
- Two-point perspective: Two vanishing points
- Three-point perspective: Three vanishing point
How to Draw a 3D Shape in Three-Point Perspective.
Three points in the form of linear perspective. Which uses three vanishing points. Three-point perspective draw drawings are usually drawn to depict the top or bottom of a structure such as a building or a city scene.
To begin a drawing. Draw the horizon line at the top of the paper with two vanishing points: one right and one to the left.
The third point should be marked at the bottom of the page. Next, draw a mark in the center of the page. This mark represents the corner of a cube. Next, draw a faint line that meets the vanishing point on the left side of the page. Repeat this process with the vanishing point on the right.
Mark a point along the line to the left and right. Repeat the process and draw a two faint line, which converges at the vanishing points to the left and right. This will create a rectangle in perspective.
The progress draw three lines from the corners of each of the nearest points on this rectangle. They should be drawn to meet the vanishing point at the bottom of the page.
Return to the vanishing points at the top of the page. Draw a line which meets the near corner of the cube on the right-hand side of the page