Drawing in pencil is a great exercise that can help sharpen your drawing skills. Many drawings are life studies, and each of them makes it easier to draw anatomy. Understanding how anatomy works are the basis of any good artist. Without these skills, the artwork will look childish and unrefined. Not that this ever made a difference for surrealist painters like Pablo Picasso, although he did learn to sketch real anatomy while he was young. Some of his studies show how truly talented he was sketching in pencil.
https://www.pablo-ruiz-picasso.net/work-3938.php
https://www.pablo-ruiz-picasso.net/work-8.php
How do You Draw a Profile From the Side?
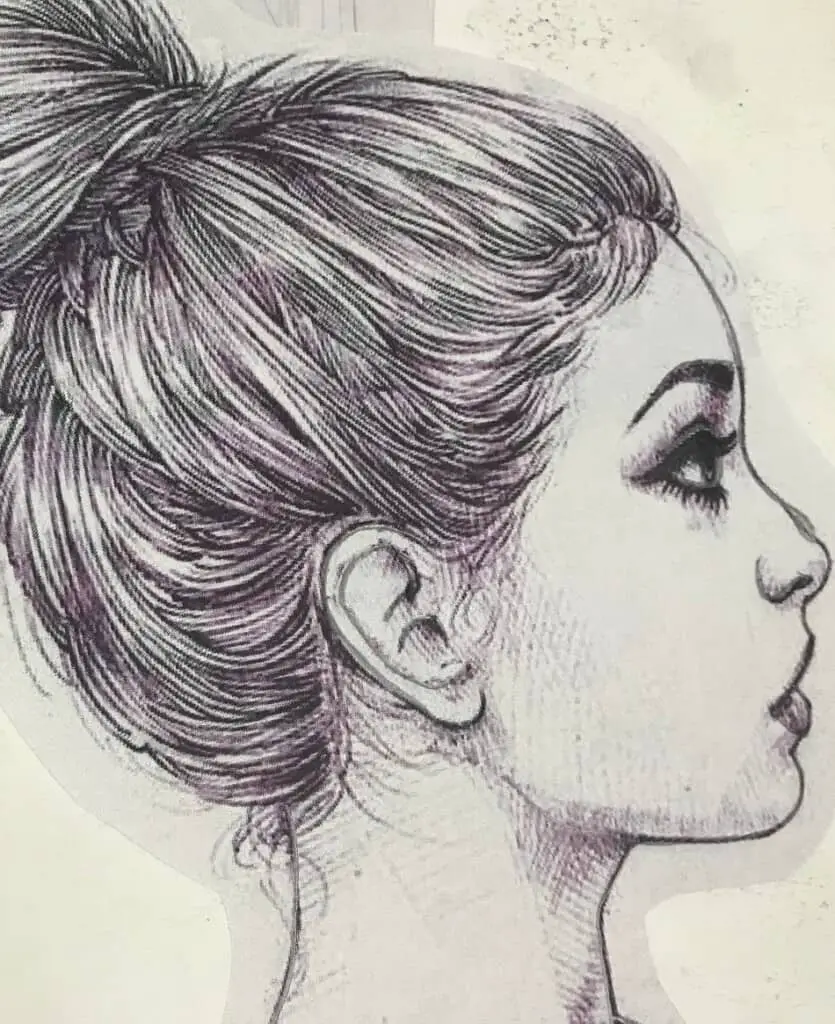
These images show you that every great artist has to start with the basics of human anatomy. Without knowing these principles, the skill as a painter or craft of the sculptor is totally lost. It's all about control of the medium and how these tools function in your hands. And as usual, practice makes perfect since we all have a weak point in our skillset. You can learn from this tutorial in a way that many teachers cannot express. Since words that are written are often like music to your ears. The Following Course By Proko Offers the Amature Artist an Excellent Introduction to Drawing the Human Form. Click Here For More Details. Anatomy for Artists
Sooner or later, something rings in your head and completes that harmony added to your paper. I will give you detailed info that can describe what you are drawing, but you will need to read between the lines. Some steps are helpful as you look at a drawing and see where the lines are finalized. It doesn't make-up for the fact you will be starting it from start to finish. And while this task might sound impossible for some who have never drawn a mouth profile before. I will give clear, simple reasoning about how it is possible.
Here are my written instructions and tips on how to draw an open mouth from the side.
Related Posts:
- How to Draw Smiling Male Lips in 12 Steps
- How to Draw Someone From Memory (in 9 Steps)
- How to Draw Portraits in Black and White: 11 Essential Tips
- What Makes a Good Self-portrait Drawing?
- The Ten Best Online Pencil Drawing Classes
Organize Your Drawing Equipment
You can choose to find these items at your local art supply store. Which quality you choose will affect the level of sketching and shading you want to achieve.
- Soft graphite drawing pencils
- A quality graphite mechanical pencil
- Smooth Canson Bristol paper
- A vinyl eraser
- Soft kneadable eraser
- A blending stump
- Ordinary tissue paper
Create a Light Profile Sketch of the Skull
So here is what I've done. To give you a better idea of what you are going to be drawing, you need a quick lesson in anatomy. The profile is straightforward and doesn't have as many 3D angles to worry about. It's a straightforward profile image we are talking about here. I've included two images that give you an immediate idea of where the skull is and where the outer skin is. A) – is a side profile example that shows a (medical model) skull as it relates to the outer skin. B) – is a male skull that is drawn, and C) is a female skull that is drawn.
You can use these as a reference when getting the correct lines that relate to both make and female. Male skull bones are more robust than females, so often, you see added shapes jutting from the chin and forehead. The female skill has a less forward chin and a shallow forehead. This is not exclusive since many female celebrities and singers have masculine features, including Charlize Theron and Margot Robbie. This gives you an excellent starting point to select which kind of jaw shape is appealing for you.
A: Anatomical model
B: Male sketch side profile
http://getdrawings.com/image-editor/?url=../images/skull-anatomy-drawing-14.jpg
C: Female sketch side profile
Sketch the Mouth and the Jaw
This is where you will now start to refer to your mouth profile. I've taken to time to fine thee more excellent resources to start. Since you will be drawing just the side profile of the mouth and lips, there's not much need to draw the rest of the features. No nose or added chin detail, just the focus in the lips is perfect enough. If you are using a standard 9″ x 12″ drawing paper, you'll need to make your lips at least 1/4 -1/2 of the size. This is, so it fits equally onto the paper you draw onto.
You will also have enough room to add your detail, such as highlights, lip shine, and detail lines. Anything smaller is a real pain to manage, so oversize is always better for adding realistic shadowing and detail. A: This is the starting point picture that begins with a simple triangle shape. B. Is a sample lip drawing you will use to draw the lips for shadow reference. C: Is a great website that can also help you with ideas on mouth and lip shape. You can print these out using a printer. Have them close by so you can easily see what you are sketching.
Focus on the Form of the Open Jaw
Looking at your first sample picture, you will see that there is a triangle shape that is shown. The flat end that sits at the end of where the lips start helps you determine two things. One is the level of an overbite, and the other is the underbite. The second is the amount of space that the jaw is open. As you can see, from the sample pictures, the lower jaw moves down toward the throat when it opens. This is a rounded swinging motion that will affect your drawing perspective.
But since you are making the illusion, the mouth is slightly open, this is very simple to do. Begin drawing a very fine line from the tip of the triangle to the center point of the flat end. You then give, at least, a sizeable gap that is equal on both sides of the centerline end. In other words, how open is this mouth gong to be? At the very middle point of that line, this is where the gap section merges into a fork. So in the end, you have a tuning fork Y-shape that comes from the pointy end of your triangle.
The top line must be nice and straight, while the fork line is the one that emerges from below. You'll see why this is important in the next steps.
The Difference Between an Overbite and Underbite
Using the reference from the skull photos, you can decide which type of bite you are drawing. Does she have either of these facial formations or just a regular balanced set of teeth? While drawing a section of a skull is fine, you can choose a faster way to use the triangle to set up a bite ratio. Moving your flat (triangle) line forward or backward will establish if there is an overbite or underbite. I think this will be obvious once you see some of the reference pictures.
Once you start adjusting the flat end, you must imagine it can swivel on a center peg on that line. What I do is take a wooden coffee stir stick and poke a hole in the middle center point. I also use a pushpin from the bulletin board, making this easier to do. Once that's done, I can then carefully put a pencil point through the hole so the coffee stick can sit on the line mark's an inside edge. Now all I do is move the line forward or backward to my liking. Then I carefully trace the straight line on the coffee stick to change it to an overbite or underbite.
Characteristics of the Top of the Mouth
This is the part I mentioned a couple of steps earlier where there is a forked line that needs fixing. The lower part of the fork branches out from the bottom side. But why is this needed? We need to imagine that your upper lip needs to have a 3D look to it. But on a 2D drawing, this is limited to a certain point. Making a 3D upper lip on a profile sketch is easy. Carefully start with a rounded curve at the top edges of your upper lip. Stay behind that straight Triangle) line, but bring the rounded curve to the top and bottom of the upper lip line.
Remember, that this is the straight line (only in regards), to the triangle shape you begin with. Or, essentially, your outer lip edges. It should curve as soft as a contact lens shape away from that straight line. Once that's done, find the connecting fork point where the lower line touches the upper line. Now once again, draw a nice contact lens shape that faces like an arch on your upper-fork line. The end of the lens should end where the fork point meets! Now you can slowly clean-up the shape to round-off the rest of these edges.
Right at the front of the upper lip, around the upper edge, slightly downward creates what is called the ‘Cupid's Bow.' This is your upper 3D upper lip shape. You may also slightly round the end line of the upper lip with the dimple line. This is a curved dimple line that's the same thickness as the fork gap between your lips. Once again, you need to play with that line and angle this dimple curve as if it swivels on a center peg. Angle this curved divot forward toward the upper lip. You'll see why later.
How to Draw the Lower Lip from the Side
Now you've reached to point where the lower lip needs to be formed. This is a bit like mathematics but in a simplified visual method. You will see that there's the lower fork line and the bottom triangle line. Now you can see where you will be putting your contact lens shape for the outer curve. However, there is also the upper lip lens that this lower lip line can continue into. It needs to flow smoothly into the center of that upper lip lens. Once you see how this works, it will make total sense.
Now all you have to darken the center edge line that wraps behind the lower lip. It only needs to slope downward with a rounded edge. The lower fork line that was part of the lower lip is cleaned up and shortened and fades before it ever reaches the edge of the lower lip. Use your eraser to clean these lines up. Defining the rest of your lips is a matter of personal taste. But you will follow these rules first! From the ending divot line at the back of your lips, you draw more contact lens arches rounding downward on the top line.
This should be rounding upward on the lower line as well. These rounded lines can be touching divot line edges, but all have a nice transition where they meet. These additional lens arches need to be cleaned up with an eraser to define the curves that you've now added. This also helps to give your lips character. Whether they are pouty, thin, or full enough is up to you.
How to Draw the Chin and Upper Lips
These additional lines are added after you have finished drawing your lip lines. This is where a little imagination helps, but not especially so. You aren't drawing a full face, so there is enough space to add a chin and upper lip line hint. Now you can go back and refer to your skulls again. How far does the lower lip curve around, how sensuous is that lower lip line for you -going to be? You will need to be your own judge on this. Keep in mind that this line needs to be rounded at the lower lens curve on the bottom lip.
The upper lip starts with the same blending from where the ‘Cupid's Bow' starts, and the upper lip connects. Once again, this can be nice and rounded for a youthful-looking face. As long as you begin with a gently rounded arch, this line can curve inward and upward until it fades off. You can take the time to start cleaning up left-over lines and defining your lip line so you can see them better. As the next step, you will begin to see why these fundamental lines are important for your detail later.
How to Draw the Skin and Lips
This is a part of the lips that will make it easier to make shading and highlights possible. It's not especially a detailed task but will need your talent to follow these steps very carefully. Do you want to follow along on how to draw an open mouth from the side? Here is how you will begin.
• Contour lines
These are lines that establish a 3D shape on your lip, so how they are curved plays a vital role. The lower lip is the hardest since this has a lot of rounded ‘meaty' surface. Towards the outer edge of your lower lip, you nearly follow the rounded edge shape. Use a very light line to lay them down. There will be an imaginary center line that your viewer will see, so your contour lines will go from curved to straight at some point. As they reach the edge of the mouth, they curve back in the opposite direction.
Have your eraser handy if these lines look too predictable. These lines are supposed to be natural, so they don't always have to match where they begin or start at the top of the bottom. Your lips also scrunch up like an accordion, so it only fits that tighter areas will look bunched-up. The upper lip is a bit easier since these lines start at the lower edge and lift upward. These aren't as thick or heavy as the lower lip, and these lines can follow in the same direction all along the upper lip.
Applying Shading and Understanding Tone
This is an aspect of sketching and drawing that needs to talk about where your light source is placed. All realistic 3D drawings have a light source that shows-off delicate lines, wrinkles, and highlighted detail. Its part of the drawing illusion that makes a 2D drawing look incredible after it has highlights and shadow added. But first, it all begins with where you can imagine where the light is coming from. To make this exercise easier, most light comes from above just sunlight. While inside, it comes from ceiling lights. Let's start with that first.
This is an easy trick to work with since all you need is to trace the outline of your outer lips with some tracing paper. Next to this, you will make an identical set of dotted lines. Now somewhere you will place your light source in the upper hand corner. Looking at the outline of your lips, where is the lightest spot, and where are the shadows? Along the lower lip will be a large wedge of reflecting light on the top-centered edge. The upper lip above the lip line will also be lit from above. There are also bounce back highlights, but that will be for later.
Drawing and Adding Details
Using this tracing paper, you can further trace the rest of your lips and lines to begin a shadow map. This will be your guide to where the shadows are going to appear. This also brings out the wrinkles on the lips and the so-called smile lines. Give you tracing general paper shading according to the light source. Don't spoil your actual drawing, so give this tracing paper a rough shadow template you can follow. When you are done, then you can begin the delicate work going back over your final drawing. Read my post: Is Tracing Cheating in Art?
This is where you are going to use a technique called contour shading'. This is a simple shading trick that uses the same direction that contour wrinkles follow. You need to use soft shading, so you don't overdo a shaded spot. Once you find the correct shadow tone to follow the area where shading is seen, the highlighted area will stand-out better. This will need to be done for both the lower and upper lips areas. Don't darken anything until it's time to start making specific shadows stand out more than others.
Detailing the Lips
Once you have finished the first task of contour shading on your final drawing, the next task will start your lower lip defining shadows. These will start from the corner of the mouth and lightly stretch over to the outer edge. This stage uses small scratching lines that are heavier than the first and follow the contour lines in slightly rounded arches between each upper lip contour line. This helps give the illusion that the light reflects on the outer lip edge in a subtle, realistic look.
The very inside edge where the lower lip line goes into the mouth must be shaded so that these lines are the darkest. Avoid shading the outside of the lip where the light is supposed to hit. Use your referral pictures to see where light is lighter or darker too. Now you follow along the bottom lower edge of the lower lip with softer shading. This can still use contour line shading, so it better follows the shape of the lower lip. Where the lower lip edge is, you should lightly shade that line with very tiny vertical shade lines.
The upper lip is a similar shading practice that follows your exact shadow map layout. This should have just enough darkened shadow lines under the lip edge as it reaches the top edge. It should avoid having too much shadow along the leading front edge, where the light will be the strongest. Even along the upper slopping edge to the dimple corner, it should have contrasting contour wrinkle shine shadows. Along the inside upper lip edges, these shadow lines will be almost as dark as the inner mouth.
But this is where there is something called bounce back highlighting comes in. And this helps to be more convincing for highlights that are related to the lower lip.
Blending the Contours of the Lips
This is part of the shading that will give your lips a realistic touch. As you look at your lower lip, the highlighted part will wrap-around the upper edge very slightly. This causes bounce-back reflection that will appear on the upper lip shaded edge. Not so much, but it does happen in real life too. This is where you take your kneadable eraser and make a pointy tip. Then you make light strokes along the upper lip shadow edge very sparingly. Make a new pointy tip to collect more graphite as you go.
It's all about the light pressure as you move along this edge. Too much will remove too much shading, and too little will be unnoticeable. Just take away enough on the leading contour edge peaks to give a glistening effect. These also look good on the very top edge of the upper lip edge towards the side of your mouth. Don't go overboard since there isn't enough light to make them look too pronounced. Let the texture of your paper give gust enough gleam to be effective for this light effect to work.
Using a Blending Stump and Tissue
Now you will be concentrating on the exposed skin areas around the lips. This needs a new technique that provides a skin-like texture. You are going to be doing small circles that are shaded. Allow the highlighted areas to be open where the upper lip along the top upper edge runs. There is also a small area that is catching light right under the lower corner dimple. Once you've finished this, you are ready to continue darker shading underneath the lower lip according to the lip shadow and shape. It needs to be lighter around the dimple too.
There will also be some shading on the upper lip where the nose causes shadows to fall. This is above the upper lip cleft. This is that little valley that sits under your nose. When this is done, you are ready for a tissue wipe. You wrap a tissue around your finger and lightly smooth out the graphite around the shaded edges. You can also make a very smooth swoop around the corner of the mouth dimple to give this a subtle, smooth shaded contour shadow. Using the tissue will soften the little circles into willowy smooth skin.
Blending Areas of your Drawing
This is the very last step of your lip sketch, and it has fine repairs and shadow touch-ups. This is caused by removing excess graphite from the tissue rub. While some of this rub can use a stump for tight areas, the tissue will be great for wide-open spots. The stump is a type of blending pencil made from tightly rolled paper that's been sharpened like a pencil. This helps to blend-out areas that need subtle softening. This is especially hand when shadowing cannot be done smoothly.
As you finish-off your lips, you can see where using tiny and fine graphite lines will come in handy. You can also take your kneadable eraser to put back selected highlight spots where the light was reflecting. By the end of your fixing of selected spots, all three tools will complete a realistic 3D drawing of your lip profile. Hopefully, these instructions will have given you a better idea of how to draw an open mouth from the side. Good luck!