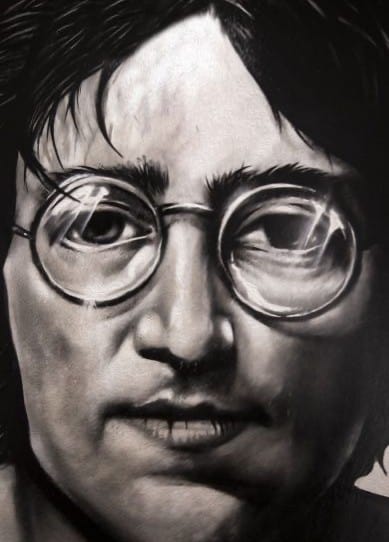
How to Draw Black and White Portraits
Have you ever wanted to learn how to draw portraits in black and white? Drawing pictures in black and white is a more straightforward approach than working in color since you'll only be worried about tone, not color, but that doesn't mean it's easy. Many artists struggle to draw realistic black and white portraits because of how challenging it is.
Drawing in black and white is different from drawing in color that many artists choose to focus on developing their skills in either or the other. That doesn't mean that this is the approach that you'll need to take, it's just worth mentioning so that you don't become discouraged if capturing the perfect black and white portrait eludes you.
Please look at this drawing and sketching video course I have created. Use this link.
Most artists start out by working in black and white, then they progress to color. That's because the most common drawing tool that people begin their artistic journey on is a #2 graphite pencil. How often did you find yourself doodling with your pencil in class when you should have been paying attention and taking notes? Don't feel too bad, most artists will tell you that they were often more interested in art than any other subject, and that impromptu, spontaneous doodling is probably what gave birth to the passion you have today for art.
While graphite may have been the first material you really explored art with, it also forces you to draw artificially. When you look at the world around you, how many grey tones do you see? Not many, if you see any at all. The point is that when you're drawing anything in black and white, you are artificially transforming what you see in color into black and white.
How can you successfully create a portrait using only black and white? There are two keys that you have to execute if you want to have a successful black and white portrait. First, you have to make sure that the features and proportions you draw match your subject.
All people share similar facial traits, but it's the subtle differences in our characteristics and how they relate to one another that makes us unique. Next, you need to be able to execute your portrait using a full range of values. Lighting is critical in a black and white portrait, and setting up a unique lighting source can mean the difference between completing a dull portrait and a portrait that is interesting and dynamic.
Related Posts You May Like to Read:
- How to Draw a Nose From Different Angles
- What Makes a Good Self-portrait?
- The Best Books on Drawing Portraits
- The Best Online Pencil Drawing Classes
- Is It OK To Draw From Photos? 5 Pros and Cons
Draw From a Monochrome Photograph
One of the challenges with drawing black and white portraits is that you have to convert a color image into one that's black and white. To avoid having to change a color image to black and white, why wouldn't you choose to work with a monochrome photo as your reference for the drawing?
When you use a monochrome photo as your reference when drawing a black and white portrait, you can draw exactly what you see instead of translating color into black and white. This has the added bonus of also giving you a much more unobstructed view of the different values in your photo, which will then allow you to create a more realistic and accurate portrait.
But what should you do if you already have the perfect photo to work from, but it happens to be a color photo instead of a monochrome one? That's simple, you'll need to convert your color photo into a black and white one. The simplest solution is to use a black and white copy machine to make a copy of your photo. Unfortunately, while simple to do, a black and white copier isn't going to give you the best results. The best way to convert a color photo to a monochrome one is to use photo manipulation software. There are many different commercial and free photo manipulation software options you can choose from, and most of them can convert a color photo to monochrome while retaining all of the details and values.
Create Prelinmary Black and White Sketches
What is the best way to improve as an artist? No, it's not hoping that you'll magically get better. It's through practice. Unless you want to spend a small fortune on supplies, you shouldn't practice creating finished pieces. You should practice by sketching.
When you want to learn how to draw black and white portraits, practicing sketching them is the only way to do it. You need to learn to identify different values so that you can recreate them in your drawing. One trick to help you spot the basic values of a picture is to look at it and squint your eyes. This will cause the details to become more obscure while allowing you to see the different values more easily.
When sketching in black and white, don't worry about details. Instead, study how light creates shadows and highlights so you can learn to create dynamic looking portraits. You should practice sketching using whatever medium you are most comfortable with. You should also spend a reasonable amount of time using whatever medium you plan to draw with. Most people that practice sketching use graphite, but if your intention is to work in charcoal, you'll need to spend time working in charcoal to get used to how the material works on different surfaces.
While using the medium that you plan to work in is a good idea, it's also a good idea to practice using different mediums. Graphite and charcoal might seem like the most obvious choices, but why not try ink or watercolor? The point is that you need to step outside of your comfort zone and try new things. You never know when you'll end up stumbling on something that you fall in love with.
Use a Grid to Map the Basic Proportions and Features
The first rule in drawing a solid portrait is to capture a solid likeness of your subject. No amount of shading and mastery of light and shadow is going to do you any good if you can't draw a portrait that looks like your subject. The likeness of your subject is the foundation that the rest of your drawing will be built on.
If the representation isn't solid, then your drawing will fail to come out the way you want it. It's one thing to say that you need a good likeness of someone, it's something else entirely to be able to execute that likeness. Some artists have a natural ability to draw people and capture their likeness that most people don't understand. If you aren't the kind of artist that can just pick up a pencil and sketch out a face that looks just like your subject don't beat yourself up about it. Most artists can't do this, and there are ways to work around your inability to freehand sketch a perfect likeness of someone.
One of the most popular methods that artists use to capture a likeness of their subject is the grid method. What is the grid method? It's a method for achieving a likeness of a person by using a grid. How do you use it? The first step is to choose the right photo, so look for one that has interesting lighting and an angle that you're comfortable with. It's also a good idea to work with a monochromatic photo for your reference image since it will make the rendering process much more straightforward. After you have your photo picked out, take a ruler out, and measure an equal distant amount along each axis of the photo. For example, you could use a ruler and mark off every inch on the width and the height. Then you draw lines connecting opposing marks, creating a grid.
The simplest way to make the grid method work is to draw an image that's the same size as the reference photo that you're using. If that isn't feasible, then you want to do it at a simple proportion. For example, if you're drawing a picture that's twice as big as your photo, and your photo's grid is divided into 1-inch squares, you'd mark off 2-inch squares on your paper.
No rule says you have to keep things simple, it just makes your life a lot easier if you do. After your grid is drawn, all you have to do is copy what you see in each grid on your reference photo onto the paper you're drawing on. Make sure that you sketch lightly while transferring details over so you can erase as needed. You shouldn't be afraid to revise your sketch as often as it takes to get a good likeness of your subject, so sketching lightly is a must.
Sketch a Basic Contour Outline of the shadows in your drawing
When drawing in black and white, value is incredibly important. When you're working in color, you might be able to get away with having some values that are slightly off. But when you're working in black and white, mistakes are going to stick out like a sore thumb. That's why you need to learn to spot different values and practice rendering them until it becomes second nature.
Do you know what makes a portrait interesting? There are quite a few factors that will influence how interesting a portrait looks, not the least of which are the shadows and highlights. When appropriately used, shadows and highlights help you give the illusion of a three-dimensional object when drawn on a two-dimensional surface. Faces aren't flat. They have noses that stick out, eyes that recede, etc. How can you show this when drawing on a two-dimensional surface? A big part of that involves the use of shadows.
The shadows on a face vary greatly depending on where the light source is coming from. Light from above will cast the eyes, under the nose, and the upper lip in shadow. Most artists know this and are comfortable depicting this. What you need to do is practice drawing portraits from many different angles with many various light sources. When doing these practice sketching, remember that you are sketching. You don't care about the details.
For this particular exercise, all you care about is the general shape of the drawing and the shadows on their face. For the shadows, you want to draw a contour line surrounding the entire area that is in shadow. You don't care about the value, you just want to outline every area in shadow. What's the point of doing this? The point is that it teaches you to recognize shadows, which is an essential part of executing a quality black and white portrait.
Simplify the Value Range in Your Drawing
Having a wide range of values in a black and white portrait can have great results, or it can overcomplicate things, making it harder for you to pull off the look you're going for. Every artist has made the mistake of blending too much, of taking things to far.
It's a fine line to walk, but you have to be able to look at a drawing, decide that it's reached a point where you're happy with it, then avoid overworking it. If you spend too much time on a picture and blend it and try to capture every single value that you see, it can lose a lot of its spontaneity. It can go from being interesting to look at to being dull.
Learning how to avoid overdoing it is a challenge. It's hard to simplify your work and intentionally leave out details and values, but once you get used to doing it, you should see the creativity in your work improve. How can you get started on the path of simplifying your work and using less of a value range when you draw? The easiest way to get used to using fewer values when you draw is to use a drawing medium that restricts what you're capable of producing. When you're drawing with graphite, charcoal, colored pencils, or even Conte crayon, you can blend to achieve a wide range of values. You can also produce a wide range of values using watercolors, acrylics, inks, and pastels. As long as you have a tool that will allow you to blend it and be accustomed to blending your work extensively, it's going to be tough to simplify things.
If you want to reduce your value range and get used to drawing using a more simplified value range, start by sketching using black ink and white paint pen on a grey paper. This gives you three values and only three values. Sure, y0u could use hatching and cross-hatching techniques to expand your value range, but you have to resist the temptation. Just sketch in black and white and use the grey of the paper as your mid-tone. It will seem odd at first, but after a while, you should notice that you're able to pick out the highlights and shadows more quickly, and you'll be able to capture the essence of your subject in a more simplified manner. Once you get used to this, you can switch back to your medium of choice, and begin to incorporate more values, while still being careful not to overdo it.
Draw a Portrait with a Dark Background
When you're trying to create a dynamic looking portrait, a wide range of contrasts between darks and lights can help make your drawing feel more energetic. Drawing a portrait with a dark background is a great way to create a lot of contrast in any picture. There are two ways that you can approach a portrait with a dark background, and you should use whatever method you are more comfortable with.
The first option is to use something like charcoal to draw with. Charcoal offers exceptional covering power, so you can sketch out your portrait, scrub in a dark background, then get back to adding details and shading to your portrait. When working with charcoal, make sure that you use a paper with some texture, and having plenty of workable fixative on hand is also a good idea.
Your other option is to work on a dark paper and use white colored pencil or white charcoal. This approach will give you a more dynamic-looking drawing, but it isn't without its challenges. Working from dark to light is the opposite of how most of us draw, so it can take some getting used to. But once you get used to this approach, you should be able to create some of the most exciting work that you've ever done.
Once you master working from dark to light, you might want to try your hand at scratchboard. With scratchboard, you work by scratching away the black surface of the board to reveal white underneath of it. You can employ the same techniques that you use with pen and ink, only you'll be working in reverse. Scratchboard isn't easy to work with, and if you make a mistake fixing it can be difficult or impossible. It's also not cheap, so make sure that you are comfortable working dark to light before working with scratchboard.
Draw a Face with Light Background
Drawing a face with a light background is more challenging than working with a dark background because of the difficulties you'll have in drawing enough contrast. One way to overcome this issue is by drawing a portrait that has bright highlights and dark shadows. Try finding photo reference that has light coming from exciting angles, which causes shadows to be cast over your subject's face excitingly. If you can't find a photo with the attributes you're looking for, make yourself. All you need is a willing model, a spotlight, and your phone, and you can easily capture the perfect reference for your drawing.
Draw Using Correct Tools Supplies
As an artist, you should always be trying to expand your skills by trying new things. With that being said, once you are comfortable using certain mediums and trying to complete a drawing that you can show or sell, then sticking to what works for you is a good idea, at least in this case.
If you want to get great results when you're drawing, you need to use professional quality materials. Sketching with a ballpoint pen and cheap paper is fine when you're sketching. When you're trying to complete a professional-caliber portrait, make sure that you use professional-caliber supplies.
Drawing with Charcoal Pencils
For many artists that work in black and white, charcoal pencils are their go-to medium for portrait work. Charcoal offers the ability to achieve intense darks, and you can also get bright highlights by erasing charcoal, or by adding white charcoal on time of your drawing.
Charcoal pencils offer charcoal benefits without having to use charcoal sticks, which can be quite messy. But, if you want to cover large areas quickly, using charcoal sticks to block in dark regions is still a good idea. It will save you time, and it will also keep you from using up a lot of charcoal pencils while filling in dark areas. This set of charcoal pencils will create excellent results. Click here to check the price on Amazon.
The best surface to use charcoal pencils on is one with quite a bit of texture. Without sufficient texture, charcoal doesn't adhere well to a surface and will tend to smudge around. While using a textured surface is usually your best option, there are many artists who work on smooth surfaces with charcoal.
This is a more challenging approach, but if you can master it, you'll be able to work in more detail than on a rougher surface. If you want to use a smooth surface, it's a good idea to spray it with workable fixative before you get started, this will give the paper a little more tooth to grab the charcoal. You should also spray your drawing with workable fixative regularly to help keep it from smudging.
The last way that you can use charcoal pencils to draw a portrait is definitely the most challenging, but it can also produce the most amazing results. This method involves adding water to your charcoal drawings. Wait, water and charcoal can be used together?
They can if you work on watercolor paper, and you are careful when you are applying water. Using a water brush is usually a good idea since it allows for precise control. When you add water to charcoal, you'll get an effect similar to ink and wash, which adds a level of spontaneity to your work that can bring it to another level.
Drawing a Portrait with Black and White Pencils
If you aren't a big fan of charcoal, and a lot of artists aren't due to its messy smudgy nature, then drawing with black and white-colored pencils is an option that you should start to explore. Black and white-colored pencils give you the ability to produce bright highlights, dark shadows, and a wide range of values in between. When working with colored pencils and creating a black and white portrait, your best surface should be a smooth grey paper.
This gives you a neutral color to work with as your base, which you can then add shadows and highlights too. Working on a smooth surface allows you to work with precision, and since quality colored pencils can be blended, you should be able to produce any tones that you need to complete your drawing. This set of black and white pencils offers excellent value. Click here to find out more on Amazon.
In addition to using standard colored pencils for your portrait work, you might also consider using watercolor pencils. Watercolor pencils behave similarly to traditional colored pencils, but when you add water to the mix, they transform into watercolor paint. You can use a small amount of water to aid in blending, or you can use water liberally to create a watercolor style painting. In either case, make sure that you use a heavier paper to handle the water without warping and tearing.
Drawing a Portrait with Graphite Pencils
If you are most comfortable when working with graphite when drawing portraits, then you aren't alone. Graphite is an extremely popular drawing medium because it's easy to use, inexpensive, and most artists are very experienced and comfortable using it. When working with graphite, make sure that you use both soft and hard graphite. Click here to find out about graphite pencils on Amazon.
Soft graphite will allow you to get darker values and blend more easily, harder graphite is ideal for sketching in the portrait and adding fine details. What type of paper should you use when drawing a portrait with graphite? That depends on what kind of style you are working in. If you want to produce a portrait with soft traditions, then the smooth paper is your best option. If you prefer to work in a looser, rougher style, then the rougher paper should work great.
Create Art With My Favourite Drawing Resources
General Drawing Courses. I like Udemy if you want to develop your knowledge of drawing techniques. Udemy is an excellent choice due to its wide range of creative courses and excellent refund policy. They often have monthly discounts for new customers, which you can check here. Use my link.
Sketching and Collage. Take a look at this sketching resource I have created. Use this link.
Proko. Is one of my favorite teachers who surpasses in the teaching of Anatomy and Figure drawing. Prokos course breaks down the drawing of the human body into easy-to-follow components aiding the beginner to make rapid progress. For this, I really like Proko.
Art Easels. One of my favorite ways to draw is by using a drawing easel, which develops the skill of drawing on a vertical surface. The H frame easel is an excellent vertical way to add variety to the style and type of marks you create when using a drawing board.
To see all of my most up-to-date recommendations, check out this resource I made for you.
