What makes a good self-portrait drawing? That depends on what type of picture you are trying to create. Do you want a self-portrait that looks exactly like you? Or how about an abstract or expressionist portrait that captures your personality? No matter what your intentions are, or what type of self-portrait you want to draw, drawing a self-portrait is something of a right of passage for every artist. Even if you don't plan on drawing figures, as an artist, you should still take the time to explore your own face and use it to create a unique and insightful piece of artwork.
How To Draw An Accurate Self-Portrait
Drawing a human face is one of the most challenging artistic endeavors. There is nothing that people are more familiar with than the human face, so if you draw a human face that isn't proportionate, or that has anything else wrong with it, people will notice.
Drawing a human face that has a recognizable likeness is even more challenging since every face is unique. If you are drawing a portrait capturing a likeness is very challenging, and for many artists, it's even more challenging when it's their own face they are drawing. Fortunately, there are many different techniques that you can try employing to capture a realistic likeness of your face.
- You could try freehand drawing your face. This is the most straightforward approach, but that doesn't mean it is the easiest. With this approach, you look at yourself in the mirror, or look at a photo, then simply start sketching what you see. Pay attention to the major shapes you see and pay careful attention to how your features relate to one another. You also need to pay attention to the light source, so you can render your face with realistic highlights and shadows. When using this approach, start out your drawing with light, sketchy lines, then slowly darken your drawing as you render it, but only after the initial sketch is in place.
- Use the grid method. The grid method is a technique that has been used by artists for generations. It's simple, effective, and can allow you to get a likeness of your subject very quickly. How does it work? For this approach, you'll need a photo. Take your photo and use a ruler to draw a grid with evenly spaced lines. Then copy that same grid to your drawing paper, adjusting it for size when needed, but always keeping the number of grid squares the same, and keeping the proportions of each grid square the same. Then you simply copy what you see in each grid of your photo to the corresponding square on your drawing.
- Use a projector or a lightbox. Is this method a bit of a cheat? That depends on who you ask. Artists have been using various techniques to trace their subject for centuries. One way to look at this approach is that using a projector or a lightbox is simply another tool. If you use this approach, you should focus on only sketching out a light outline on your paper, then render out the forms, highlights, and shadows.
Self-Portrait Drawing Tips
- Don't obsess over creating a perfect likeness of yourself. As an artist, you should be working to express yourself, and that expression includes drawing what you feel as much as what you see. If you want a perfect copy of your face, you can take a picture for that. If you want an intriguing and thought-provoking self-portrait, then worry more about the mood of the piece rather than trying to create a photo-realistic drawing.
- Color can be your friend. Whoever said that a self-portrait has to be black and white? You could draw your self-portrait in graphite or charcoal, or you could be more adventurous and try colored pencils, pastels, or oil pastels. Or, you could really step your game up and try painting a self-portrait with watercolors, gouache, acrylics, or oils.
- Try to start your self-portrait with light, quick sketching lines. This will not only breathe life and create a sense of movement in your drawing, but it will also allow you to lay out a solid foundation before you start to render your drawing in with more details.
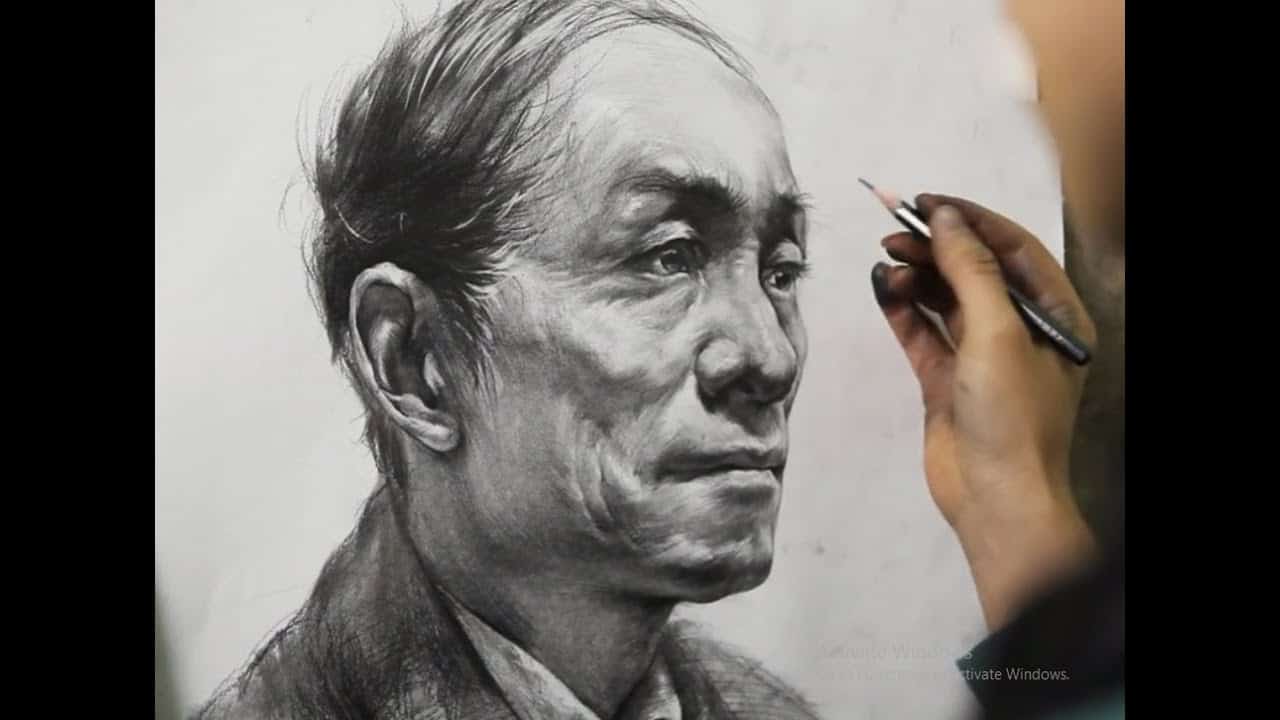
Graphite Or Charcoal?
If you decide that you want to draw a black and white self-portrait, you have your choice of many different materials you could use. Two of the most popular options are graphite and charcoal. Both have their advantages and can be used in similar ways, but they are definitely distinctive materials that will give you a different look for your finished drawing.
Drawing with graphite is a less messy material, which is an advantage if you don't feel like finishing a drawing, then having to spend a fair amount of time scrubbing your hands, arms, and cleaning up your work area. There are different levels of hardness available with graphite pencils, which gives you the ability to make light marks, as well as deep shadows. If you need to lay down a lot of graphite to establish shadows, or for your background, you could use powdered graphite. There is also water-soluble graphite available that you can use to create beautiful washes that can add a unique element to your self-portrait. The one main drawback of using graphite is the reflective sheen it produces in the light.
Drawing with charcoal is definitely much messier than graphite, and after working on a drawing for some time, you'll probably have black palms and fingerprints. This isn't a bad thing. It just means that if you are planning to draw with charcoal, you need to be prepared to clean up afterward. When drawing with charcoal, you have more range with what direction you want to take your self-portrait in. You can draw on a smooth surface, and if you are careful, you can create a beautiful picture with a full range of soft tones. Or you can draw on a rough surface and create a rougher portrait.
One of the more advanced techniques that you can try with charcoal is adding water to the mix. Adding water to charcoal will allow you to create washes of greys, as well as intense blacks. If you want to try adding water to your charcoal drawing, make sure that you use a heavier watercolor paper.
Whether you add water to the mix or not, one problem you'll run into when drawing with charcoal is smudging. Charcoal's soft nature allows it to be blended, which is a huge benefit. But, that same soft nature also leaves it vulnerable to unwanted smudging. Every artist has accidentally smudged a drawing at one point or another when they leaned on it without thinking about it, and it can be incredibly frustrating. Fortunately, there's an easy way to avoid smudging your drawing. First, you workable fixative regularly as you work. Make sure that you use it in a well-ventilated area. Next, use a piece of scrap paper and lay it on top of the drawing to rest your hand on. This will help to prevent unwanted smudges, as long as you don't allow the paper you are resting your hand on to move.
Important Considerations When You Are Drawing A Self-Portrait
When you are planning to draw a self-portrait, you must plan out your intentions before you start working. Can art be spontaneous? It can be, and you should embrace this. But when you are trying to create a finished piece of art, you should lay down a framework of what you intend to create, then start working toward that goal.
For example, if you are planning to do a simple sketch, then there's no reason you can't draw on plain copy paper. But if you are planning on creating a finished self-portrait that you intend to frame, then you need to use a higher quality paper. If you are planning to add watercolor or acrylic or ink to your drawing, you need to use paper that can handle the moisture.
If you plan to use oil paint, then you need to draw on paper that has been treated to be used with oil paint. The point here is that planning ahead of time to reach a goal should be your preferred method of working as an artist.
Drawing A Self-Portrait From A Photographic Reference
Some artists prefer to draw from a photograph, while other artists prefer to draw from life. Which approach is better? As with anything else related to art, it's a matter of personal preference. Should every artist who draws the human figure spend time drawing from a live model? Absolutely. Does that mean that drawing from life is better than drawing from a photograph? Absolutely not. It's all a matter of your personal preference.
When you are drawing a self-portrait from a mirror, there are some issues that you are going to have to overcome. Namely, you are going to have to either get very good at replicating your pose, or you are going to have to learn how to draw without having a model that has a perfect pose every time.
When you are drawing from a mirror, you are looking into a mirror, moving, and drawing. That means that your reference is moving, which is challenging.
When you draw from a photo, you have the benefit of a model that will remain in the same position. You also benefit from having a model that has a fixed light source. If you are going to try to draw a self-portrait that is as close to a perfect likeness as possible, then using a photo is the best approach for you. Another benefit of drawing from a photo is that you can use the grid method, or you can use a projector or lightbox to help you establish a rough outline for your self-portrait.
Drawing A Self-Portrait Using A Mirror
Many artists will argue with you for hours on end about how drawing from life is superior to drawing from a photo. After all, if you already have a photo of someone, why should you try to recreate that by drawing it? That logic is a bit skewed since many artists that are drawing portraits or self-portraits aren't interested in copying a photograph. They are trying to create an original piece of artwork that is based on a photo.
While drawing from life with a self-portrait involves using a mirror, and it is challenging, it's also a challenge that is definitely worth taking. Many artists will tell you that there's nothing quite like drawing from life, so even though drawing while looking in a mirror might be difficult, it's quite rewarding.
One thing you can do to make the process a bit easier on yourself is to take a backup photo. Once you have your pose in the mirror down, take out your phone and take a quick picture. You can use this as a guide to ensure that your light source doesn't change and to help you capture little details that may not show up in the mirror.
How To Draw A Detailed Portrait
Sometimes less is more. But that's not always the case when you are drawing a self-portrait. You could draw a minimalist self-portrait, and it could turn out amazing. But if you want to do a highly detailed self-portrait, you are going to have to spend some more time and effort on the process.
If you are going to try to execute a highly detailed self-portrait, the prep work you do before putting pencil to paper is very important. Art may be spontaneous and creative, but there are times when you have to take a more methodical approach. When your goal is to draw a highly detailed self-portrait, this is one of those times.
Start out by getting your lighting set up. Good lighting can mean the difference between a boring looking portrait and a fantastic looking portrait. Try something different here, set up dynamic lighting that illuminates one half of your face and not the other. Or have a strong light source that comes from above that casts shadows under your nose and neck, and darkens your eyes. What you are going for is something out of the ordinary that will give your self-portrait a unique and exciting look.
Next, take a photo. Yes, some artists will be unhappy with the idea of working from a photo, but when you are drawing a highly detailed self-portrait, it's the best option for you. You don't need a fancy digital camera, the camera on a smartphone is high enough in quality to give you a detailed image you can work from.
After you have the right photo to draw from now comes the fun part, drawing! You might be tempted to jump right in, but you have to spend a few minutes here getting ready for the creative process. Are you going to draw your self-portrait? If so, are you using a pencil, charcoal, or ink? What about painting your self-portrait? Choose your materials, and then choose a paper that is appropriate for them.
It's tempting to just jump right in and start drawing in detail using heavy lines, but this is a mistake. You need to start out with a light sketch to get your proportions correct. If you aren't confident in your ability to sketch a good likeness, then use the grid method, or a lightbox to transfer the outline of your image to the paper you are drawing on.
Start out with a light sketch, this is your framework that you are going to build your drawing on. Once you have your initial sketch done, start to establish your different values. If you are using a pencil or charcoal, then begin by adding a light tone over the entire face. Then using an eraser, you should look at your photo, find the highlights, then start to erase the areas that have the highest values. This is a type of subtractive artwork that gives you the ability to establish your mid-tones and highlights quickly.
The last step in establishing your tonal values is to add dark areas. Not all shadows are going to have the same level of darkness. Pay attention to the depth of the shadows and start to render them in. Don't be afraid to go really dark here! If you don't draw your darkest values really dark, then your picture will look flat. If you are having trouble spotting the darkest areas on your photo, try squinting when you look at it. This is an old artist trick that helps your eyes to pick out the darkest parts of an image.
After the tonal areas of your drawing are established, the final step is to start laying in detail. Before you do this, it's a good idea to use some workable fixative on your tonal drawing. This will help to keep anything from smudging accidentally while you are drawing. When rendering in the details on a self-portrait where you want to create as much detail as possible, there's no limit to what you can accomplish. It's merely a matter of how much time you want to spend.
After painstakingly rendering in individual hairs, moles, wrinkles, and possibly even pores, it's time to start the finishing touches. Before you do, it's time for more workable fixative, though. When using a workable fixative, make sure that you are using it in a well-ventilated area since the fumes can make you very sick.
How do you finish up a highly detailed self-portrait? You want to use this time to touch up shadows, add a few more details, and, most importantly, retouch the highlights in your picture. While you have been rendering in detail and establishing values, there's a good chance that the highlights on your self-portrait have slowly disappeared. Fortunately, there are a few easy fixes for combating this problem.
Option one is to use an electric eraser. An electric eraser will enable you to remove more graphite or charcoal than a traditional eraser, and it's advantageous if you are trying to avoid damaging the paper. Option two is a white charcoal pencil. White charcoal does an extraordinary job of creating highlights.
Even if you have drawn the rest of your piece in graphite, you can still add white charcoal over the top of it to establish highlights. The last option is to use a white paint pen. A white paint pen will lay down a thin layer of white acrylic paint on the top of a drawing, creating a very bright highlight.
How Do I Make Sure The Portrait Doesn't Look Stiff Or Dull?
Have you ever spent hours working on a drawing, then after taking a step back, realized that it looks really dull and lifeless? If not, then you haven't drawn enough. Every artist that has spent any amount of time drawing portraits can recount a time when a portrait came out looking dull and boring. It happens. Now that you know it's happened to others, what can you do to keep it from happening to you again?
One way to create a self-portrait that has a lot of movement and fluidity is to do a contour line drawing self-portrait. With this type of drawing, a pen works best. You can either sketch out the initial layout using graphite, or if you feel like it, you can jump right in with ink. When drawing your picture in this way, don't lift the pen from the paper. You make one continuous line layering lines on top of each other to render in the darkest areas, and leaving the paper blank when you need to create a highlight.
Another option when drawing a self-portrait that will look more fluid is to intentionally draw with a sketchy style. Instead of trying to blend in the different tones and creating smooth transitions, opt for an intentional sketchy look. Use bold lines, and don't be afraid to leave your self-portrait looking unfinished. As an artist, you have to learn how to step out of your comfort zone, doing so can help you to grow and expand your skills.
Try drawing from dark to light. How do you do that? Pick out a dark paper to start with. Black works great, but any dark color will work. Now, you a white colored pencil and start rendering in your image. Leave the paper blank where you want the darkest shadows to be, and really lay down a lot of white for the highlights. You can also use colored pencils with actual color for this approach. Whether you are drawing black and white or with color, starting out with a dark paper, then adding light values will give you a unique and dynamic looking self-portrait.
Use a splash of spot color. What is spot color? Spot color is an artistic technique where you draw a piece in black and white, or black, white, and grey tones, then add a splash of a single type of color somewhere in the portrait. This single area of color will create a focal point and will give your picture a more dramatic look.
Using a triangular layout when drawing anything is a time-honored technique for creating a dynamic drawing or painting. Do you want proof? Take some time to look at the paintings by the old masters of the Renaissance. You won't see a triangle outlined in any of them, but you will notice that the figures are often arranged in a triangular pattern. How can you do this when you are drawing a self-portrait? That's simple, add more to your drawing that just the face. If you include the arms and neck in your drawing, it's straightforward to have them posed in a way to give you that all-important triangular design.
Self-Portrait Drawing Ideas
- Whoever said that a self-portrait has to be done in black and white? Why shouldn't you use color? Do you see the world in black and white? No, you don't you see the world in color. So, if you want to create a self-portrait that has a strong likeness to you, then you should be using color! What should you use? That's up to you. You could try painting.
- Or, you could try adding a splash of color to your drawing with a little paint. Or, if you want to stick to dry media and draw, then colored pencils, pastels, or oil pastels are all excellent options.
- Don't worry about creating a perfect self-portrait. Every artist is his own worse enemy when it comes to their artwork. How many times have you finished a painting or drawing, had a lot of people tell you how great it is, only to decide you hate it? Try creating an impressionistic style self-portrait using pastels.
- Pastels are great for laying down color quickly and can give you an effect similar to painting, but without all of the prep time and messy cleanup. Try drawing your self-portrait with a color palette that represents your mood on that day. Remember, this is art, so no rule says that flesh tones have to be flesh-colored!
