
Lacking inspiration and not sure what to draw with your kids. I suggest you try drawing a Zentangle. If you don’t know what a Zentangle is, or what they are, read on. The following article is a simple and essential step by step guide to drawing one of these awesome designs. For a more in-depth explanation of Zentangle Patterns, please read my post, ‘ Zentangle Patterns: A Complete Guide‘.
What is Zentangle? A Zentangle drawing is a simple method of representing visually recurring patterns. The Zentangle drawing method was developed by Maria Thomas and Rick Roberts in Central Massachusetts in 2009. A typical Zentangle pattern will be drawn on a 3.5-inch tile with a drawn border and string lines. The aim is to holistically enhance focus and artistic well being.
- Preparation before you draw
- Workout the border dimensions
- Mark out the border
- Draw the strings
- Draw the tangle
- Add shade and tone
- Sign your Zentangle
Zentangles are also a great way to learn to draw and have fun with children. Kids love to doodle a draw simple repetitive patterns. So for those of you who do not know what a Zentangle is, what follows is a step by step by guide to drawing a Zentangle.
Preparation Before You Draw
How to prepare your children before drawing a Zentangle. Central to this drawing method is a focus upon internal calmness and well being. The developers of the Zentangle method, believe in centering the spirit before beginning the practical aspect of drawing a Zentangle. Focus on the ZEN in the zentangle!
The therapeutic nature of this drawing method can easily be achieved by playing some ambient background music or spend a couple of minutes concentrating on your breathing and centering the spirit.
Work Out Your Tiles Border Dimensions
What are the Zentangle corner dots? If you want to draw a Zentangle in the standard form, they need to work out the dimensions of your tile correctly. The design itself should measure 3.5 inches or 89 mm to be accurate. This is probably best done by an adult.
Sourcing good quality paper is also a good idea at this stage if you want your drawing to have a professional finish.
Once you have cut your tile to size, the next stage is to draw dots in each corner. So lightly draw a dot in each corner to establish the width of your border.
Creating a Zentangle Border
How to create a Zentangle border. At this stage in the drawing of your Zentangle, it's a good idea to draw with faint lines as you begin to connect the dots of the border on your tile.
Begin Drawing Your Strings
What are the strings in a Zentangle drawing? The strings in a Zentangle are the lines that are drawn inside the border, these lines separate the tile into different sections. Again, at this early stage of your drawing focus on working with faint lines.
The strings of your Zentangles can be drawn using any shape. The freedom of the drawing process allows you to draw Straight geometric lines as curved, irregular lines can be drawn.
Draw the Tangle
How to draw the tangle with kids. The next stage in the process of creating a drawing is to demonstrate how to draw a tangle. The knot consists of the repetitive marks, these are drawn inside shapes created by the strings.
Focus upon practicing draw different types of patterns is a good idea at this stage. I would reference at least 25 basic Zentangle patterns and shapes, this will instantly inspire them to draw great designs.
At this stage, focus upon drawing consciously, carefully considering the marks you are creating drawings. But also remembering that you ask the children to rotate their sketch in any direction as a Zentangle has no up or down.
Apply Shade and Tone onto Your Zentangle
How to add contrast to a Zentangle tile. Some of the best examples of Zentangles display clear areas of shading. This can become quite complex if you are looking to create the illusion of a 3-dimensional shape.
My advice if you are drawing a Zentangle pattern for the first time with kids is to keep it simple. Focus on basic methods of applying dark areas of shade behind a section of your drawing. This will have the immediate impact of allowing that shape to stand out.
If you want to create a sense of depth in your Zentangle, they can apply some necessary shade to one side of a shape to form a shadow.
Sign Your Zentangle
Why sign your Zentangle Tile? Once you have completed your design, it is usually customary the sign it. A unique signature is often written by many Zentangle artists after they have completed their plan.
This could also be a fun way of completing your designs with children, by encouraging them to sign their patterns at the end.
Basic Zentangle Patterns Step by Step
If you are unsure how to start your zentangle, a good idea is to look at the countless examples of patterns that are available in books or on the internet. Many of which are drawn by official zentangle teachers and artists. Here are my choice of basic zentangle patterns step by step to try with kids.
Zentangle Starter Patterns
Linked Zentangle
The linked zentangle. This is a trendy design with many variations, that range from straightforward single-line links, to more complex link design that has excellent detail and shading.
This design as with many zentangle tiles begins with quite simple lines drawn on to the plan. There are four different types of linked designs which can be progressively drawn from very simple marks to more intricate designs.
Shading can be applied to this design as can bolder outlines which will allow areas to stand out and have more of an impact.
Msst Zentangle
The msst zentangle. Is also a good design, to begin with. The msst design consists of many flowing lines which seem to represent water and raindrops. This is a simple design which young children or beginners will have not a problem trying to draw.
First draw a simple wavy line, which when repeated and illustrated in one direction, is reminiscent of rain or running water.
Pina Zentangle
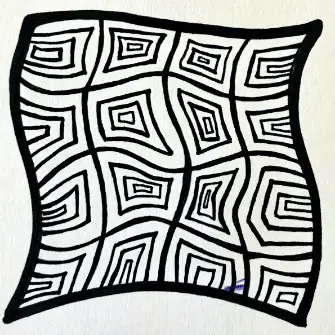
The pina zentangle. The pina design is a combination of a grid with crisscrossing lines, which when draw is similar to the surface of a pineapple. This is a favorite design which has been developed to create many different variations.
The shading and blackening of the background of this image is the right way to make it stand out. The creator of this zentangle Barbara Allen suggests using a square instead of circles when working out the structure of your pattern.
Netting Zentangle
Netting zentangle. The netting variation is an excellent simple repetitive pattern to attempt with children if you are unsure which design to try. This design like all zentangles starts with lines drawn diagonally across the tile in both directions. The result is a simple netted design.
To enhance and improve the design it is suggested that tone and shade are added. Some of the best quality zentangle drawings incorporate a netted pattern and subtle areas of shading.
Sand Swirl Zentangle
The sand swirl zentangle. This is a mainly decorative pattern which consists of repetitive swirls or aura. An enjoyable and straightforward tile to draw, this pattern is especially useful when shading is applied to it.
To begin this tile start by drawing random marks or stems at the side of the tile, remembering the rule that you can render your scores from any direction as you turn the tile.
Stage two is to fill the tile by drawing repetitive marks around these swirls until the design is packed with lines. Then add shading to the patterns.
Zentangle Pattern ideas
Zentangle patterns are undoubtedly easy to learn. They are both exciting and enjoyable. Once you have perfect your drawing skills, you will quickly see the potential you're developing these patterns efficiently.
Think about ways in which you can develop these patterns using different mediums and techniques. Once you have to draw your designs, they can be improved further using various methods.
Create Art With My Favourite Drawing Resources
General Drawing Courses. I like Udemy if you want to develop your knowledge of drawing techniques. Udemy is an excellent choice due to its wide range of creative courses and excellent refund policy. They often have monthly discounts for new customers, which you can check here. Use my link.
Sketching and Collage. Take a look at this sketching resource I have created. Use this link.
Proko. Is one of my favorite teachers who surpasses in the teaching of Anatomy and Figure drawing. Prokos course breaks down the drawing of the human body into easy-to-follow components aiding the beginner to make rapid progress. For this, I really like Proko.
Art Easels. One of my favorite ways to draw is by using a drawing easel, which develops the skill of drawing on a vertical surface. The H frame easel is an excellent vertical way to add variety to the style and type of marks you create when using a drawing board.
To see all of my most up-to-date recommendations, check out this resource I made for you.
