How to draw village scenery with pencil and mastering the drawing of scenery is deemed to be an essential skill for any landscape artist. In fact, the depiction of the Landscape and nature in art has always been one of the more popular traditions in the arts.
Please look at this drawing and sketching video course I have created. Use this link.
How to Draw Village Scenery with Pencil? To draw village scenery step by step, you will need to collect materials and equipment. Next, if drawing from a direct source, begin to sketch the outlines. This is an excellent way to proceed.
In this post, I will describe how to draw a village scenery step by step in pencil.
First of all, we will begin by examining how you can go about organizing the composition of your landscape drawing.
What do You Intend to Draw
One of the first decisions you need to make is do you want to draw scenery from direct observation.
If this is the case, then you will need to find a suitable situation from which you can draw on location.
Drawing on location requires preparation, and you may want to read my article. Tips for Drawing on Location.
If drawing on location, use the following guide.
| Materials and Equipment | Pencils, Charcoal, Pens and a Drawing Board. |
| Viewpoint | Sketch the main features |
| Horizon Line | Viewpoint is important. High or low horizon will make a difference |
| Foreground, Midground, Background | Add the individual features such as houses and trees in the different parts of the drawing. |
| Detail | Draw Texture and Contrast |
If you are drawing scenery from a secondary source. There are are several things you can use to aid you in your drawings.
Photographs taken on the location of the scene that you intend to draw are an excellent way to study aspects of the scenery that you are drawing.
Viewing frame is also an excellent way to isolate areas, of scenery that you want to draw.
A viewing frame can be moved around, up or down to explore alternative scenes on location, or over the top of a photographic reference.
A grid can also be drawn over the top of your reference to help you draw the different aspects of drawing and keep them in proportion.
Horizon
The horizon is an essential part of your drawing as the central features of your scenery will be set.
Before you draw the horizon, consider where in the picture it will be placed. A high line will create the impression of depth and height on the picture plane. This is a perfect way to create a dramatic scene in your work.
Depth in your drawing is also an important consideration. Features in the background will appear small, will the horizon be obscured by elements in the middle and forefront of the picture.
Composition
To create a successful view of a village scene, you will need to combine the different features in your drawing. The next step in developing a scenic viewpoint is to begin organizing the pictorial composition of your picture.
Create or draw a dominant feature in your drawing. This could take the place of a large tree in the front of the drawing, or a building such as a cottage. Drawing commanding features will immediately give your drawing a sense of power or a presence.
Apply the Rule of Thirds. This is an excellent way to balance the different features of your drawing into a balanced composition. By splitting the pictures plane into thirds with horizontal and vertically drawn lines, we create four intersecting points on the page.
Where the lines intersect on page four points will be created. You can now use these points on the page to create areas of interest on your page.
Create an L Shaped composition. The L shaped composition is also a popular way to organize the picture space when drawing and painting scenic landscapes. To create a balanced composition using this formula simply place one dominant aspect in your drawing to the side.
Tips for Drawing the Features of Your Drawing
| Overlapping Overlapping different parts of your drawing is an excellent way to create visual interest, as it forces the eye to move from one individual feature to the next. | |
| Off Center Features | Never draw a feature directly in the center of the page, instead draw them off center and to the side. Another great way to create balance in your Landscape is to group three similar objects together. They can be of different sizes and the same shape. |
| Create a Focal Point | Create a focal point in your drawing by adding a dominant feature. This can be achieved by drawing large sized features and contrasting it with smaller similar objects around it. |
| Cropping Features | Including a cropped feature at the edge of the page is also an excellent way to bring the viewer into your drawing from the side of the page |
The Foreground of the Village
The foreground space in your drawing is an area where individual features such as roads, streams, bushes, hedges, and even branches can be drawn.
Creating depth in your scenic viewpoint by drawing the individual features in your drawing remember the rule of foreshortening, were objects in the foreground in appearing more significant than the elements in the back of the composition.
Drawing a cropped feature at the edge of your drawings such as a house, wall, or a hedge is an excellent way to add visual interest and bring the viewer into your drawing.
Midground of the Village
The middle ground area of your drawing is where a commanding characteristic can be represented. In terms of drawing a landscape of a village scene, you should add a tree or a cottage to the drawing.
Pro Tip: Learn to sketch and draw the main characteristics faintly with a sketching pencil and strengthening up expanses of value and tone. Benefits of tone should be darker in the front of the drawing and less so in the midground and background areas.
Background of the Landscape
Depending on the scene, you intend to draw the background will appear, including the same features such as houses, trees, streams, and hills. The difference that to create a sense of depth and space that they will be drawn much smaller.
Again, when referring to the rules of foreshortening, features which receded into the background will appear much smaller.
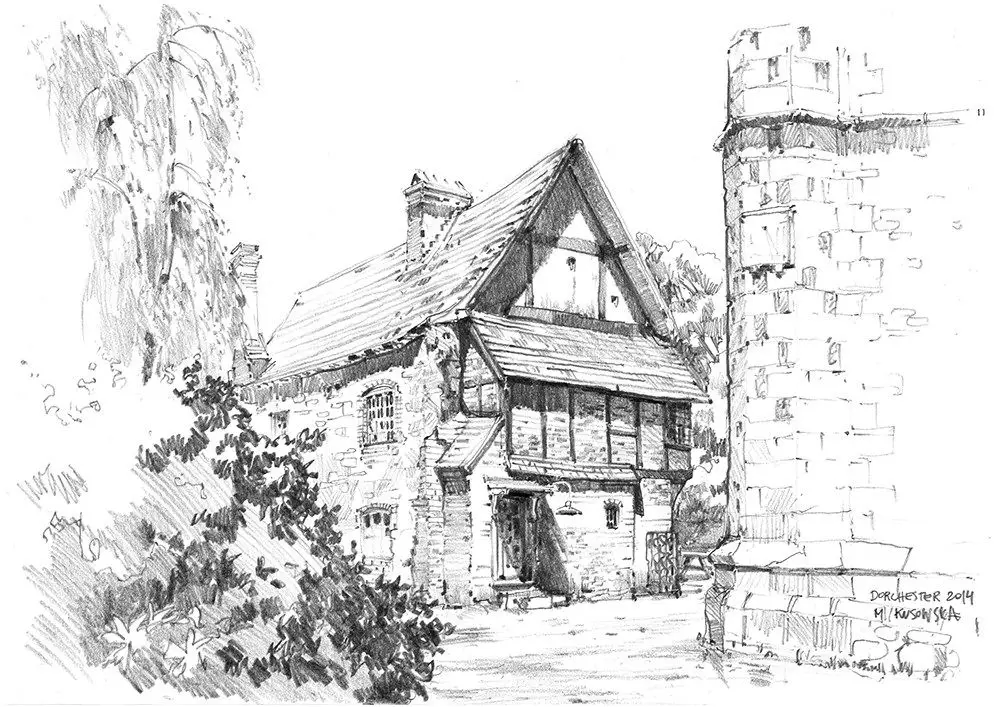
Features in the Landscape such as buildings
How to draw intricate structures. Using a sketching pencil begin by drawing the basic shapes that make up the outside walls of the building. You can then progress on to establishing details such as window and doors, as well as the roof of the building or cottage.
Finally, to make the building appear authentic, you can attempt to stimulate the textures of the walls. This can be achieved using the side of the pencil by adding tone and shading.
Drawing ideas for Sky and Clouds
The sky and clouds in any landscape drawing can be an arena to create quite dramatic effects. The interplay of light and dark shadows is an excellent way to achieve this effect. Shading from dark to light with the side of the pencil will enable you to accomplish this.
Also, think carefully, as mentioned earlier in the post, about where you want to position the horizon concerning the rest of the features in the Landscape. A lower skyline will immediately create a sense of height.
A high horizon will create precisely the opposite effect. This will enable you to fill the remaining space on the ground with exciting features from the Landscape.
Additional Questions
How to Draw Landscapes in Pencil
Pencils are an ideal medium for drawing landscapes with. They will enable you to create a wide range of effects, from beginning with sketch precise and faint outlines of the main features of your drawing.
Pencils are excellent for sketching the form of the objects in the Landscape such as buildings and trees. Softer and darker grades of pencil graphite can also be used to apply value and tone.
Holding the pencil in various ways will also enable you to draw loosely and fluidly to draw textures. This is an ideal way to apply textures to stone walls, cottages, and trees. The side of the pencils is also excellent for using value to the sky and mountains with the bottom of the pencil.
Scenery Drawing in Oil Pastels
Alternatives to using a pencil in isolation are the application of oil pastels. Pastels are particularly useful for creating dramatic effects in the sky of a landscape drawing.
Oil pastels can be layered from dark to light by adding white or a lighter color to the original darker base color. This is mainly good for creating light and dark contrast with cloud formations or textures in features such as trees.
Create Art With My Favourite Drawing Resources
General Drawing Courses. I like Udemy if you want to develop your knowledge of drawing techniques. Udemy is an excellent choice due to its wide range of creative courses and excellent refund policy. They often have monthly discounts for new customers, which you can check here. Use my link.
Sketching and Collage. Take a look at this sketching resource I have created. Use this link.
Proko. Is one of my favorite teachers who surpasses in the teaching of Anatomy and Figure drawing. Prokos course breaks down the drawing of the human body into easy-to-follow components aiding the beginner to make rapid progress. For this, I really like Proko.
Art Easels. One of my favorite ways to draw is by using a drawing easel, which develops the skill of drawing on a vertical surface. The H frame easel is an excellent vertical way to add variety to the style and type of marks you create when using a drawing board.
To see all of my most up-to-date recommendations, check out this resource I made for you.
