Learning these sketching techniques for beginners can help you to get your creative juices flowing while improving your technique, and broadening your skills as an artist. If you are a beginner artist, you must sketch frequently. This will help to develop your skills, and it will also help you to create a style of your own.
Before you start trying to complete finished pieces of art that you can show or sell, you need to refine your skills. Most people that are interested in art have a natural talent for it. But, that natural ability needs to be honed to reach its full potential.
That means practicing, then practicing more, then practicing even more. While it's a lot of work to develop as an artist, it's a journey that is fun, exciting, and definitely worth taking. The following sketching techniques for beginners are great tips that can help you to start to develop as an artist.
Additional Posts You May Be Interested In:
- What are the Basics of Sketching?
- Are Your Sketches Messy? Here’s How to be Neater
- Sketching vs. Drawing: What’s the Difference?
Breakdown Your Subject Into Basic Shapes
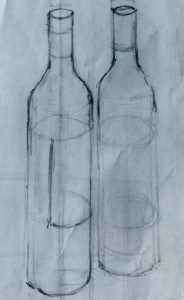
One of the challenges that all artists face when working on a two-dimensional surface is creating the illusion of three-dimensional depth. Fortunately, there are techniques that you can use to help to create the illusion of a 3D image even while you are drawing on a flat 2D piece of paper.
The first thing you need to do is to look at the subject and break it down into its basic 3D shapes. When you look at a person, don't see a person. Instead, see a sphere for a head, and tubes for arms, legs, and the body. Once you learn how to see what you are planning to draw as simplified 3D shapes, you'll be able to create exciting compositions before rendering them out with highlights and shadows.
Always remember, the foundation of a great drawing is a light sketch focusing on the basic shapes of your subject.
Create Warm-Up Sketches
Warm-up sketches are to an artist, what stretching and warming up the body is to an athlete. For example, a sprinter would never show up to a race, walk up to the starting line, then take off running full speed without warming up first.
A sprinter could be injured by behaving in this way, but even if they aren't, then they won't be primed and ready to perform at their peak level. While an artist is very unlikely to suffer an injury when drawing, what they do have in common with the sprinter is an inability to perform at a peak level if they haven't adequately warmed up.
When using sketching as a warm-up exercise, don't worry about drawing correctly or drawing fine details. Instead, hold your pencil loosely and focus on making big strokes and on general shapes. If you like the way that your sketch is turning out, you can always go back and add details later. You could even end up turning your sketch into a finished piece, or you could use it as a basis for a finished piece of art. The point here is that you should be focusing on general shapes, loose lines, and just loosening up and getting your creative juices flowing.
Don't Be A Perfectionist
Don't let perfect stand in the way of good. Artists are their own harshest critics. Many artists will finish a drawing, painting, or sculpture and have many people love it, but all they can see for themselves are the flaws. One of the most important sketching techniques for beginners that all artists have to focus on is not being a perfectionist. You'll probably never get to a point in your artistic journey where you think that your work is perfect. In fact, if you do ever get to that point, then you will stop learning and growing as an artist, and that's never a good thing.
How do you overcome being a perfectionist as an artist? Start out by realizing that nobody is perfect! Nobody! You'll make mistakes, and you'll stumble. You'll finish a drawing, then come back later and see areas where it could be better. Well, it can always be better.
What you have to accept is that no matter how hard you try, how refined your technique is, or how talented you are, you'll never live up to your own standards if you expect perfection. Instead of trying to be perfect, just try to be the best artist you can be. Embrace your mistakes and learn from them, and above all else, don't judge your own work too harshly.
Draw With The Correct Grade Pencil
What's the first type of pencil that you can remember using to draw or sketch with? Probably an HB pencil, right? That's the most common type of pencil. It's what we learn to write with as kids, and it's what most of us used the first time when doodled something on paper or attempted to draw our first masterpiece. But, now that you're older, wiser, and more experienced, you've probably started to experiment with different grades of pencil. So, which is the best one for sketching with? Whichever one you are the most comfortable with.
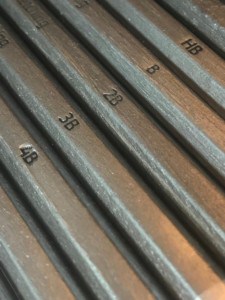
What are different grades of pencils like, and how will they create different types of marks on paper? The harder lead will produce lighter marks, stay sharper longer, and allow you to use more precision when you are drawing. Softer leads will create darker marks, be more comfortable to blend, and will let you to put down more graphite quickly when you are drawing.
Many artists will start out a sketch with a harder pencil lead to create a basic outline. Then, they move onto softer leads when they want to add darker values to their drawing. If you want to grow as an artist, you'll need to learn to sketch with many different grades of pencils.
Alter Your Pencil Grip
Did you know that there are several different ways you can hold your pencil when you are drawing? Most artists start out by using the same type of grip for drawing that they used when they learned to write.
This grip is great for creating details, but it's not something you want to use when you are just sketching or laying out the general design of a composition. When you are first laying out a sketch or drawing, you want to use a looser grip and draw with your arm instead of your wrist. When you draw with your wrist, you rest your hand on the paper.
This allows for more control so you can add details, but it also results in stiffer drawings. Instead, hold your pencil with a looser grip, then use your entire arm to draw with when you are first starting out a drawing.
Practice Stippling Techniques
Stippling is a shading technique that can allow you a great deal of control when adding shadows to a drawing. You can either use them with great care to add controlled gradations in your drawing, or you can use them rougher and more haphazardly to add more texture to your drawing. How do you use stippling? Stippling involves placing small dots on your drawing to indicate darker areas. When you place a lot of dots close to one another, it appears darker, when you put them farther apart, it appears lighter.
Stippling works best when you are drawing with ink. When you are drawing with graphite or charcoal, you can vary the amount of pressure you use to apply more pigment to paper. You can also blend areas from light to dark with your finger or a blending stump. With ink, this type of blending isn't possible.
You can use ink and wash technique to introduce different values. But if you don't want to dilute ink, or deal with a paintbrush, then stippling is one of the methods that you can use to indicate shadows. While it works best for ink, stippling can also be very effective when you are drawing with graphite. The trick to using graphite for stippling is to choose a harder lead that is less likely to smudge.
Practice Hatching And Cross Hatching Techniques
Hatching and cross-hatching are other techniques that you can use to indicate shadow and dark areas in a drawing. Hatching involves placing short lines next to one another on a drawing to show shadows. The close the lines are to one another, the darker the shadow will appear. Cross-hatching is similar to hatching, but with cross-hatching lines going in the opposite direction are placed over the first set of hatching lines. Why use cross-hatching instead of only hatching? Cross-hatching allows you to overlap lines giving you the ability to create darker values than hatching alone can.
Hatching and cross-hatching are techniques that are ideal for ink because they give an artist the ability to add shadows and gradations in their artwork. Hatching and cross-hatching can work with a pencil as well, but you have to be careful because softer lead will tend to smudge, ruining the work you put in to create hatching lines.
Hatching and cross-hatching are both techniques that can be used to add some texture to a drawing, which can help you to develop areas of interest for the viewer to focus on.
Vary The Thickness And Quality Of The Line You Draw With
If you want to create a sketch or drawing that is dull and boring, then make sure that you use the same weight line throughout it. If you use the same weight line when you draw everything, everything will start to look flat.
That's the exact opposite of what you want to happen when you are trying to create the illusion of 3D images on a 2D sheet of paper. Using heavier lines for hard edges and for darker areas of your composition. Using light, wispy lines in other parts where there are highlights, or where there are light details.
Varying your line thickness is easy to do, but it's harder to do the right way. You can't just vary your line width for the sake of varying it. You need to learn what parts of a drawing look better with heavier lines, and what elements work better with lighter, thinner lines. Once you master this, you will be able to add another layer of interest to your drawings and sketches.
Place Paper Under Your Hands To Stop Smudging
Have you ever spent a lot of time working on a drawing, only to move your hand and see that the graphite has smudged? Quickly you raise your hand up to see that your pinky finger and the back of your hand are grey and silver from the graphite smudged on them. This moment has happened to every artist at one point or another, and it's always a moment that leaves artists anywhere from mildly frustrated to very upset.
Using workable fixative as you draw is one solution you could consider. But, workable fixative changes the texture of the paper slightly, and many artists hate the feel of drawing on top of workable fixative. On top of that, workable fixative costs money, and you have to take your drawing outdoors or to a well-ventilated area each time you use it. So, it's not exactly a convenient solution.
Fortunately, there is a low-tech solution that artists have been using for generations to keep their drawings from smudging when they work on them. That solution is using a plain sheet of paper to rest your hand on when you are drawing. When you are doing detailed work, you probably hold your pencil much like you do when you are writing.
That means that the back of your hand is resting on the paper. As your hand moves, the graphite will smudge. This smudging quality is excellent when you are trying to create different tones, but it's not so great when you don't want it to smudge. Placing a sheet of paper on your drawing where you rest your hand is a simple, cheap, and effective way to keep your drawing from smudging while you work on it.
Use A Blending Stump To Add Tone
Graphite has many qualities that make it an ideal drawing medium, and one of the most prominent of those qualities is the ability to blend and smudge it. While this can create a frustrating moment when you realize that you've smudged your drawing, these accidents can be avoided if you are careful.
Take a second and look around at your environment. You probably see some highlights and shadows, right? Now, do you also see mid-tones? What about areas where there are gradation changes between light and dark? You see, very rarely will you see anything in the real world that is either totally black or totally white. There are different values, and if you want to be able to draw realistically, you need to learn to create those values.
Now, you could use your finger to blend graphite, but that's not the best solution. Not only will your finger end up covered in graphite, which is messy and can result in you accidentally smudging your drawing, your finger also isn't exact. Look at the tip of your finger then hold it up to a pencil.
See how the pencil has a fine point to allow you to work in detail? Your finger lacks that point, which means that any blending that you do with it will look messy. Is there a better way? There is, and that's to use blending stumps. Blending stumps are bits of paper that are tightly wound so that they have the same shape and point like a pen or pencil. That means that you can use them precisely, giving you far more control than you'll ever have if you are blending your drawings with your finger.
Compose Your Drawing Using The Rule Of Thirds
There are many aspects to becoming a skilled artist. You need raw talent, practice, and a mastery of different techniques. You also need to be able to create exciting compositions. One way to do this is to use the rule of thirds. What is the rule of thirds? The best way to illustrate this is to use an example.
Take a sheet of paper and place it in front of you. Now, measure it, then place a line at the 1/3 point, then at the 2/3 point. Now, rotate your paper around, then place a line at the 1/3 and 2/3 points again. Do you see the points where these lines intersect? These are the point where you should try to put the most prominent parts of your drawing.
You can also place prominent parts of your drawing along any of these lines. Following the rule of thirds is simple, easy, and it will help you to create visually dynamic artwork.
Develop Your Observational Drawing Skills
If you want to become a better artist, there are several things you need. Chief amongst those things are keen powers of observation. If you're going to be able to draw anything realistically, you need to continually be looking at the world around you and analyzing it. How would you draw that tree?
How does the light cast shadows on that person's face? What are the shapes that you see at the building in front of you? The point here is that you have to be looking at the world, as if everything was something you were drawing. The more you observe the world around you, the more you will improve.
A big part of improving as an artist is drawing from reference. When you look at the shadows on a person's face. Or the shapes of a building or the structure of a tree. Try translating what you see as a drawing.
Sketch In A Portable Sketchbook Everyday
Another way to improve as an artist is to sketch every day. You should have a sketchbook that you keep with you, and when you see something interesting, try sketching it. If you don't have time to sketch it now, then take a picture of it and sketch it later.
You should also make sure that you date anything that you sketch. By keeping a sketchbook, and dating your work, you can go back and see where you were as an artist, and where you've improved.
Challenge Yourself
What's your favorite subject matter to draw? No matter what it is, chances are your pretty good at it. Why is that? Because you probably draw it all the time. Why wouldn't you? If you love to draw people, then draw people.
If you prefer drawing landscapes, then draw landscapes. But, you also need to draw things that you aren't as familiar with. Why? Because broadening your horizons and drawing new things will challenge your skills and force you to evolve as an artist. It may not be easy, but if you work on it, drawing unfamiliar subject matter can fuel artistic growth.
Use An H Pencil To Create Lighter Lines
One of the reasons that pencils are so popular. Is the fact that mistakes can be made a thing of the past thanks to the power of an eraser.
But, even when you use high-quality paper and a good eraser, when you have dark lines on the paper, they can be difficult to remove.
Even if you do succeed in removing them, the paper can be worn, damaged, or even torn. This is problematic when you are doing a pencil sketch or drawing, and it's even more of a problem when you are planning to add ink, watercolor, or any other type of medium to your drawing. One way you can make it easier to remove errant lines is by using an H pencil. Using a harder lead will produce lighter marks, which are easier to remove.
Use A B Pencil To Produce Darker Sketching Lines
Once your first lines are laid out with a harder lead pencil, you may want to darken them. Maybe you want to turn your sketch into a finished piece of art, or perhaps you just want to add some more definition to it. In either case, you should use a B pencil. A softer pencil lead will create darker lines, giving you the ability to add definition and shadows to your sketch.
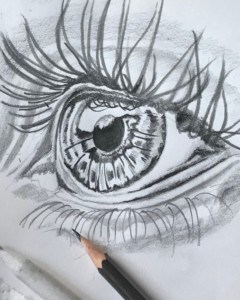
Learn To Blend Shadows Light To Dark
As an artist, blending is your friend. Blending shadows from light to dark will create a gradation in tone that will help your drawings to look more realistic. Start by sketching in your image. Next, you should add a light layer of graphite as a base to work from. You can then use a kneaded eraser to remove areas where there are highlights. This will establish your highlights and some of your mid-tones. Next, use a soft pencil to add the really dark areas of your composition. You can then go back and blend some of the dark areas into the lighter areas to create the crucial transition zones that will make a flat drawing look three dimensional.
Learn To Sketch 3D Shapes
When you are sketching, you need to see the world around you as simple shapes when you are forming your compositions. This will give your drawing more life and make them more interesting, and most importantly, it will help you to draw art that looks three dimensional.
While it may not be the most exciting thing in the world to do, spending time sketching simple 3D shapes can give you invaluable experience. Try setting up spheres, cubes, and triangles under different types of light to see how shadows are cast, and where the highlights are. The more you practice sketching simple geometric scenes, the more your overall skills as an artist will improve.
Apply Light, Mid Tonal And Dark Shadows To Your Sketches
When you want to draw a realistic scene, you need to have an image that has a whole range of values. You will rarely see anything in the real world that doesn't have highlights, mid-tones, and dark shadows. You won't just have three values either, you'll have many different values that slowly shift from light to dark in most cases. If you want to improve as an artist, you'll need to be able to convey all of these values. You'll need to learn to blend them so that they transition smoothly instead of abruptly. It takes time, effort, and practice to learn how to draw the different values you see in the world around you, but once you master it, your artwork will take a significant step forward.
Sketch On Different Quality Papers
Sketching is a time for experimentation. It's a time where you can try new things and see what works for your style and what doesn't. You should push the envelope when you sketch so that when you do move onto finished art, you'll know what your comfort zone is. When sketching, you should try out different types of paper.
Do you prefer the smoothness of a hot press finish? Or is a rough, cold press finish more suitable for your style? Different quality paper comes in at various price points, so now is the time to see what works for you. Most of your sketching should be done on inexpensive paper, but you should also try out more expensive papers to see which ones work for your style.
Create Art With My Favourite Drawing Resources
General Drawing Courses. I like Udemy if you want to develop your knowledge of drawing techniques. Udemy is an excellent choice due to its wide range of creative courses and excellent refund policy. They often have monthly discounts for new customers, which you can check here. Use my link.
Sketching and Collage. Take a look at this sketching resource I have created. Use this link.
Proko. Is one of my favorite teachers who surpasses in the teaching of Anatomy and Figure drawing. Prokos course breaks down the drawing of the human body into easy-to-follow components aiding the beginner to make rapid progress. For this, I really like Proko.
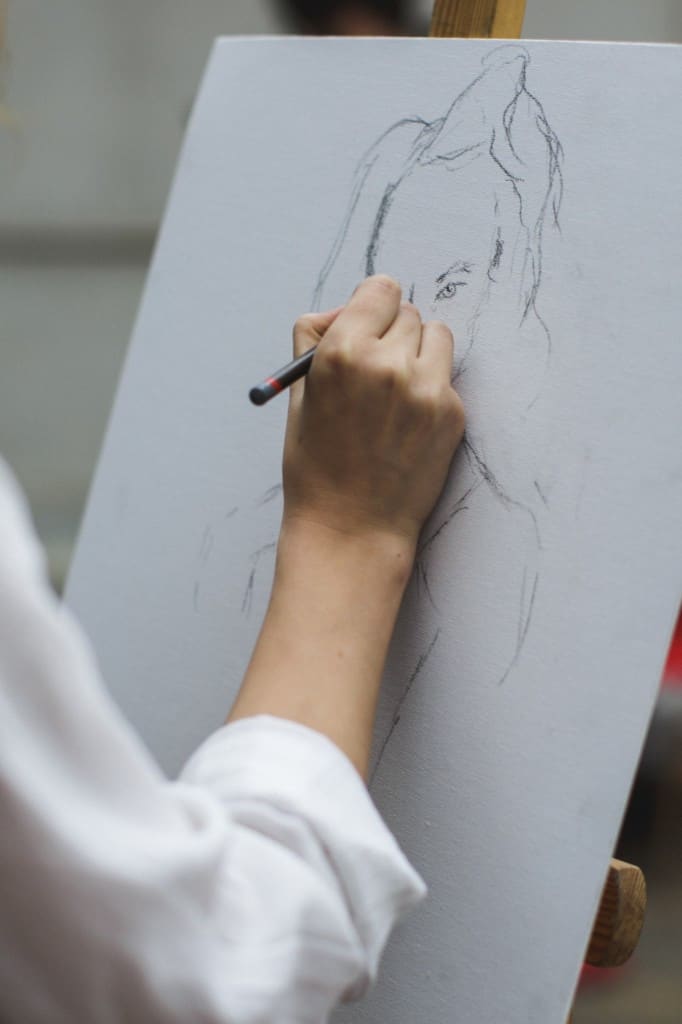
Art Easels. One of my favorite ways to draw is by using a drawing easel, which develops the skill of drawing on a vertical surface. The H frame easel is an excellent vertical way to add variety to the style and type of marks you create when using a drawing board.
To see all of my most up-to-date recommendations, check out this resource I made for you.